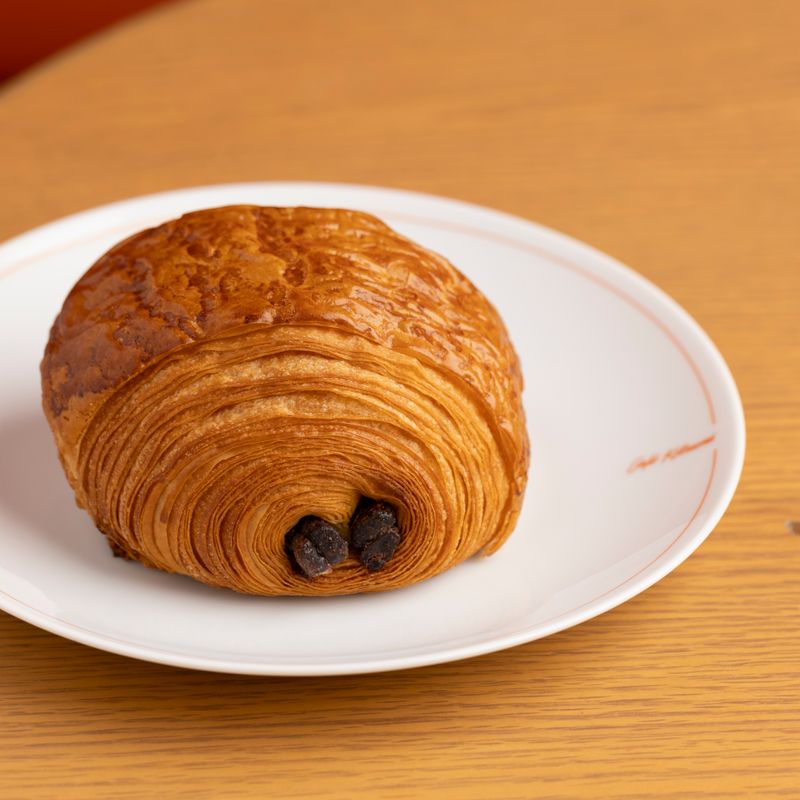
Classic Pain au Chocolat
Flaky, deeply golden French breakfast pastries made from a yeasted dough laminated with cold butter and wrapped around two batons of dark chocolate. It takes a day, but most of that is hands-off chilling and proofing.
- Prep
- 1 hr 50 min
- Cook
- 20 min
- Wait
- 4 hr 50 min
- Total
- 7 hr
- Makes
- 12 pastries
Steps
Before you start
- Read the whole recipe first. The dough must stay cold and the butter must stay pliable, so plan for a cool kitchen (ideally under 72°F / 22°C) and about 7 hours in total.
- Use European-style butter (82% or higher fat) for the butter block. It is more pliable when cold and gives a cleaner lamination.
- Make sure the fridge has room for a baking sheet or two on a flat shelf.
- Chocolate batons are sold for this purpose. If you can't find them, cut a good 60-70% dark chocolate bar into 3-inch (7-8 cm) sticks about ⅜ inch (1 cm) thick, about 7 g each.
- You can chill the dough overnight after step 2 or after step 7 to split the work over two days.
Mix the dough
- In a large bowl or stand mixer bowl, whisk the bread flour, sugar, salt and yeast.
- Add the cold milk, cold water and softened butter.
- Mix with the dough hook on low for 3 minutes, then medium for 3 minutes (or stir and knead by hand for 8 minutes), until a smooth, slightly tacky dough forms that pulls away from the bowl.
- Do not over-knead; laminated dough should be supple, not elastic.
+ Show details− Hide details
Ready when: Dough is smooth, soft and holds together in a ball without sticking heavily to your hands.
Tip: If the dough feels very stiff, add 1 tablespoon of cold water; if it sticks badly, dust with 1 tablespoon of flour.
Chill the dough
- Shape the dough into a flat 8-inch (20 cm) square on a floured surface, wrap tightly in plastic wrap and refrigerate for 60 minutes.
- The dough will puff slightly, which is fine.
- Shape the butter block (next step) while it chills.
+ Show details− Hide details
Ready when: Dough is firm and cold throughout.
Tip: You can leave it in the fridge up to 12 hours if you want to continue the next day.
Shape the butter block
- Place the cold butter block between two sheets of parchment.
- Pound with the rolling pin to flatten, then roll into an even 6-inch (15 cm) square about ½ inch (1.2 cm) thick, squaring the edges by folding the parchment around it like an envelope.
- Refrigerate while the dough finishes chilling, at least 20 minutes.
+ Show details− Hide details
Ready when: Butter is a uniform square, cold but bends slightly without cracking or feeling greasy.
Tip: If the butter cracks into shards, let it sit for 5 minutes and pound again. It should be the same firmness as the dough when you use it.
Lock in the butter
- On a lightly floured surface roll the chilled dough into an 8×13-inch (20×33 cm) rectangle with a short edge toward you.
- Place the butter square in the center so there is about 3½ inches (9 cm) of dough above and below it, and 1 inch (2.5 cm) at each side.
- Fold the top and bottom flaps over the butter so they meet in the middle, and pinch the seam and side edges firmly closed so no butter can escape.
+ Show details− Hide details
Ready when: Butter is fully enclosed, with sealed seams and no gaps.
Tip: Brush off excess flour from the dough as you fold, since trapped flour makes layers dry.
First fold
- Turn the package so the seam faces away from you.
- Roll it firmly and evenly into an 8×24-inch (20×60 cm) rectangle, about ⅜ inch (1 cm) thick.
- Brush off excess flour.
- Fold the bottom third up and the top third down over it like a business letter, forming an 8×8-inch (20×20 cm) square.
- Wrap in plastic and chill for 30 minutes.
+ Show details− Hide details
Ready when: Dough rolls out with an even butter layer visible through the surface, with no butter breaking through.
Tip: If butter starts to soften or leak, stop and chill the dough for 15 minutes before continuing.
Second fold
- Unwrap the dough and place it with the folded seam to your right, like a closed book.
- Roll again into an 8×24-inch (20×60 cm) rectangle, brush off flour, and fold into thirds once more.
- Wrap and chill for 30 minutes.
+ Show details− Hide details
Ready when: Dough feels smooth and cool, and layers are even.
Tip: Keep the corners square by gently tugging them into place as you roll.
Third fold
- Roll the dough one last time into an 8×24-inch (20×60 cm) rectangle, brushing off excess flour, and fold into thirds.
- Wrap tightly and chill for 30 minutes (or up to 12 hours overnight).
+ Show details− Hide details
Ready when: Dough is firm and cold, with a smooth surface.
Tip: Mark each turn by pressing fingertips into the dough corner if you lose track of folds.
Roll and cut
- Line two baking sheets with parchment.
- On a lightly floured surface, roll the dough into a 12×24-inch (30×60 cm) rectangle about ⅕ inch (5 mm) thick.
- If it springs back, rest it for 5 minutes, then keep rolling.
- Trim the edges about ½ inch (1 cm) with a sharp knife or pizza cutter for clean layers.
- Cut 3 rows across the 12-inch width by 4 rows along the 24-inch length to make 12 rectangles, each about 4×6 inches (10×15 cm).
+ Show details− Hide details
Ready when: Even sheet of dough with layers visible at the cut edges, and 12 matching rectangles.
Tip: Cut with straight downward strokes, don't drag the blade, since dragging seals the layers together and limits rise.
Fill and shape
- Position a rectangle with a short edge toward you.
- Lay one chocolate baton about 1 inch (2.5 cm) from the near edge and fold that edge over it.
- Place a second baton right against the fold and roll the dough up all the way, finishing with the seam on the bottom.
- Place on the lined baking sheet, seam side down, spacing them 3 inches (7.5 cm) apart.
- Repeat with remaining rectangles and 24 batons total.
+ Show details− Hide details
Ready when: Each pastry is a snug roll with 2 batons hidden inside and a seam on the underside.
Tip: If the dough turns soft or greasy while shaping, slide the tray into the fridge for 10 minutes.
Proof the pastries
- Loosely cover the pastries with oiled plastic wrap or a large inverted container and proof at 75-78°F (24-26°C) for about 2 hours.
- Don't go above 80°F (27°C) or the butter will melt out.
- In the final 20 minutes, preheat the oven to 400°F (200°C) with racks in the upper and lower thirds.
+ Show details− Hide details
Ready when: Pastries are visibly puffy, about 1½ times their size, and jiggle slightly when the tray is nudged, with visible layers.
Tip: Underproofed pastries leak butter and are dense; if unsure, give them an extra 15 minutes.
Egg wash and bakeOven 400°F / 205°C
- Whisk the egg and milk together and gently brush the tops and sides of each pastry, avoiding the cut layers.
- Bake at 400°F (200°C) for 18 to 20 minutes, rotating the trays top to bottom and front to back halfway through, until deep golden brown.
+ Show details− Hide details
Ready when: Deep golden brown all over, puffed high, and the layers sound crisp when tapped.
Tip: If the pastries brown too fast before 15 minutes, lower the oven to 375°F (190°C) and bake a few minutes longer.
Cool and serve
- Slide the parchment with the pastries onto a wire rack and cool for 20 minutes.
- The chocolate will be molten when first baked, so wait before serving.
- Serve warm or at room temperature.
+ Show details− Hide details
Ready when: Pastries are warm, not hot, and the bottoms feel crisp.
Good to know
Tips
- Temperature is everything: if butter feels soft or greasy at any stage, stop and chill the dough 15 to 20 minutes.
- Use as little flour as possible when rolling and brush it off before every fold so the layers stay distinct.
- Always roll with firm, even strokes from the center outward, keeping the rectangle's edges straight.
- A scale gives the best results, since lamination depends on the butter-to-dough ratio.
Make ahead
"After step 3 of the folds, the dough can be refrigerated overnight (up to 12 hours). Shaped, unproofed pastries can be frozen on a tray, then bagged for up to 1 month; thaw in the fridge overnight, then proof 2 to 2½ hours before baking."
Storage & reheating
"Room temperature: best the day they're baked; keep loosely covered up to 2 days. Fridge: store airtight up to 3 days. Freezer: wrap baked pastries airtight up to 2 months. To reheat, warm on a baking sheet at 350°F (175°C) for 5 to 8 minutes (from frozen, 10 to 12 minutes) until crisp and warmed through."
Substitutions
- bread flour → all-purpose flour. Works well; the pastry will be slightly softer and less chewy. Add about 1 tbsp less liquid if the dough feels too slack.
- unsalted European-style butter (82% fat) → standard unsalted butter (80% fat). Works but is softer and wetter; chill longer between turns and handle quickly.
- dark chocolate batons (60-70% cocoa) → chopped dark chocolate bar. Cut 60-70% dark chocolate into sticks of similar size, about 7 g each.
- instant yeast → active dry yeast. Use 9 g (2¾ tsp) and dissolve it in the warmed (not hot) portion of the milk for 5 minutes before mixing.
More pastries
See all →


Find more like this
- Meal
- Breakfast
- Cuisine
- French
- Diet
- VegetarianHalal
- Method
- Oven
- Quick & Easy
- Make Ahead