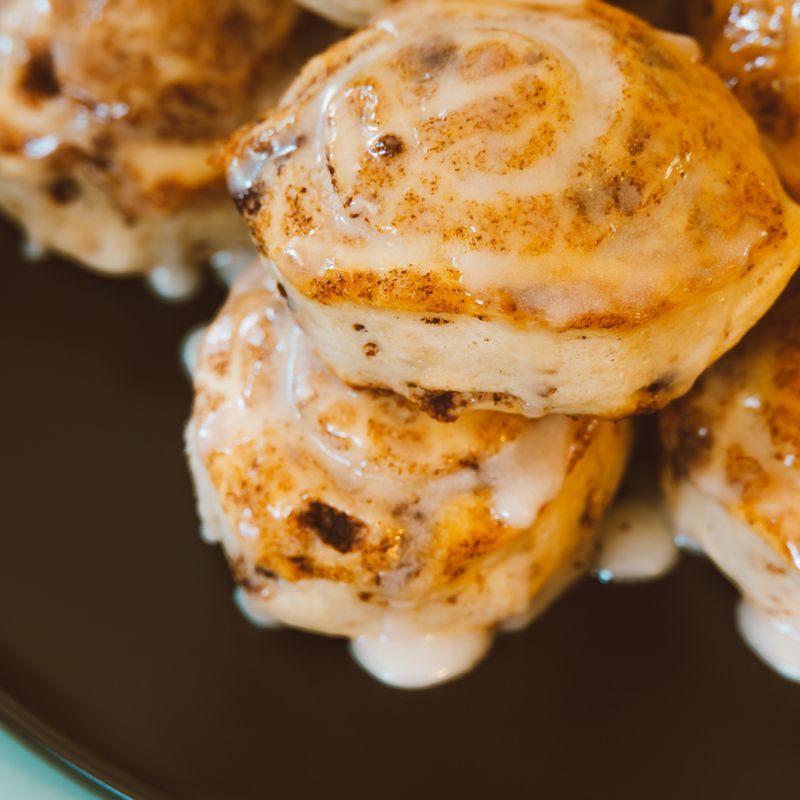
Sourdough Sticky Cinnamon Rolls
Rich, tangy sourdough cinnamon rolls with a sticky caramel-brown sugar base and cream cheese filling, made with an overnight cold proof for deep flavor. The long fermentation develops complex sourness while keeping the crumb soft and tender. These rolls are perfect for weekend breakfast or entertaining.
Steps
Before you start
- Activate your sourdough starter 4–8 hours before mixing (it should be bubbly and at peak rise)
- Warm all liquids to 75°F (24°C) for proper fermentation
- Have all ingredients at room temperature except cold butter for the filling
- Clear a 9×13-inch (23×33 cm) baking pan for the rolls
Mix the dough
- In a large bowl, whisk together the active sourdough starter, warm water (75°F / 24°C), bread flour, salt, and granulated sugar until no dry flour remains.
- The dough will be shaggy and slightly sticky.
- Let it rest at room temperature for 15 minutes.
+ Show details− Hide details
Ready when: All flour is incorporated and dough is shaggy
Tip: Don't overmix; you'll develop the gluten during stretching and folding
Stretch and fold
- Wet your hand and perform 4 sets of stretch-and-folds over the next 2 hours, spaced 30 minutes apart.
- For each fold, grab one side of the dough, stretch it up and over the center, rotating the bowl 90° each time.
- By the end, the dough should feel noticeably stronger and smoother, though still soft.
+ Show details− Hide details
Ready when: Dough increases in volume and holds its shape better after folding
Tip: Keep the bowl at room temperature (68–72°F / 20–22°C) for consistent fermentation
Prepare the sticky base
- About 3 hours after mixing (while the dough is still fermenting), melt the 3 tbsp (43 g) butter in a small saucepan over medium heat.
- Add the 0.33 cup (65 g) brown sugar and stir constantly until the mixture turns a deep amber color with a caramel aroma, about 2 minutes.
- Do not let it burn.
- Pour the sticky caramel evenly into the bottom of a 9×13-inch (23×33 cm) baking pan and spread it gently with a spatula.
- Set aside to cool.
+ Show details− Hide details
Ready when: Caramel is deep amber and smells toasted, not burnt
Tip: Watch the caramel carefully—it goes from perfect to burnt in seconds. If it darkens too quickly, add a splash of water off heat to dilute it
Shape the rolls
- Turn the dough out onto an unfloured work surface.
- Gently stretch it into a rough 10×14-inch (25×36 cm) rectangle, with a longer edge facing you.
- Combine the 0.75 cup (150 g) brown sugar and 2.5 tsp (6 g) cinnamon in a small bowl.
- Brush the dough lightly with water, then sprinkle the cinnamon-sugar mixture evenly over the surface.
- Scatter the cold cream cheese cubes evenly across the dough.
- Dot with the 4 tbsp (57 g) cold butter pats.
- Starting from the far edge, roll the dough toward you tightly, sealing the seam with your palm.
- Using a sharp knife or dental floss, cut the log into 9 equal pieces (each about 1.5 inches / 4 cm wide).
- Arrange them cut-side down in the prepared pan over the sticky caramel.
+ Show details− Hide details
Ready when: Rolls are evenly sized, snug in the pan with little space between them
Tip: Use a bowl of water to dampen your hands as you shape; it prevents sticking better than flour
Cold proof overnight
- Cover the baking pan tightly with plastic wrap and refrigerate for 12–16 hours at 38°F (3°C).
- The rolls will rise slowly and should nearly fill the pan when fully proofed.
- You should see some doming and hear bubbles if you tap the side.
+ Show details− Hide details
Ready when: Rolls nearly fill the pan, dough feels puffy when pressed gently, indentation springs back slowly
Tip: Overnight proofing is optional—you can let them rise at room temperature for 3–4 hours instead, but cold proofing develops deeper sourdough tang
Preheat and proof at room temperatureOven 375°F / 190°C
- Remove the rolls from the refrigerator and let them sit on the counter at room temperature while the oven preheats to 375°F (190°C).
- This usually takes 30–45 minutes.
- The rolls should spring back slowly when you press them lightly with a floured finger, and the seams should feel taut.
+ Show details− Hide details
Ready when: Rolls feel puffy, dough temperature is around 70°F (21°C), and poke test shows slow spring-back
Tip: Don't skip this step—cold dough bakes unevenly. If your kitchen is very warm, the rolls may only need 20 minutes to come to temperature
Bake the rollsOven 375°F / 190°C
- Once the oven reaches 375°F (190°C) and the rolls are at room temperature, place the pan on the middle rack and bake for 28–32 minutes.
- The rolls should puff and rise above the rim of the pan, and the tops should turn deep golden brown.
- The caramel will bubble slightly at the edges.
+ Show details− Hide details
Ready when: Tops are deep golden brown, caramel bubbles at the edges, internal temperature reaches 200–205°F (93–96°C) when measured in the center of a roll
Tip: If the tops brown too quickly, tent loosely with aluminum foil after 20 minutes. The rolls should sound hollow if tapped on top when fully baked
Flip and cool
- Let the rolls cool in the pan for 3 minutes.
- Then invert the pan carefully onto a large serving platter or cutting board, holding it steady so the sticky rolls slide out cleanly and the caramel stays on top.
- Let cool for 10 minutes before serving.
- If any caramel sticks to the pan, scoop it out with a spatula and drizzle it back over the rolls.
+ Show details− Hide details
Ready when: Rolls are released cleanly from the pan, caramel coats them generously, they feel soft but hold their shape
Tip: Invert while still warm so the caramel flows and sticks to the rolls—it will harden if you wait too long
Good to know
Tips
- Keep your starter at peak rise (bubbly, doubled, starting to recede) when you feed it 4–8 hours before mixing. A weak starter will result in sluggish fermentation and flat rolls.
- The overnight cold proof is key: it slows fermentation, allowing acid development and flavor complexity while keeping the dough easy to handle. If you skip it and proof at room temperature, reduce the total proof time to 3–4 hours, checking rolls at the 2-hour mark.
- Cut rolls with a sharp serrated knife or dental floss to minimize compression and preserve the spiral shape. Floss works especially well because it doesn't drag the filling into the sides.
- Do not skip the sticky caramel base step. It serves both as flavor and as insurance—the caramel keeps the rolls moist and prevents them from sticking to the pan, and it's easier to flip them if you let the caramel cool slightly first.
Make ahead
Prepare through step 5 (after cold proof) up to 18 hours ahead. In the morning, remove from the fridge and proceed with step 6 (room-temperature proof and baking). You can also freeze the shaped, unbaked rolls (after step 4) in a rigid container for up to 3 weeks; thaw in the fridge overnight, then continue with step 6.
Storage & reheating
Store cooled rolls in an airtight container at room temperature for up to 2 days. Reheat in a 300°F (150°C) oven for 8–10 minutes, wrapped in foil, to restore softness. Refrigerate for up to 5 days (layers may compress slightly). Freeze for up to 3 months in an airtight, freezer-safe container; thaw at room temperature for 2 hours, then reheat as above.
Substitutions
- cream cheese, cold → mascarpone or ricotta. Use the same weight. Mascarpone will be richer; ricotta will be slightly drier. Both add a subtle tang that complements sourdough.
- ground cinnamon → cardamom, nutmeg, or a blend of both. Use 2–2.5 tsp total for a more complex spice profile. Reduce slightly if using nutmeg alone, as it's more potent.
- bread flour → all-purpose flour. Use the same weight. All-purpose flour will produce slightly softer, less chewy rolls. Add an extra 1 tbsp water if the dough feels too stiff.
- active sourdough starter, bubbly and at peak rise → 0.5 cup whole-wheat sourdough starter or rye starter. Whole-wheat or rye starters will produce earthier, deeper flavor. Reduce the granulated sugar to 1 tbsp if using rye, as it can ferment faster.
More breakfast bakes
See all →




Find more like this
- Meal
- Breakfast
- Diet
- VegetarianHalal
- Method
- Oven
- Quick & Easy
- Make Ahead