
Roast Chicken and Sun-Dried Tomato Panini
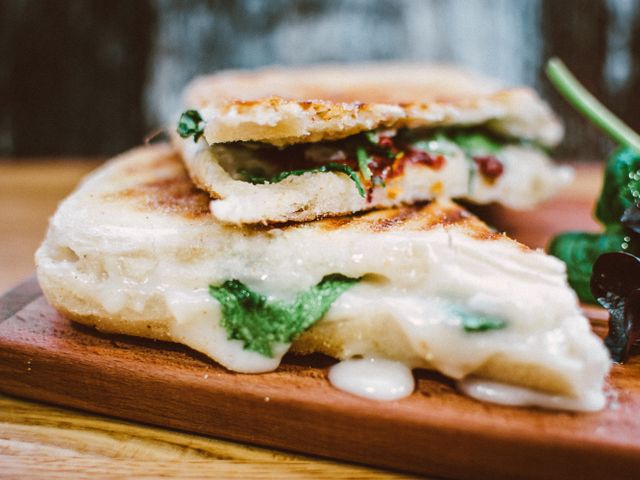
Rustic focaccia sandwiches filled with tender roasted chicken, sweet sun-dried tomatoes, creamy fresh mozzarella, and fresh basil, pressed until golden and melted. This Mediterranean-inspired panini comes together quickly and makes an impressive lunch or dinner.
- Prep
- 17 min
- Cook
- 13 min
- Wait
- 3 min
- Total
- 33 min
- Makes
- 2 panini (2 sandwiches)
Steps
Before you start
- If using a homemade or bakery roasted chicken, shred or slice it into bite-sized pieces
- Have a panini press or heavy cast-iron skillet with a weight (another pan, brick, or press) ready to go
- Pat the cut sides of focaccia dry with paper towels to prevent a soggy sandwich
- Use oil-packed sun-dried tomatoes; drain them well before chopping so the chicken seasoning isn't watered down
Prepare bread and all toppings
- If using focaccia rolls, leave them whole.
- If using a focaccia loaf, use a serrated bread knife to slice it horizontally into approximately 1-inch-thick slices (cut to roughly 5×3 inches / 12×8 cm per panini).
- Place all bread pieces on a cutting board and pat the cut sides lightly with paper towels to absorb any excess moisture—this prevents the sandwich from becoming soggy during grilling.
- Slice the fresh mozzarella into ¼-inch-thick slices.
- Finely chop the sun-dried tomatoes (you should have about 2 tablespoons / 30 ml).
- Mince the 2 garlic cloves very fine.
- Tear or chop the basil leaves into bite-sized pieces.
- Arrange everything on your work surface in the order you'll use it.
+ Show details− Hide details
Tip: Pat the bread dry with paper towels—moisture is the enemy of a crispy crust.
Season the chicken
- In a small bowl, combine the shredded roasted chicken with the minced garlic, ¼ teaspoon of salt, ⅛ teaspoon of black pepper, and 1 tablespoon of the olive oil.
- Using a fork or your hands, toss the chicken gently but thoroughly until it is evenly coated with the oil and seasonings.
- Taste a small piece and adjust the salt and pepper if needed—the chicken should taste flavorful but not overly salty, since the bread and cheese will also contribute to the overall salt content.
+ Show details− Hide details
Ready when: Chicken is evenly coated with oil and seasonings
Tip: Don't oversalt—the mozzarella and bread will add savory notes.
Assemble both panini sandwiches
- Take the first focaccia roll (or bottom slice if using a loaf) and open it or lay it flat.
- If using whole rolls, you may gently split them horizontally with your knife to create two halves, or layer fillings inside without cutting.
- For the first panini, on the bottom bread piece, layer half of the seasoned chicken (about 4 oz / 110 g), then half of the chopped sun-dried tomatoes (about 1 oz / 28 g), then 3 slices of fresh mozzarella.
- Sprinkle 4–5 of the torn basil leaves over the cheese.
- If using arugula, add a small handful (about ½ cup / 15 g) now.
- Top with the second bread piece and press down gently so the sandwich feels substantial but not bursting at the seams.
- Repeat this layering process with the second focaccia and remaining ingredients, creating a second identical panini.
+ Show details− Hide details
Ready when: Both panini are assembled with layers in place and bread pieces fitted together snugly
Tip: Don't overstuff—if the filling seems about to burst out the sides, you've gone too far. Leave a small border around the edges.
Butter the outside of both panini
- Using a pastry brush or butter knife, spread the softened butter evenly over the outside of the top of the first panini, covering all exposed bread surfaces.
- Flip it over and spread butter on the bottom side as well.
- The butter should form a thin, even layer—aim for enough to create a golden crust, but not so much that it pools or drips.
- Repeat with the second panini, buttering both top and bottom sides generously.
+ Show details− Hide details
Ready when: Both panini have an even, visible layer of soft butter on all exposed bread surfaces
Tip: Softened butter spreads easily and evenly; cold butter will tear the bread. Leave it at room temperature for 30 minutes before use.
Heat the panini press or skilletOven 375°F / 190°C
- Place a panini press on the counter and preheat it to medium-high heat (approximately 375°F / 190°C if your press has a temperature setting).
- If you don't have a panini press, heat a cast-iron skillet, griddle, or nonstick pan over medium-high heat for 3–4 minutes until a droplet of water sizzles immediately on contact.
- If using a skillet, you will need a heavy weight (another cast-iron pan, a flat baking sheet, a panini weight, or even a brick wrapped in foil) to press the sandwich as it cooks, mimicking the effect of a panini press.
+ Show details− Hide details
Ready when: Droplet of water sizzles on contact; press feels hot to the back of your hand
Tip: A properly heated surface ensures the bread crisps quickly without burning the inside. If it's not hot enough, the panini will be soft and greasy.
Grill the first panini
- Carefully place the first butter-coated panini into the preheated panini press and close the lid firmly.
- The panini should grill for 4–5 minutes in the press.
- If using a skillet instead, place the panini in the hot pan, then immediately place your heavy weight on top, pressing down gently but firmly.
- Grill for 2–3 minutes on this first side until the bread is golden brown with light grill marks and the bottom is crispy.
- Carefully flip the panini using a long spatula, replace the weight, and grill for another 2–3 minutes on the second side until that side is also golden brown and the cheese is visibly softening at the edges.
+ Show details− Hide details
Ready when: Bread is deep golden brown with light grill marks; cheese is softened and beginning to melt at the edges
Tip: In a panini press, resist the urge to flip or move the sandwich—just let it sit and cook undisturbed.
Rest first panini and grill second panini
- Carefully remove the first panini from the press or skillet using a long spatula and place it on a cutting board.
- Do not cut it yet—let it rest for 1–2 minutes so the cheese can fully set and the sandwich will hold together better when you slice it.
- While the first panini is resting, quickly place the second panini in the press or skillet.
- If using a skillet, immediately place the weight on top.
- Close the press or press down on the weight and grill the second panini for 4–5 minutes (or 2–3 minutes per side in a skillet) using the same method as the first.
+ Show details− Hide details
Ready when: First panini is cooling slightly; second panini is golden brown with melted cheese at the edges
Tip: Resting the first panini prevents the cheese from running everywhere when you slice it. The 1–2 minute rest is short but crucial.
Rest and serve warm
- Remove the second panini from the press or skillet using a long spatula and place it on the cutting board next to the first.
- Let both panini rest for 1–2 minutes so they are warm but safe to handle.
- If desired, slice each panini diagonally to create two triangles—this is both traditional for panini and makes them easier to eat without the filling squishing out.
- Transfer to plates and serve immediately while the bread is still warm, the cheese is gooey, and the flavors are at their peak.
- The best panini are enjoyed while the contrast between crispy, buttered exterior and soft, melted interior is pronounced.
+ Show details− Hide details
Ready when: Both panini are cooled enough to handle and slice cleanly without oozing excessively
Tip: Eat the panini over a plate—melted cheese drips are part of the charm.
Good to know
Tips
- Don't overstuff the panini, or the filling will squeeze out when you press it—leave a small border of clear bread around the edges.
- Pat mozzarella slices dry with paper towels if they're very wet to prevent a soggy, watery sandwich.
- The butter on the outside is absolutely key to achieving that golden, crispy crust—don't skip this step or substitute it with oil, which doesn't brown the same way.
- In a panini press, resist the urge to flip or move the sandwich; just let it cook undisturbed. In a skillet, use a gentle flip and replace the weight to ensure even, crispy cooking on both sides.
Make ahead
The chicken can be shredded and seasoned up to 4 hours ahead and stored in the refrigerator in an airtight container. Assemble and grill just before serving for best results—a pre-grilled panini will lose its crispy exterior if stored.
Storage & reheating
Best enjoyed fresh, but wrapped leftovers can be refrigerated for up to 2 days. Reheat in a skillet over medium heat for 2–3 minutes per side until warmed through and the bread is crispy again. Freezing is not recommended because the bread texture becomes soggy upon thawing and the cheese separates.
Substitutions
- Fresh mozzarella → Provolone or smoked mozzarella. Use the same amount for a more robust, savory flavor
- Sun-dried tomatoes in oil → Roasted red peppers. Use the same amount for a milder, slightly sweeter flavor without the intense tang
- Roasted chicken → Grilled chicken breast. Grill or broil the chicken breast, then slice thinly for a lighter alternative
- Focaccia rolls or focaccia loaf → Ciabatta roll or sourdough bread. Use the same weight for a different crust and crumb structure; adjust butter as needed
More paninis
See all →

Find more like this
- Meal
- Lunch
- Cuisine
- Mediterranean
- Main ingredient
- ChickenMozzarellaTomatoes
- Diet
- HalalSugar-Free
- Method
- Stovetop