Peruvian Arroz con Pato
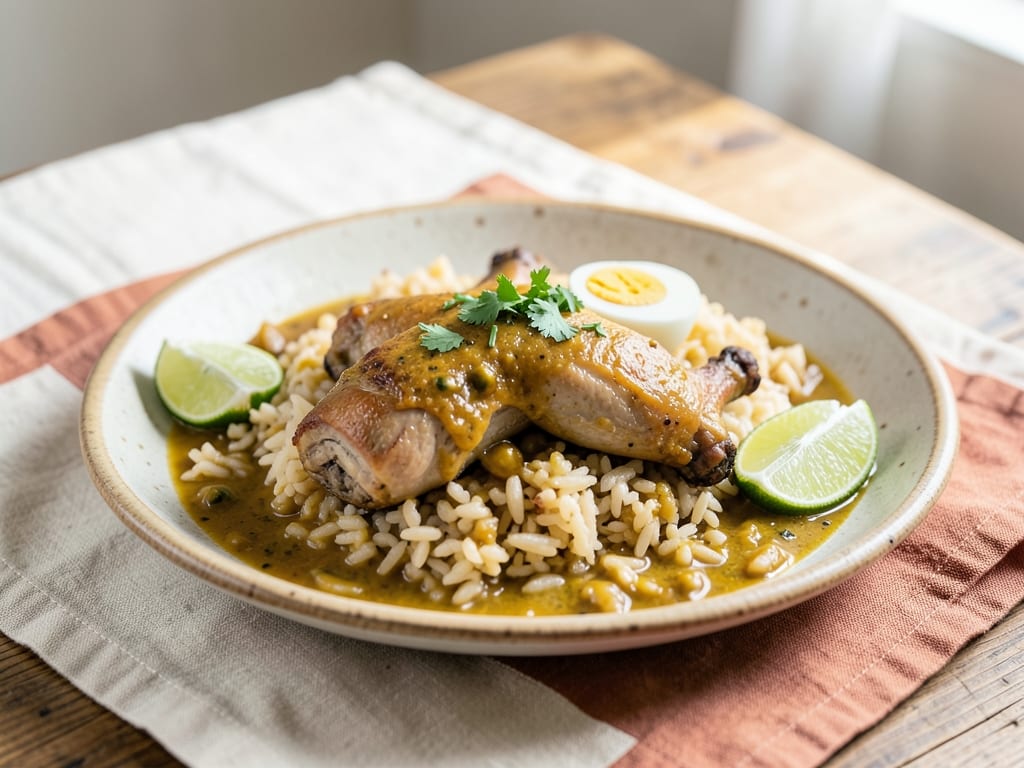
This iconic Peruvian braise marries tender duck legs with creamy short-grain rice cooked in a velvety ají amarillo (yellow chili pepper) sauce enriched with dark beer. The result is a deeply flavored, amber-colored rice dressed with tender meat and aromatic spices. Traditionally served with fresh lime, hard-boiled eggs, and cilantro for brightness and balance, arroz con pato is a celebration dish that's rich, warming, and surprisingly approachable to make at home.
- Prep
- 20 min
- Cook
- 1 hr 33 min
- Wait
- 5 min
- Total
- 1 hr 58 min
- Makes
- 4 servings (2 duck legs per person with rice)
Steps
Before you start
- Bring duck legs to room temperature for 30 minutes before cooking so they cook evenly and brown properly.
- Have a heavy pot with a tight-fitting lid ready—it's essential for both braising and rice cooking.
- If using fresh ají amarillo peppers, have a blender or food processor ready to make a smooth paste.
- Read through the full recipe before starting so you understand the timing and don't skip the long, unattended braise.
Pat and Season Duck
- Remove duck legs from refrigerator and pat dry thoroughly with paper towels—this step is crucial for browning properly.
- Season generously on all sides with salt and pepper.
- Set aside at room temperature.
+ Show details− Hide details
Ready when: Duck is completely dry; salt and pepper coat all surfaces
Tip: Wet duck won't brown properly. Spend time really drying it with multiple paper towels.
Brown Duck Legs
- Heat vegetable oil in a 5–6 quart heavy-bottomed pot over medium-high heat until the oil shimmers, about 1–2 minutes.
- Working in batches if necessary to avoid crowding the pot, place duck legs skin-side down and sear for 5–6 minutes without moving them.
- The skin should turn golden brown and render fat.
- Flip and sear the other side for 3–4 minutes until also golden.
- Transfer browned duck to a clean plate.
+ Show details− Hide details
Ready when: Duck skin is golden brown and has rendered fat; no pink remains on exposed flesh
Tip: Resist moving the duck around—let it sit undisturbed to build a golden crust. This fond (browned bits) is flavorful.
Sauté Onion and Garlic
- Discard all but about 2 tbsp of rendered duck fat from the pot (reserve the rest for another use or discard).
- Add finely diced onion and sauté over medium heat, stirring occasionally, for 4–5 minutes until translucent and softened.
- Add minced garlic and cook for 1 more minute, stirring constantly, until fragrant.
- Do not allow garlic to brown.
+ Show details− Hide details
Ready when: Onion is translucent and soft; garlic is fragrant and light golden
Tip: Don't let garlic brown—if it starts to darken, it will taste acrid and bitter throughout the entire dish.
Add Ají Amarillo and Liquid
- Add the ají amarillo paste and cook, stirring constantly, for 2 minutes.
- The paste should deepen slightly in color.
- Pour in the dark beer, using a wooden spoon to scrape the bottom of the pot and loosen all browned bits (fond) stuck there—this is pure flavor.
- Add the chicken stock and ground cumin if using, and stir until everything is fully combined and smooth.
+ Show details− Hide details
Ready when: Ají amarillo is darkened and incorporated; liquid is smooth with no streaks of paste; no browned bits remain on bottom of pot
Tip: Scraping the fond is essential—those browned, caramelized bits contain deep savory flavor. Take your time here.
Braise Duck Until Tender
- Return the browned duck legs to the pot, nestling them into the braising liquid so the meat is mostly submerged (skin can poke above).
- Bring the liquid to a simmer over medium-high heat, then immediately reduce heat to medium-low.
- Cover the pot with a tight-fitting lid and let braise, undisturbed, for 45 minutes.
- The duck is done when the meat is very tender and pulls easily away from the bone with a fork.
+ Show details− Hide details
Ready when: Duck meat pulls easily from bone with minimal resistance; liquid is rich and amber-colored
Tip: Resist lifting the lid frequently—each time you do, you release steam and extend cooking time. Trust the process.
Remove Duck and Add Rice
- Using tongs, carefully transfer the braised duck legs to a clean plate or shallow bowl.
- Look at the remaining braising liquid in the pot—you should have approximately 4 to 4.5 cups.
- If there's significantly more, simmer the liquid uncovered over medium heat for a few minutes to reduce it; if there's less, add water to reach about 4.5 cups total.
- The ratio of liquid to uncooked rice is crucial for proper texture.
- Stir the unrinsed short-grain rice into the hot liquid, breaking up any clumps with your spoon.
- Rice grains should be evenly distributed and fully coated.
+ Show details− Hide details
Ready when: Duck is removed; rice is stirred in and evenly distributed; liquid fully coats all grains
Tip: Do not rinse the rice—the starch contributes to the creamy, velvety texture traditional to this dish.
Cook Rice and Return Duck
- Nestle the reserved duck legs on top of the rice, pressing them gently into the grains so they stay moist.
- Cover the pot with the lid, reduce heat to low, and cook without stirring for 18–20 minutes.
- The rice will absorb the liquid and become tender.
- You'll know it's done when you shake the pot and hear no liquid sloshing inside, or when a small spoon inserted into the rice comes out nearly dry.
- Rice grains should be tender but still have a slight bite.
+ Show details− Hide details
Ready when: Rice is tender but still has a slight bite; no visible liquid remains; duck is heated through
Tip: Do not stir the rice while it cooks—stirring breaks the grains and makes the dish mushy. The unattended rice will develop a slightly crisped bottom layer (socarrat), which is prized.
Rest and Fluff
- Remove the pot from the heat and keep it covered undisturbed for 5 minutes.
- The carryover heat will continue to soften the rice, and the liquid will finish absorbing.
- After 5 minutes, remove the lid and gently fluff the rice with a fork, breaking up any clumps.
- Taste the rice and duck and adjust seasoning with additional salt or pepper as needed.
+ Show details− Hide details
Ready when: Rice is fluffy and absorbs liquid fully; duck is tender throughout
Tip: This brief rest prevents overcooking and makes the rice lighter and less mushy. Don't skip it.
Plate and Garnish
- Divide the rice mixture between four serving plates, mounding it in the center.
- Top each portion with one duck leg (or split two legs between plates if you prefer).
- Scatter the chopped fresh cilantro generously over the top.
- Place lime wedges and halved hard-boiled eggs (if using) alongside each plate.
- Instruct guests to squeeze lime juice over their plate at the table and eat the eggs alongside—the citrus and eggs provide brightness that complements the rich duck.
+ Show details− Hide details
Ready when: Plated and ready to serve; duck is warm
Tip: The lime, eggs, and cilantro aren't just garnish—they're essential for balancing the rich, savory duck. Every bite should include some of each.
Good to know
Tips
- The unrinsed rice creates a creamier texture than rinsed rice—this is traditional for this dish. Don't rinse if you want authentic results.
- Socarrat (a lightly crisped, golden rice bottom) is considered a delicacy in paella and arroz con pato. To encourage it, after the rice is cooked, increase heat to medium for 1–2 minutes at the very end until you hear light crackling and smell toasted rice. This is optional but traditional.
- This dish is traditionally served with lime, hard-boiled eggs, and fresh cilantro. These aren't just garnishes—they brighten and balance the rich, dark duck braise and are eaten with each bite.
- If fresh ají amarillo peppers are hard to find, check Latin or Peruvian markets, or search for frozen peppers online. If unavailable, you can substitute 3 tbsp jarred ají amarillo paste. As a last resort, red bell pepper mixed with a pinch of turmeric offers a different but pleasant flavor profile.
Make ahead
Arroz con pato is best made the day it is served, but the duck can be braised 1 day ahead. Cool completely, cover, and refrigerate. To finish, bring to room temperature (about 30 minutes), then add rice, stock, and remaining ingredients and cook as directed from Step 6.
Storage & reheating
Leftovers keep in an airtight container in the refrigerator for up to 3 days. Reheat gently on the stovetop over low heat, adding a splash of stock or water if the rice seems dry, until heated through. Arroz con pato does not freeze well due to the rice texture, but you can freeze just the braised duck (without rice) for up to 2 months; thaw in the refrigerator and proceed with the rice cooking step.
Substitutions
- fresh ají amarillo peppers → Ají amarillo paste (3 tbsp / 45 g). Use store-bought paste if available. Many Peruvian or Latin markets carry jarred ají amarillo paste; 3 tbsp equals approximately 2 fresh peppers. Thaw frozen paste if necessary.
- dark beer (such as Cusqueña, Maltin Negro, or similar Peruvian or dark lager) → Dark lager, amber ale, or porter. Use any flavorful dark beer. Avoid very hoppy IPAs as they can overpower the delicate ají amarillo flavor.
- duck legs → Duck thighs, or a combination of thighs and legs, or a whole quartered duck. Adjust cooking time slightly if using a whole duck or very large thighs. All dark-meat duck parts work well.
- unsalted chicken stock (or duck stock for deeper flavor) → Duck stock, or a combination of chicken and duck stock. Duck stock will add more depth and richness. Chicken stock works perfectly well if duck stock is unavailable.