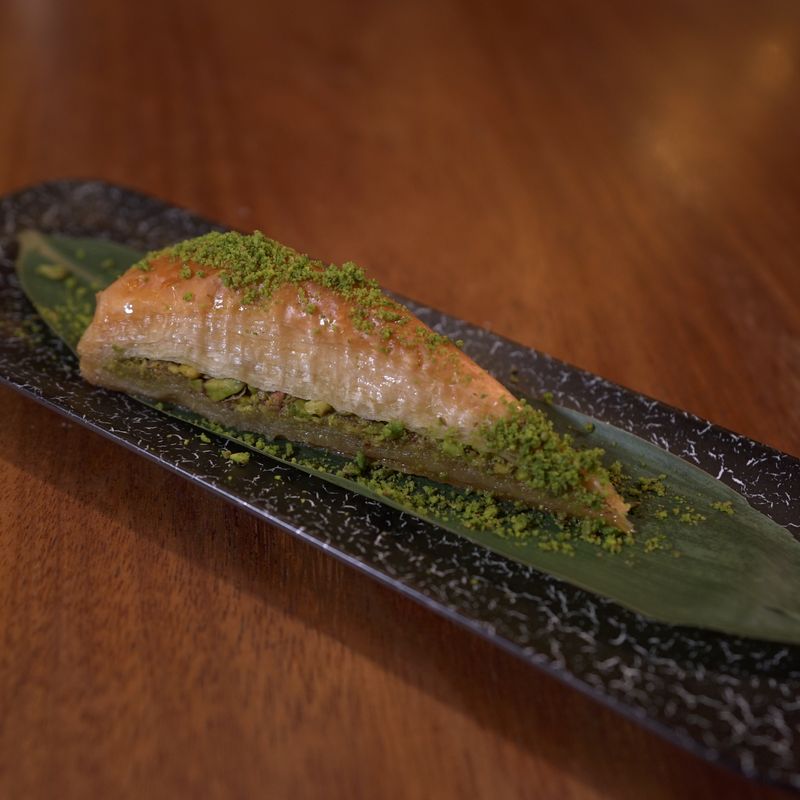
One-Pot Spiced Pear and Walnut Baklava Bites
Crispy, flaky baklava bites filled with spiced walnuts, fresh pears, and warm spices, finished with a fragrant honey-orange syrup. This one-pot method simplifies traditional baklava by cooking the syrup and pear filling together, then assembling and baking the pastries in one session. The result is a sophisticated pastry that balances buttery phyllo with fruit and nuts.
- Prep
- 30 min
- Cook
- 35 min
- Wait
- 45 min
- Total
- 1 hr 50 min
- Makes
- 24 baklava bites
Steps
Before you start
- Preheat oven to 350°F (175°C)
- Have phyllo dough thawed (if frozen) at room temperature for 30 minutes
- Measure all dry spices before starting
- Set out a pastry brush and a 9×9-inch (23×23 cm) baking pan
Prepare the honey syrup
- In a 2-quart (2 L) heavy saucepan, combine honey, water, orange zest, cinnamon, and whole cloves.
- Bring to a simmer over medium heat, stirring occasionally, until the mixture becomes slightly darker and fragrant, about 5 minutes.
- The syrup should be liquid and pourable.
- Remove from heat and let cool to room temperature.
- The cooled syrup will be used both in the filling and poured over the baked baklava.
+ Show details− Hide details
Ready when: Syrup is fragrant and slightly darker; remove cloves before use
Tip: Don't boil the syrup aggressively or it will become too thick; a gentle simmer is best.
Make the walnut-pear filling
- In the same saucepan (or a bowl), combine the chopped walnuts, diced pears, cinnamon, nutmeg, cardamom, and brown sugar.
- Reserve 2 tablespoons of cooled honey syrup (without the cloves) and stir it into the filling.
- Mix thoroughly until the spices and sugar are evenly distributed.
- The filling should feel moist but not wet.
- Let it rest while you prepare the phyllo.
+ Show details− Hide details
Ready when: All ingredients are evenly mixed and the filling is moist
Tip: Use firm pears so they don't fall apart in the filling; overripe pears will make it mushy.
Prepare the baking panOven 350°F / 175°C
- Preheat the oven to 350°F (175°C).
- Brush the bottom and sides of a 9×9-inch (23×23 cm) baking pan with melted butter, ensuring even coverage.
+ Show details− Hide details
Ready when: Pan is evenly coated with a thin layer of butter
Tip: Use a pastry brush to coat evenly; this prevents sticking and adds to the crispy exterior.
Layer the phyllo base
- Lay 6 phyllo sheets in the prepared pan, brushing each sheet lightly with melted butter and layering them directly on top of each other.
- Some overlap is fine; trim excess phyllo that extends beyond the pan edges with a sharp knife.
- The stack should cover the entire bottom of the pan.
+ Show details− Hide details
Ready when: 6 sheets are stacked, buttered, and cover the pan bottom
Tip: Keep unused phyllo dough covered with a damp kitchen towel so it doesn't dry out while you work.
Add the filling
- Spread the walnut-pear filling evenly over the phyllo base in a thin, even layer, leaving about ½ inch (1.3 cm) of space at the edges.
- Use about 1.5 cups (300 g) of the filling.
- Press gently so it adheres to the butter-brushed phyllo, but do not press so hard that the phyllo tears.
+ Show details− Hide details
Ready when: Filling is spread evenly and adheres to the phyllo
Tip: If filling seems too thick or dry, add a teaspoon more honey syrup to help it spread smoothly.
Layer the phyllo top
- Top the filling with the remaining 6 phyllo sheets, brushing each with melted butter and layering them as you did the base.
- Trim any overhang to match the pan edges.
- The final top sheet should be well buttered.
+ Show details− Hide details
Ready when: Top layer of 6 sheets is complete, buttered, and even
Tip: Ensure the top layer is fully buttered so it becomes crispy and golden; dry spots will bake hard.
Cut into bites
- Using a sharp, thin knife (a serrated bread knife works well), cut the baklava into 24 small bites.
- Make 3 cuts lengthwise to create 4 columns, and 5 cuts widthwise to create 6 rows, yielding 24 pieces.
- A light scoring motion works better than pressing down hard, which can crack the phyllo.
+ Show details− Hide details
Ready when: 24 uniform bite-sized pieces are cut and visible
Tip: Cut before baking so the syrup can soak into all the pieces and the layers stay together.
Bake the baklavaOven 350°F / 175°C
- Place the pan in the preheated 350°F (175°C) oven and bake for 25–30 minutes, until the phyllo is deep golden brown and the edges are light caramel.
- The top should look crispy and smell fragrant.
- Do not open the oven door during the first 20 minutes, as this can disrupt the baking process.
+ Show details− Hide details
Ready when: Phyllo is deep golden brown, edges are caramel colored, and the pastry looks crispy
Tip: If the top is browning too quickly before the bottom is done, lower the oven temperature to 325°F (160°C) and add 5–10 minutes to the baking time.
Pour the warm syrup
- Remove the baklava from the oven and immediately pour the reserved cooled honey-orange syrup (about ¾ cup / 180 ml) evenly over the hot pastry.
- Work quickly so the hot phyllo absorbs the syrup.
- The syrup will sizzle as it hits the hot pan.
- Allow the syrup to settle into the cuts and soak in.
+ Show details− Hide details
Ready when: Syrup is evenly distributed over the baklava and is sizzling
Tip: Pour the syrup while the phyllo is still hot so it absorbs into the layers and becomes tender; cold phyllo won't absorb syrup as well.
Cool and set
- Let the baklava rest in the pan at room temperature for at least 30–45 minutes.
- During this time, the remaining syrup will continue to soak into the phyllo layers and the pastry will firm up.
- The baklava will be easier to remove from the pan once cool.
- Sprinkle with chopped pistachios if desired.
+ Show details− Hide details
Ready when: Baklava is cool enough to handle, syrup is absorbed, and pieces are set
Tip: Do not refrigerate until fully cooled; chilling warm baklava can make the phyllo tough.
Serve
- Once cooled, carefully remove each baklava bite from the pan using a thin spatula, working from the edges inward.
- If desired, serve at room temperature or slightly warm.
- Baklava tastes best the day it is made but will keep for several days.
+ Show details− Hide details
Ready when: Baklava bites are removed from the pan cleanly
Tip: Use a thin, flexible spatula and work gently so you don't break the delicate pastry.
Good to know
Tips
- Phyllo dough dries out quickly; keep unused sheets under a damp towel at all times while assembling.
- For crisper baklava, brush butter between every layer, not just on the top and bottom—this takes more time but yields superior results.
- The one-pot method saves time by making the syrup and filling in the same saucepan; feel free to clean and reuse it.
- Baklava is best eaten within 1 day of baking. The flavor and crispness peak on day one, though it stays fresh for up to 3 days when stored in an airtight container.
Make ahead
Store cooled baklava in an airtight container at room temperature for up to 3 days. Do not freeze as the phyllo will become tough upon thawing. Assemble and bake fresh for best flavor and texture.
Storage & reheating
Room temperature: 3 days in an airtight container. Refrigerator: Not recommended as cold temperatures make phyllo tough. Freezer: Not recommended. Reheat: Gently warm in a 300°F (150°C) oven for 5–10 minutes if desired, but baklava is best served at room temperature or fresh-baked.
Substitutions
- firm pears (about 2 medium) → diced apples (such as Honeycrisp or Granny Smith) or dried apricots. Apples will give a tarter flavor and drier texture; apricots (chopped) will add sweetness. Use the same total weight.
- raw walnuts → roasted almonds or pistachios. Both work well; pistachios will add a more delicate flavor. Chop finely to match the original texture.
- orange zest → lemon zest or 1 teaspoon of rose water. Lemon adds brightness; rose water adds floral notes. Either will complement the spices and pears.
- light brown sugar → granulated white sugar or date paste. White sugar is more neutral; date paste adds richness and authentic Turkish flavor. Use equal weight.
More middle eastern sweets
See all →



Find more like this
- Meal
- Dessert
- Cuisine
- Middle Eastern
- Diet
- VegetarianHalal
- Method
- Oven
- Quick & Easy
- One-Pot