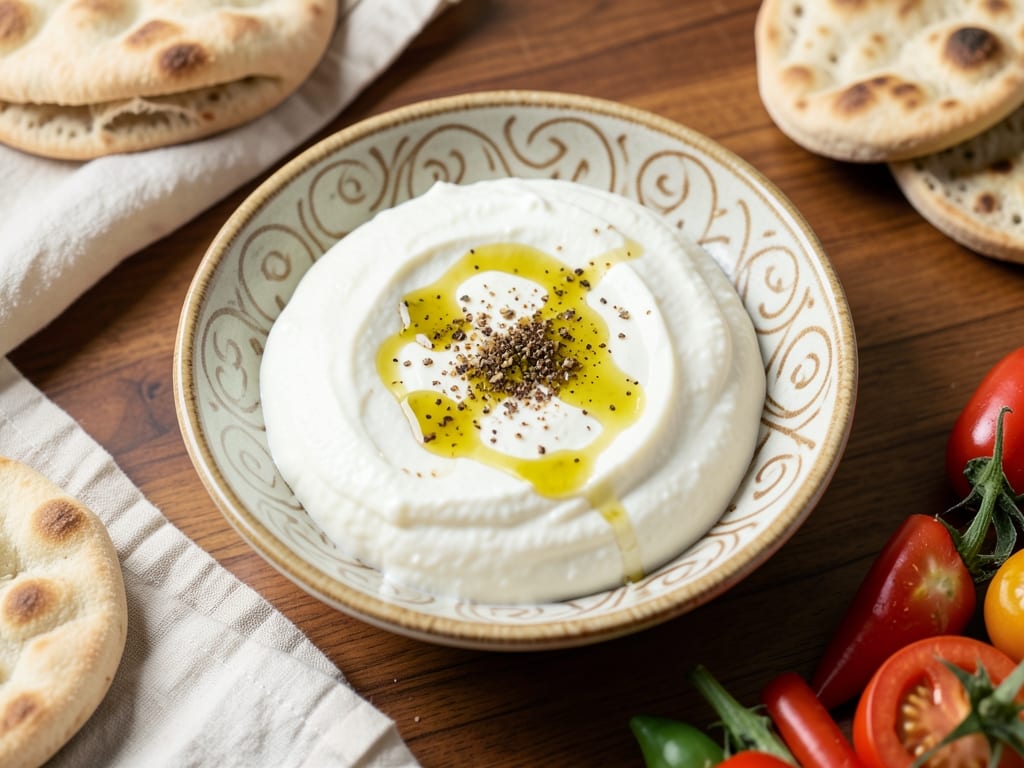
Instant Pot Labneh from Homemade Yogurt
Make thick, tangy yogurt right in your Instant Pot, then strain it overnight into spoonable, cream-cheese-style labneh. Finish it with a pool of olive oil for a classic Middle Eastern spread or dip.
- Prep
- 39 min
- Cook
- 25 min
- Wait
- 1.1 days
- Total
- 1.1 days
- Makes
- About 2 cups (500 g) labneh, enough for 8 servings as a spread or dip
Steps
Before you start
- Plan on about 26 hours start to finish: roughly 1 hour of heating and cooling, 8 to 10 hours of incubating, 4 hours of chilling, and 12 to 24 hours of straining. Start in the morning so the yogurt can incubate during the day and strain overnight.
- Use pasteurized whole milk that is not ultra-pasteurized (UHT), because UHT milk can set weakly. Ultra-pasteurized milk will still work, but the yogurt may be looser.
- Your starter must be plain yogurt that lists live active cultures and has no thickeners, flavoring, or sugar. Use it within its date, or use a freeze-dried yogurt starter packet.
- Wash the inner pot, whisk, and spoon in hot soapy water and rinse well so stray bacteria don't compete with your culture.
- Have an instant-read thermometer ready. Hitting 180°F (82°C) and then 110°F (43°C) is what makes the yogurt set.
Prepare the pot
- Wash the stainless steel inner pot, whisk, and spatula in hot soapy water, rinse well, and dry.
- Set the pot in the Instant Pot base.
- Pour in 8 cups (1900 ml) cold whole milk.
+ Show details− Hide details
Ready when: Pot is clean and the milk is measured in.
Tip: Take the starter yogurt out of the fridge now so it loses its chill while you heat the milk.
Heat milk to 180°FOven 180°F / 80°C
- Leave the lid off.
- Press Sauté and set it to Normal (medium heat).
- Heat the milk, stirring every 3 to 4 minutes along the bottom and corners with a spatula, until it reaches 180°F (82°C) on a thermometer, about 20 to 25 minutes.
- Press Cancel as soon as it hits temperature.
+ Show details− Hide details
Ready when: Thermometer reads 180°F (82°C); the milk is steaming with small bubbles at the edge and a thin skin forming.
Tip: Don't walk away. Heating to 180°F denatures the milk proteins, which gives thicker yogurt, but milk left on Sauté can scorch or boil over.
Cool to 110°F
- Using oven mitts, lift the inner pot out and set it in a sink or large bowl filled with a few inches of ice water.
- Stir gently every few minutes until the milk reaches 110°F (43°C), about 20 to 30 minutes.
- Skim off and discard any skin.
+ Show details− Hide details
Ready when: Thermometer reads 105 to 112°F (41 to 44°C); the pot feels just warm to the touch.
Tip: If the milk is above 115°F (46°C) when you add the starter, it will kill the cultures. If it dips below 100°F (38°C), the yogurt may set weakly.
Stir in the starter
- Scoop about 1 cup (240 ml) of the warm milk into a small bowl and whisk in 2 tablespoons (30 g) yogurt starter until completely smooth.
- Pour this back into the pot and whisk gently for 30 seconds to combine.
+ Show details− Hide details
Ready when: No streaks or lumps of yogurt remain.
Tip: Whisk gently. Heavy whipping adds bubbles that give the yogurt a looser texture.
Incubate 8 to 10 hours
- Return the pot to the Instant Pot base and put the lid on, sealing vent in either position.
- Press Yogurt, then adjust to Normal and set the time to 9:00 (9 hours).
- Don't stir, move, or lift the lid while it incubates.
+ Show details− Hide details
Ready when: Yogurt is set and jiggles as one mass when the pot is nudged, with a pale yellow whey pooling at the edges and a pleasantly tangy smell.
Tip: Use 8 hours for milder yogurt and up to 10 for tangier. If it's still liquid after 10 hours, the milk was likely too hot or too cool when you added the starter.
Chill the yogurt
- Take the pot out of the base without stirring.
- Cover it with a lid or plastic wrap and refrigerate for at least 4 hours, until fully cold and firm.
- Reserve 2 tablespoons for your next batch if you like, in a small clean jar.
+ Show details− Hide details
Ready when: Yogurt is cold and firm enough to hold a clean spoon cut.
Tip: Cold yogurt strains more cleanly than warm yogurt, which tends to seep through cheesecloth.
Salt and set up strainer
- Set a large strainer over a deep bowl, leaving at least 3 inches (8 cm) of space beneath it for whey.
- Line it with 2 layers of damp cheesecloth that overhang the sides.
- Stir 1 teaspoon (6 g) fine sea salt into the cold yogurt, then spoon the yogurt into the lined strainer.
+ Show details− Hide details
Ready when: Salt is fully mixed in and all the yogurt is in the cloth.
Tip: Salt helps draw out whey and seasons the labneh all the way through.
Strain in the fridge
- Fold the cheesecloth overhang over the top, cover the whole setup loosely with plastic wrap, and refrigerate.
- Strain 12 hours for thick, spoonable labneh, or up to 24 hours for a firm, cream-cheese texture you can roll into balls.
- Pour off the whey from the bowl if it rises to touch the strainer.
+ Show details− Hide details
Ready when: Labneh is thick like soft cream cheese and holds a swirl when you drag a spoon through it; about 2 cups (500 g) remain.
Tip: Don't press or squeeze the cloth. It can push solids through and make the labneh grainy.
Serve with olive oil
- Scrape the labneh into a shallow bowl or container with a spatula.
- Swirl the surface with the back of a spoon to make a shallow well, drizzle with 2 tablespoons (30 ml) olive oil, and sprinkle with za'atar or sumac if using.
- Serve with warm pita, cucumbers, or olives.
+ Show details− Hide details
Ready when: Labneh is smooth and creamy with a glossy pool of olive oil on top.
Tip: The leftover whey can go into smoothies, soups, or bread dough rather than being discarded.
Good to know
Tips
- Save 2 tablespoons of your own yogurt (before salting) to start the next batch. Starter can be reused for several batches, but replace it with fresh store-bought yogurt if it starts tasting off or sets poorly.
- For firmer labneh, strain a full 24 hours. For a softer dip, stop at 8 to 12 hours.
- Make sure your strainer is wide enough to sit securely on the bowl, and keep the bowl in the coldest part of the fridge.
- Once you pull the pot out, don't stir the incubated yogurt before chilling; stirring too early breaks the set and thins the final texture.
Make ahead
Make the yogurt up to 5 days ahead and keep it refrigerated, then strain it into labneh the day before serving. Fully strained labneh keeps well, so it can be made 2 to 3 days in advance.
Storage & reheating
Refrigerate labneh in an airtight container, topped with a thin layer of olive oil, for up to 7 days. Serve straight from the fridge or let it stand at room temperature for 15 minutes to soften; don't leave it out more than 2 hours. Freezing isn't recommended because it turns grainy, though thawed labneh still works in cooking and baking (up to 1 month; thaw overnight in the fridge and stir well). Whey keeps in the fridge for up to 1 week.
Substitutions
- whole milk → 2% milk. Works, but the labneh will be less rich and yields a bit less. Skim milk gives a noticeably thinner, chalkier result.
- plain whole-milk yogurt with live active cultures → 1 packet freeze-dried yogurt starter culture. Follow the package amount for 2 quarts of milk and whisk it into the cooled milk in step 4.
- za'atar or ground sumac → Aleppo pepper, dried mint, or flaky salt with lemon zest. Any of these gives a nice finishing flavor; use about 1 teaspoon.
- fine sea salt → Diamond Crystal kosher salt. Use 1½ teaspoons (about 6 g) because the flakes are lighter by volume.
More dips & spreads
See all →

Find more like this
- Meal
- Breakfast
- Cuisine
- Middle Eastern
- Method
- StovetopInstant Pot
- Quick & Easy
- 5 Ingredients or LessEasyMake Ahead