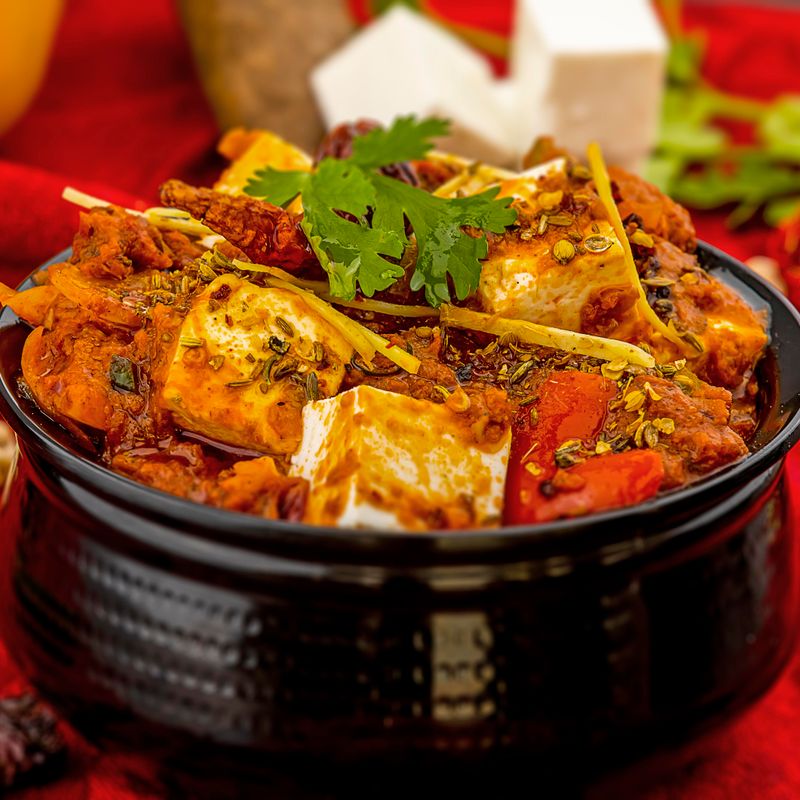
Instant Pot Indian Paneer Tikka Masala with Quinoa
A creamy, aromatic Indian paneer tikka masala made efficiently in an Instant Pot, served alongside fluffy quinoa. Tender paneer cheese cubes absorb the rich tomato-cream sauce infused with garam masala, ginger, garlic, and warm spices, while quinoa steams on top of the trivet. The result is a complete, protein-rich vegetarian main course ready in under 45 minutes.
- Prep
- 8 min
- Cook
- 14 min
- Wait
- 18 min
- Total
- 40 min
- Makes
- Serves 4 (about 1.5 cups sauce with paneer and 3/4 cup cooked quinoa per serving)
Steps
Before you start
- Cut paneer cheese into 1-inch cubes and set on paper towels to drain excess moisture
- Measure all spices (garam masala, turmeric, cumin, coriander, chili powder) into one small bowl for quick addition during cooking
- Confirm your Instant Pot includes a stainless-steel trivet and locate or prepare a steamer basket that fits inside the pot
- Have vegetable broth and water measured and ready to pour; room-temperature liquid speeds up the pressure-cooking process
Prepare all ingredients
- Cut paneer into 1-inch cubes and place on a plate lined with paper towels.
- Finely dice the onions (you should have about 2 cups).
- Mince garlic and ginger separately using a microplane or fine grater (or knife).
- Pour all dry spices—garam masala, turmeric, ground cumin, ground coriander, and red chili powder—into a small bowl.
- This mise en place ensures smooth cooking without scrambling later.
+ Show details− Hide details
Ready when: All ingredients are finely chopped and spices are combined in one bowl
Tip: Mince garlic and ginger as close to cooking as possible to preserve their volatile aromatics
Sauté onions in ghee
- Press the Instant Pot's sauté mode button and set to medium-high heat.
- Add the 2 tablespoons of ghee and allow it to melt and heat for about 30 seconds until shimmering.
- Add the diced onions and cook for 4–5 minutes, stirring occasionally with a wooden spoon, until the onions soften and just begin to turn golden at the edges.
- This step builds the flavor foundation of the sauce.
+ Show details− Hide details
Ready when: Onions are soft, translucent, and have light golden color at edges
Tip: Don't skip this step or rush it—caramelizing onions develops deep, sweet flavor that creates the sauce's body
Add garlic and ginger
- Add the minced garlic and ginger to the pot and stir constantly for about 1 minute.
- The aromatics will become fragrant and darken slightly in color.
- Watch carefully to prevent burning—the goal is to cook out the raw bite while maintaining the bright, fresh flavor.
+ Show details− Hide details
Ready when: Mixture is fragrant, slightly darker in color, and begins to stick lightly to the pot
Tip: Keep the heat on medium-high and stir non-stop to cook the garlic and ginger without burning them
Bloom spices in fat
- Pour in all the spice mixture (garam masala, turmeric, cumin, coriander, and red chili powder) and stir continuously for about 1 minute.
- The spices will darkened slightly and fill the pot with a deeply aromatic fragrance.
- This process, called blooming or tempering, releases the essential oils from the spices and multiplies their flavor impact exponentially.
+ Show details− Hide details
Ready when: Spices are darkened, highly fragrant, and no longer smell raw
Tip: Toasting spices in fat rather than dry is the secret to a rich, restaurant-quality curry flavor
Add tomatoes and yogurt
- Pour in the entire can of crushed tomatoes (with juices) and stir well, scraping up any browned bits stuck to the bottom of the pot with your spoon.
- These caramelized bits (called fond) are pure flavor.
- Add the room-temperature yogurt and stir until evenly distributed with no white streaks visible.
- The mixture should look thick, aromatic, and rusty-red in color.
+ Show details− Hide details
Ready when: Tomatoes and yogurt are fully combined, no streaks of yogurt visible
Tip: Scrape the pot bottom thoroughly to incorporate the fond—it contains deep, complex flavors
Layer paneer and set up for pressure cooking
- Gently fold in the paneer cubes without breaking them; use a light hand and folding motion rather than aggressive stirring.
- Pour in 1 cup of vegetable broth.
- Turn off the sauté mode by pressing the button.
- Place the stainless-steel trivet or rack inside the pot, resting on top of the sauce (it will sit above the liquid level).
- In a separate steamer basket, combine the 1 cup of dry quinoa with 1.5 cups of water and stir gently.
- Carefully set this steamer basket on top of the trivet so it rests securely above the sauce.
- Double-check that the basket is stable and won't tip during cooking.
+ Show details− Hide details
Ready when: Paneer is evenly distributed in sauce, trivet sits securely, and steamer basket rests stably on top
Tip: Don't stir after adding paneer—gentle folding keeps the cubes intact. Make sure the steamer basket is level and won't slide during pressure cooking
Cook under high pressure
- Close the Instant Pot's lid and ensure the steam valve is set to SEALING (not venting).
- Select HIGH pressure and set the timer to 8 minutes.
- The pot will take 3–5 minutes to come to pressure (you'll see the float valve rise and hear a quiet hiss); once it reaches pressure, the 8-minute cooking time begins.
- Do not open the lid or adjust the pressure during this entire phase.
+ Show details− Hide details
Tip: Resist the urge to open the lid during cooking—doing so releases pressure, extends cooking time, and risks making the paneer tough
Release pressure naturally
- When the 8-minute cooking timer beeps, turn off the Instant Pot.
- Allow the pot to sit undisturbed for 10 full minutes.
- During this time, the pressure inside decreases gradually, and the float valve slowly lowers back down to its starting position.
- This natural release (rather than manual/quick release) is critical for maintaining tender paneer and a smooth sauce.
- After 10 minutes, if the float valve is still raised, turn the steam valve to VENT and allow any remaining steam to escape (hold the pot with a kitchen towel for safety).
+ Show details− Hide details
Ready when: Float valve has fully lowered to its original resting position
Tip: Never use quick-release for cream-based curries—the rapid pressure drop can make paneer grainy and tough
Remove steamer basket with quinoa
- Carefully open the Instant Pot's lid, angling it away from your face to let steam escape safely.
- Using heat-safe gloves or tongs, gently lift the steamer basket straight up and out of the pot, being careful not to tip it and spill the quinoa water back into the sauce below.
- Place the basket on a heat-safe surface (such as your counter or a trivet).
- Let the quinoa sit covered in the basket for 2–3 minutes more to fully absorb any remaining liquid and fluff up.
+ Show details− Hide details
Ready when: Steamer basket is safely removed; quinoa is fluffy and water is absorbed
Tip: Letting quinoa rest 2–3 minutes after removal makes it fluffier and more tender
Finish sauce with cream
- Turn the Instant Pot back to sauté mode on medium heat.
- Pour in the heavy cream and crumble in the kasuri methi (dried fenugreek leaves).
- Stir gently and slowly to combine, careful not to break apart the paneer cubes.
- Let the sauce simmer for 1–2 minutes, stirring occasionally, until the cream is fully incorporated and the sauce has thickened slightly.
- The sauce should now be rich, aromatic, and visibly creamy.
- Taste it and adjust the seasoning with salt and ground black pepper to your preference.
+ Show details− Hide details
Ready when: Cream is fully incorporated, sauce coats a spoon, and tastes balanced in spice and salt
Tip: Always taste and adjust seasoning at the end—you cannot remove salt once added, and flavors change as the sauce cools
Combine and serve
- Fluff the cooked quinoa with a fork to separate the grains.
- You can either gently stir the quinoa into the paneer tikka masala for a mixed dish, or serve them separately so diners can adjust the grain-to-sauce ratio to their liking.
- Ladle the paneer tikka masala into serving bowls, top with a portion of quinoa (or serve quinoa alongside), and garnish generously with fresh chopped cilantro.
- Serve hot and enjoy.
+ Show details− Hide details
Ready when: Quinoa is fluffy, sauce is hot, and dish is ready to serve
Tip: Cilantro's fresh, bright flavor balances the rich cream and warm spices—don't skip it
Good to know
Tips
- Do not skip the natural release step (step 8). Quick-releasing pressure can cause the paneer to toughen and the sauce to become grainy or separated. Natural release keeps everything tender and silky.
- Toast the spices in hot ghee (step 4) to bloom them fully. This releases their essential oils and is the cornerstone of building deep, complex curry flavor. Burnt spices taste bitter and unpleasant, so stir constantly and keep heat at medium-high.
- Always taste the sauce and adjust seasoning with salt and pepper at the very end (step 10), before serving. The creaminess and heat change as the sauce cools, and you cannot remove salt once added.
- For an extra layer of flavor, lightly fry 1–2 tablespoons of additional kasuri methi in a tiny bit of ghee for 30 seconds until fragrant, crush it with your fingers, and sprinkle on top of each bowl instead of stirring into the sauce—this preserves its aromatic texture and aroma.
Make ahead
The paneer tikka masala sauce can be made completely ahead (without the quinoa). Refrigerate in an airtight container for up to 3 days. Reheat gently on the stovetop over medium heat with a splash of cream or broth, stirring occasionally, for 4–5 minutes. Cook fresh quinoa separately in the Instant Pot or on the stovetop while reheating the sauce. Alternatively, prepare both components ahead, refrigerate separately, and gently warm them together just before serving (about 4–5 minutes on the stove over medium heat).
Storage & reheating
Refrigerate in airtight containers for up to 4 days. The sauce and quinoa may be stored together or separately. Freezer: The tikka masala sauce freezes very well for up to 3 months (quinoa may become slightly grainy when thawed, so consider freezing them separately). To reheat from refrigerated: microwave in a bowl with a splash of water, stirring halfway through (2–3 minutes); or heat gently on the stovetop over medium heat, stirring occasionally (4–5 minutes). To reheat from frozen: thaw overnight in the refrigerator, then reheat as above.
Substitutions
- paneer cheese → extra-firm tofu or chickpeas. Use 14 oz (400g) extra-firm tofu, pressed and cubed, or 2 cans (15 oz each) drained and rinsed chickpeas. Add tofu or chickpeas in the last 2 minutes of sauté mode before pressure cooking to prevent them from breaking down. The dish becomes vegan.
- heavy cream or heavy whipping cream → full-fat coconut milk. Use 3/4 cup (180ml) full-fat coconut milk instead of heavy cream. Stir well before adding, as coconut milk separates. The sauce will be slightly lighter in color and taste but remain creamy and delicious.
- dry quinoa → basmati rice or jasmine rice. Use 1 cup (200g) long-grain white basmati or jasmine rice. Use the same 1.5 cups (360ml) water in the steamer basket. The texture is slightly different but the cooking time and pressure technique remain identical.
- plain yogurt or Greek yogurt → sour cream or crème fraîche. Use 1/4 cup (60ml) sour cream or crème fraîche in place of yogurt. Add it along with the tomatoes in step 5. Sour cream is more acidic and adds a subtle tang that brightens the sauce.
More curries
See all →
Find more like this
- Meal
- Dinner
- Cuisine
- North Indian
- Main ingredient
- Tomatoes
- Method
- Instant Pot
- Quick & Easy
- One-Pot