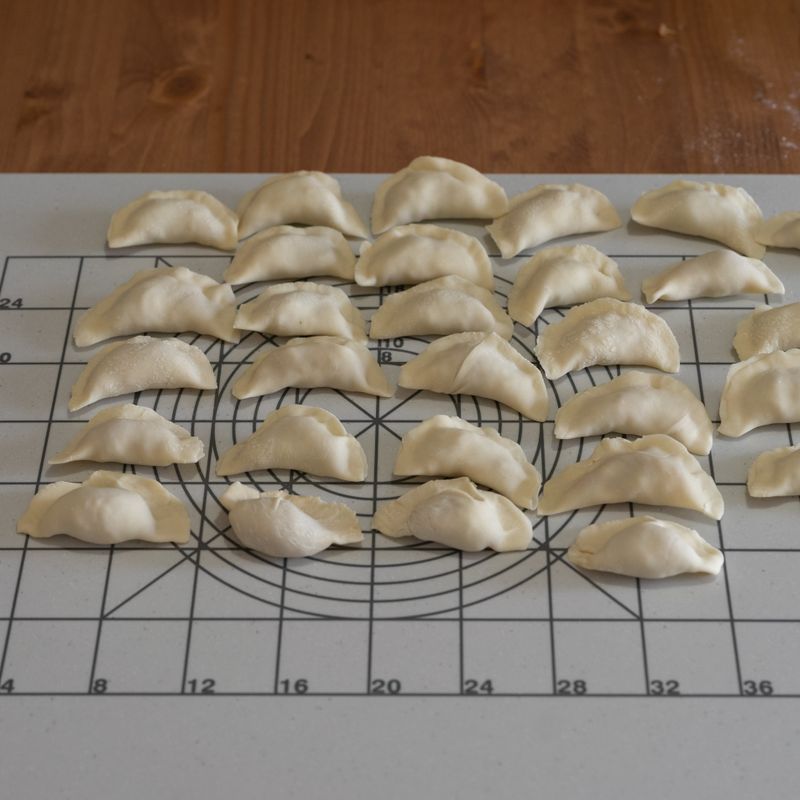
Homemade Chicken Potstickers
Juicy ground chicken, napa cabbage, ginger and scallion are folded into store-bought wrappers, then browned, steamed and crisped in one skillet for golden bottoms and tender tops. Serve with a quick soy-vinegar dipping sauce.
- Prep
- 50 min
- Cook
- 28 min
- Wait
- 35 min
- Total
- 1 hr 53 min
- Makes
- 30 potstickers (about 5 per person as an appetizer)
Steps
Before you start
- Plan on about 2 hours from start to finish: roughly 50 minutes of prep (30 or more of it folding), 35 minutes of salting and chilling, and 28 minutes of cooking in two batches. Folding is slower the first time, so don't rush it.
- Use thin, round dumpling (gyoza) wrappers about 3½ inches (9 cm) across, not thick wonton squares. Thaw frozen wrappers in the fridge overnight.
- Choose ground chicken made with thigh meat if you can; lean breast meat makes a drier filling. Keep it in the fridge until you mix.
- Set up a work station first: a small bowl of water, a baking sheet lined with parchment and dusted with cornstarch, and a damp towel to keep the wrappers from drying out.
- You will cook in two batches of 15 in a 12-inch skillet. Keep the second batch on the tray, loosely covered, while the first cooks.
Salt the cabbage
- Place the 300 g (3 cups) finely chopped napa cabbage in a medium bowl and toss with the ½ tsp kosher salt.
- Let it sit for 15 minutes so the salt draws out excess water.
- Use this time to make the dipping sauce (next step).
+ Show details− Hide details
Ready when: Cabbage looks wilted and there is a pool of liquid at the bottom of the bowl
Tip: Chop the cabbage very fine; large pieces poke through the thin wrappers.
Make dipping sauce
- While the cabbage sits, stir together the 3 tbsp soy sauce, vinegar, 1 tsp sesame oil, chili crisp (if using) and the sliced scallion green in a small bowl.
- Set aside for serving.
Squeeze cabbage dry
- Scoop the cabbage into a clean kitchen towel, gather the edges and twist firmly over the sink, squeezing out as much liquid as you can.
- Napa is mostly water, so 300 g will shrink to roughly 100 to 130 g (a loose ¾ cup); the exact amount varies, and that is fine.
- Fluff the cabbage with a fork.
+ Show details− Hide details
Ready when: Cabbage feels damp like a wrung-out sponge, and no liquid drips when you squeeze a handful
Tip: Don't skip this: wet cabbage is the main cause of watery filling and wrappers that won't seal.
Mix the filling
- In a large bowl combine the cold ground chicken, squeezed cabbage, scallions, ginger, garlic, 1½ tbsp soy sauce, Shaoxing wine, 1 tbsp sesame oil, white pepper and 1 tbsp cornstarch.
- Stir vigorously in one direction with a sturdy spatula or your hand for about 1 minute.
- Add the cold broth 1 tbsp (all of it, in one addition), then keep stirring in the same direction for another 1 to 2 minutes until it is fully absorbed.
- You will have about 700 g of filling.
+ Show details− Hide details
Ready when: Filling looks like a sticky, tacky paste that clings to the spatula and holds its shape when scooped, with no puddle of liquid in the bowl
Tip: Stirring in one direction develops the protein so the filling is bouncy and juicy rather than crumbly.
Chill the filling
- Cover the bowl and refrigerate for 20 minutes.
- Chilling firms the filling so it is easier to scoop and fold.
- Meanwhile, line a rimmed baking sheet with parchment and dust it with the 1 tbsp cornstarch.
+ Show details− Hide details
Ready when: Filling feels cold and noticeably stiffer when stirred
Tip: Test the seasoning now: microwave 1 tsp of filling for 15 to 20 seconds until cooked through, taste, then adjust salt or soy sauce.
Fill and fold
- Hold one wrapper flat in your palm (keep the rest under a damp towel).
- Spoon a heaped tablespoon (about 22 g) of filling into the center.
- Dip a finger in the sealing water and moisten the entire rim of the wrapper.
- Fold it in half to make a half-moon and pinch the center of the edge closed.
- On the front edge only, make 3 small pleats toward the center, pressing each pleat against the flat back edge, then press the whole seam firmly shut, working out any air.
- The flat back is the bottom and the pleated curve faces up.
- Set the potsticker on the tray pleated side up, flat side down, pressing gently so it sits flat.
- Repeat with the remaining wrappers, leaving space between them.
- You will have 30 potstickers and may have a spoonful or two of filling left over (pan-fry it as a small patty for a cook's snack).
- Allow 30 to 35 minutes.
+ Show details− Hide details
Ready when: Each potsticker is fully sealed with no gaps and sits upright on its flat bottom
Tip: Don't overfill; much more than a heaped tablespoon makes sealing difficult and the wrapper may burst while steaming.
Brown the bottoms
- Heat 1½ tbsp of the oil in the 12-inch nonstick skillet over medium-high heat until it shimmers, about 1 minute.
- Arrange 15 potstickers flat side down in a single layer with small gaps.
- Cook without moving them for 3 to 4 minutes.
+ Show details− Hide details
Ready when: Bottoms are golden brown when you peek with a spatula
Tip: Don't crowd the pan, or the potstickers will steam instead of browning and may stick together.
Steam covered
- Reduce the heat to medium.
- Standing back from the pan, pour ⅓ cup (80 ml) water around the edges of the pan (it will sputter) and cover immediately with the lid.
- Steam for 6 minutes without lifting the lid.
+ Show details− Hide details
Ready when: Wrappers look slightly translucent and puffy, and the water has mostly evaporated
Tip: Pouring water over the potstickers instead of around them washes off the browning.
Crisp and release
- Remove the lid and cook 2 to 4 minutes more over medium heat, until the remaining water has evaporated and the bottoms sizzle and re-crisp.
- Slide a thin spatula under each potsticker to release it.
- Insert an instant-read thermometer into the filling of one potsticker; it should read 165°F (74°C).
- Transfer them browned side up to a plate.
+ Show details− Hide details
Ready when: Pan is dry, bottoms are crisp and deep golden, and the filling reads 165°F (74°C)
Tip: If they stick, let them cook another 30 seconds; well-browned potstickers release easily.
Cook second batch
- Wipe out the skillet with a paper towel, then repeat with the remaining 1½ tbsp oil, the other 15 potstickers and the remaining ⅓ cup (80 ml) water: brown for 3 to 4 minutes over medium-high heat, steam covered for 6 minutes over medium heat, then uncover and crisp for 2 to 4 minutes.
- Check one for 165°F (74°C).
+ Show details− Hide details
Ready when: Bottoms are deep golden brown, the pan is dry, and the filling reads 165°F (74°C)
Tip: Let the pan cool for a minute after wiping it so the oil doesn't smoke.
Serve hot
- Arrange the potstickers browned side up on a platter and serve with the dipping sauce.
+ Show details− Hide details
Tip: Let them cool 2 minutes before biting in; the filling is very hot and juicy.
Good to know
Tips
- Squeeze the salted cabbage very well; excess moisture is the number one cause of soggy, leaky potstickers.
- If the filling still feels loose after mixing, stir in 1 more tsp cornstarch and chill another 10 minutes.
- A nonstick skillet with a tight lid gives the best crisp bottoms and the most even steaming.
- Keep unfilled wrappers under a damp towel; dried-out edges won't seal.
Make ahead
Assemble the potstickers up to 1 day ahead: arrange on a cornstarch-dusted tray, cover loosely with plastic wrap and refrigerate. Or freeze them (see storage) and cook straight from frozen. The dipping sauce keeps in the fridge for 1 week.
Storage & reheating
Cooked potstickers keep in an airtight container in the fridge for up to 3 days; reheat in a nonstick skillet with 1 tsp oil over medium heat for 3 to 4 minutes, covering for the last minute, until hot and crisp. Don't leave cooked potstickers at room temperature for more than 2 hours. To freeze uncooked, place the tray in the freezer for 1 hour until solid, then transfer to a freezer bag for up to 3 months. Cook from frozen using the same method but steam for 8 to 9 minutes, adding 2 tbsp more water if the pan dries out early, and check that the filling reaches 165°F (74°C).
Substitutions
- ground chicken, preferably thigh meat → ground pork or ground turkey. Pork gives a richer filling; turkey is leaner, so use thigh meat and keep the broth.
- napa cabbage → green cabbage. Chop very fine and salt as directed; it is slightly firmer and less sweet.
- Shaoxing wine or dry sherry → dry sherry or extra chicken broth. Broth makes it alcohol-free but slightly less aromatic.
- Chinese black vinegar or unseasoned rice vinegar → apple cider vinegar. Use the same amount for a similar tang; it is a little fruitier.
More stuffed bites
See all →
Find more like this
- Meal
- Dinner
- Cuisine
- Chinese
- Main ingredient
- Ground ChickenCabbage
- Method
- Stovetop