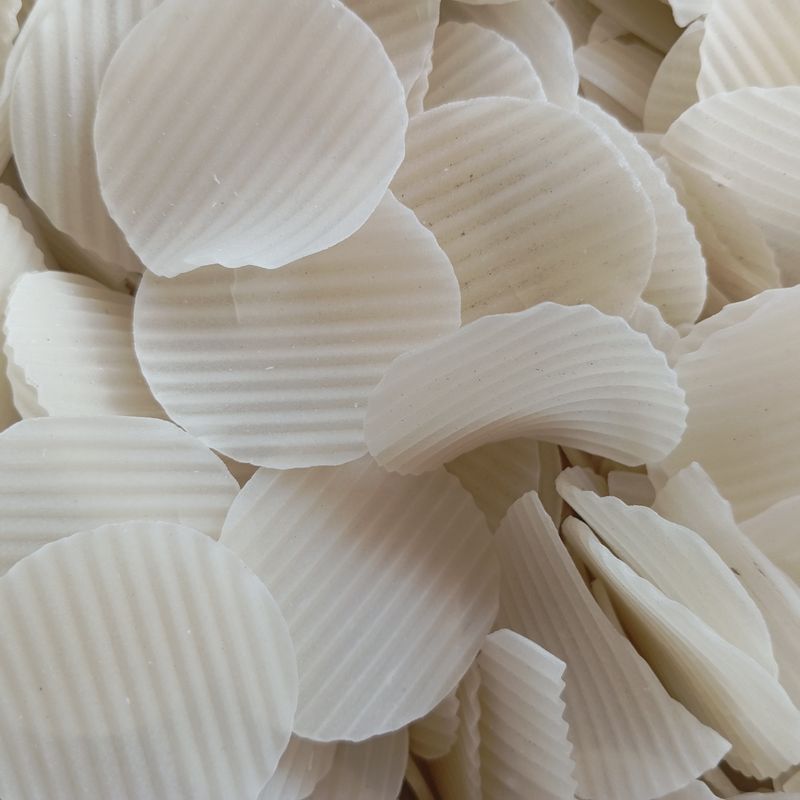
Crispy Chickpea Flour Wafers with Sea Salt
Thin, golden, and impossibly crispy wafers made from chickpea flour, olive oil, and sea salt. These Mediterranean-inspired crackers are naturally gluten-free and require just five ingredients and minimal equipment. They shatter delicately on the tongue and are perfect for serving alongside cheese, dips, or as a savory snack.
- Prep
- 15 min
- Cook
- 20 min
- Wait
- 30 min
- Total
- 1 hr 5 min
- Makes
- About 24 wafers
Steps
Before you start
- Preheat oven to 400°F (200°C)
- Line two large baking sheets with parchment paper
- Have sea salt ready for finishing
Whisk the batter
- In a medium bowl, whisk together chickpea flour, fine sea salt, and water until completely smooth.
- There should be no lumps—whisk for about 1 minute.
- Stir in the olive oil until fully incorporated.
- The batter should be the consistency of heavy cream, thin enough to spread but thick enough to coat the back of a spoon.
+ Show details− Hide details
Ready when: Batter is smooth with no lumps and coats a spoon
Tip: Sift the chickpea flour if it's lumpy or clumpy to ensure a truly smooth batter.
Rest the batter
- Let the batter rest at room temperature for 15 minutes.
- This allows the flour to fully hydrate and makes spreading easier.
Spread on first sheet
- Pour half the batter onto the center of the first parchment-lined baking sheet.
- Using the back of a spoon or a small offset spatula, spread the batter as thinly and evenly as possible into a rough rectangle covering most of the sheet.
- Aim for a thickness of about 1/16 inch (1.5 mm)—the thinner, the crispier.
- Don't worry about perfect edges; irregular ones add visual appeal.
+ Show details− Hide details
Ready when: Batter is spread in a thin, even layer
Tip: Dip your spoon in water and wipe it between strokes to prevent sticking and make spreading smoother.
Spread on second sheet
- Repeat with the remaining batter on the second parchment-lined baking sheet, spreading as thin and evenly as possible.
+ Show details− Hide details
Ready when: Batter is spread in a thin, even layer
Season with finishing salt
- Sprinkle fleur de sel or coarse sea salt evenly over both sheets, using just enough to lightly cover the surface.
- The salt will add flavor and texture.
+ Show details− Hide details
Ready when: Surface is evenly dotted with coarse salt
Bake until crispyOven 400°F / 205°C
- Place both sheets in the preheated 400°F (200°C) oven on the middle and lower-middle racks.
- Bake for 10 minutes, then swap the positions of the sheets.
- Continue baking for another 8–10 minutes, until the wafers are deep golden brown and completely crispy.
- They may still feel slightly flexible while warm but will crisp further as they cool.
+ Show details− Hide details
Ready when: Wafers are deep golden brown, feel crispy and light, edges may be darker
Tip: Rotate the sheets partway through to ensure even browning, as ovens have hot and cool spots.
Cool and break into wafers
- Remove the sheets from the oven and let the wafers cool on the pans for 5 minutes—they will continue to firm up.
- Once cooled slightly but still pliable, break them by hand into irregular, bite-sized pieces or wafers.
- (If they cool too much and become too brittle, return them to the oven for 1 minute to soften slightly.) Alternatively, cut them into strips or squares with a sharp knife while still warm.
+ Show details− Hide details
Ready when: Wafers are fully crispy, cooling to room temperature
Tip: Break them into irregular pieces for an artisanal look, or cut them into uniform shapes if you prefer consistency.
Cool completely
- Transfer the broken wafers to a wire rack or plate and let cool to room temperature.
- They will continue to crisp as they cool, becoming even more delicate and crunchy.
+ Show details− Hide details
Ready when: Wafers are cool, completely crispy, and pale golden
Good to know
Tips
- The thinner you spread the batter, the crispier the wafers. Aim for about 1/16 inch (1.5 mm) if you have a ruler to guide you.
- If your batter is too thick to spread easily, whisk in a little more water, 1 tablespoon at a time, until it reaches a pourable but spreadable consistency.
- These wafers pair beautifully with labneh, whipped feta, hummus, or simply as a snack with olives and cheese.
- Humidity is the enemy of crispy wafers. Store them in an airtight container away from steam or moisture, and use them within 5 days for the best crunch.
Make ahead
You can make these up to 5 days ahead and store in an airtight container. Refresh them in a 325°F (160°C) oven for 3–4 minutes if they soften from humidity.
Storage & reheating
Store in an airtight container or glass jar at room temperature for up to 5 days. Keep away from moisture; a silica packet in the jar helps. Do not refrigerate or freeze, as moisture will soften them.
Substitutions
- chickpea flour (also called gram flour) → Lentil flour or fava bean flour. Use the same weight; these flours are slightly denser so the batter may be a touch thicker. Add an extra tablespoon of water if needed. The flavor will be slightly different but equally delicious.
- extra virgin olive oil → Neutral oil such as sunflower or light sesame oil. You'll lose the olive oil flavor, but the wafers will still be crispy. Use the same amount.
- fleur de sel or coarse sea salt, for finishing → Dukkah (Egyptian spice blend), za'atar, or crushed dried herbs. Use about the same amount; these add different flavor profiles while maintaining the crispy texture.
- water, room temperature → Aquafaba (liquid from canned chickpeas). Use the same amount. This adds a subtly nutty flavor and a slightly lighter, airier texture.
More party snacks
See all →


Find more like this
- Meal
- Snack
- Cuisine
- Mediterranean
- Method
- Oven
- Quick & Easy
- 5 Ingredients or LessEasy