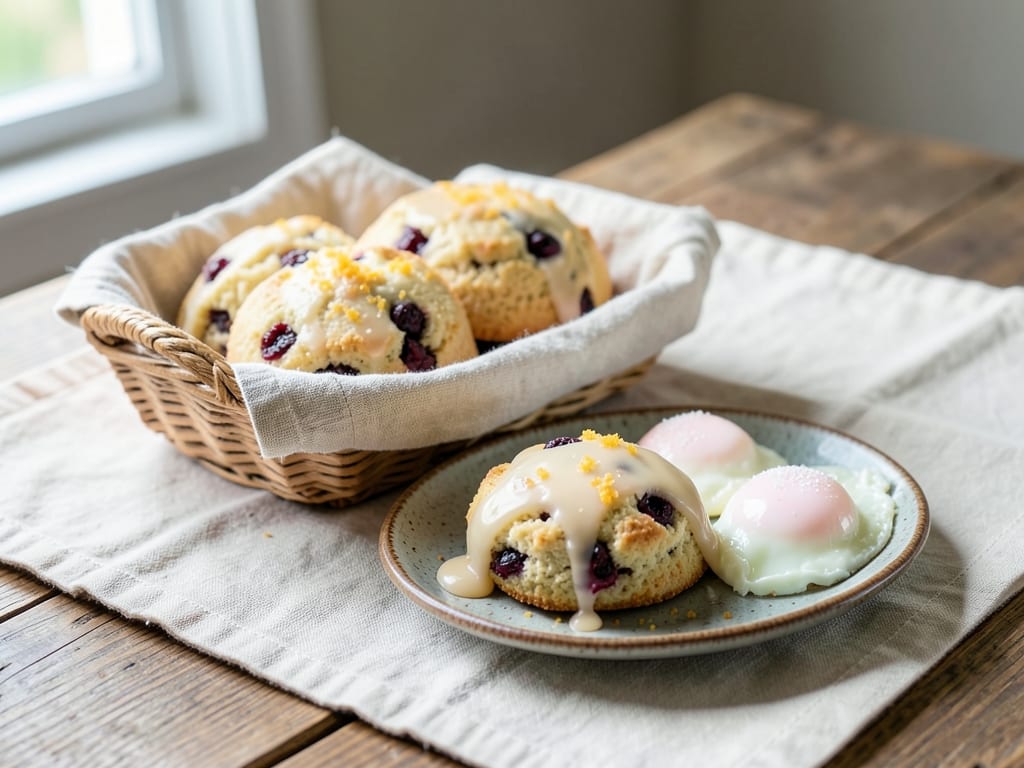
Cranberry Orange Scones
These tender, flaky scones combine tart dried cranberries with bright orange zest in a classic British-American style. Made using the traditional scone method—cold butter worked into flour to create delicate steam pockets—they rise beautifully in the oven and have a light, crumbly interior. Perfect for breakfast, afternoon tea, or dessert, especially when served warm with clotted cream, jam, or butter.
Steps
Before you start
- Read through the recipe before starting—you'll be working quickly once mixing begins to keep the dough cold and tender.
- Chill your butter and cream in the refrigerator for at least 30 minutes before use (longer if your kitchen is very warm).
- Gather your equipment: two mixing bowls, whisk, pastry cutter or sharp knife, baking sheet with parchment paper, wire cooling rack, and pastry brush.
- Measure out your orange zest and dried cranberries, and have your room-temperature egg ready.
Preheat and prepareOven 400°F / 205°C
- Preheat your oven to 400°F (200°C).
- Line a large baking sheet with parchment paper.
+ Show details− Hide details
Ready when: Oven reaches 400°F (200°C)
Tip: Preheat for the full 10 minutes so the scones rise immediately and evenly in the oven.
Mix dry ingredients
- In a large bowl, whisk together the all-purpose flour, granulated sugar, baking powder, salt, and orange zest until well combined and the zest is evenly distributed throughout.
+ Show details− Hide details
Ready when: Orange zest is evenly distributed; mixture is light and fluffy
Cut in cold butter
- Add the cold butter cubes to the flour mixture.
- Using a pastry cutter, two knives, or your fingertips, work the butter into the flour by gently rubbing or cutting it in, until the mixture resembles coarse breadcrumbs with some pea-sized pieces of cold butter still visible throughout.
+ Show details− Hide details
Ready when: Mixture resembles coarse breadcrumbs with visible pea-sized butter pieces remaining
Tip: Work quickly and keep everything cold. Warm butter makes tough, dense scones. If your kitchen is very warm, chill the bowl briefly before adding butter.
Add cranberries
- Fold the dried cranberries into the flour-butter mixture, distributing them evenly throughout.
+ Show details− Hide details
Ready when: Cranberries are evenly distributed with no clumps
Combine wet ingredients
- In a small bowl, whisk together the room-temperature egg and cold heavy cream until just combined.
+ Show details− Hide details
Ready when: Egg and cream are uniform and well mixed
Gently mix dough
- Pour the egg-cream mixture into the flour-butter mixture.
- Using a fork or wooden spoon, fold together gently until just combined into a shaggy, slightly moist dough.
- Do not overmix; some lumps and streaks of flour are completely fine and desirable.
+ Show details− Hide details
Ready when: Ingredients are barely combined into a shaggy dough; visible flour streaks remain
Tip: Overmixing develops gluten and makes tough, dense scones. Mix only until the ingredients are barely combined—lumpy dough is your friend.
Shape and brush scones
- Turn the dough out onto a lightly floured work surface.
- Using your hands, gently pat it into a 1-inch-thick round or square, handling it as little as possible.
- Using a sharp knife, cut the dough into 12 equal wedges (like a pie), or use a 2-inch biscuit cutter and gently repattern any scraps once.
- Arrange the scones on the prepared baking sheet, spacing them about 2 inches apart.
- In a small bowl, whisk together the milk and 1 tbsp water.
- Using a pastry brush, gently brush this mixture over the tops of the scones.
- If desired, sprinkle a small amount of coarse sugar over each scone for a sweet, sparkly crust.
+ Show details− Hide details
Ready when: Scones are shaped, arranged on the baking sheet, and egg wash is applied
Tip: Cut straight down with a sharp knife or press the cutter straight down without twisting, which can seal the edges and prevent even rising. Keep your hands light to avoid compacting the dough.
Bake until golden brownOven 400°F / 205°C
- Place the baking sheet in the preheated 400°F (200°C) oven.
- Bake until the scones are light golden brown on top and a toothpick inserted into the center of one comes out clean or with just a few moist crumbs, 15–18 minutes.
- The bottoms should also be lightly golden.
+ Show details− Hide details
Ready when: Tops are light golden brown; bottoms are lightly golden; toothpick comes out clean or with a few moist crumbs
Tip: Don't overbake—scones dry out quickly. If the tops are browning too fast before the insides cook, loosely tent with foil and continue baking.
Cool on rack
- Remove the baking sheet from the oven.
- Using a spatula or tongs, transfer the scones to a wire cooling rack and let them rest for 5 minutes.
- They can be served warm or at room temperature.
+ Show details− Hide details
Ready when: Scones have set slightly and cooled enough to handle comfortably
Make optional glaze
- If desired, make a simple orange glaze: in a small bowl, whisk together the powdered sugar and fresh orange juice until smooth and pourable (adjust the juice amount for the right consistency—more for thinner, less for thicker).
- Drizzle the glaze over the cooled scones and let it set for a few minutes before serving.
+ Show details− Hide details
Ready when: Glaze is smooth, pourable, and coating the scones evenly
Tip: Start with 2 tbsp orange juice and add more gradually until you reach your desired consistency. Too thin and it runs off; too thick and it's hard to drizzle.
Good to know
Tips
- The key to tender, flaky scones is keeping ingredients cold and handling the dough minimally. Cold butter creates steam pockets that make scones rise tall and flaky; overmixing develops gluten and makes them tough and dense.
- Fresh orange zest is essential—bottled or frozen zest lacks the bright, fragrant oils that make these scones special. Zest the orange just before mixing.
- Scones are best enjoyed slightly warm with butter, jam, clotted cream, or whipped cream. Warming them gently before serving refreshes their texture.
- Don't skip the egg wash—it creates a beautiful golden-brown crust and helps any coarse sugar adhere nicely for a professional appearance.
Make ahead
The shaped scones can be frozen on a baking sheet for up to 3 months, then baked directly from frozen (add 2–3 minutes to the baking time). Alternatively, baked scones can be frozen for up to 3 months, thawed at room temperature, and reheated gently before serving.
Storage & reheating
Room temperature: 2 days in an airtight container. Refrigerator: 4 days in an airtight container. Freezer: 3 months (wrap individually in plastic wrap, then place in a freezer bag). Reheating: Wrap in foil and warm in a 325°F (160°C) oven for 8–10 minutes until heated through, or microwave a single scone for 15–20 seconds.
Substitutions
- dried cranberries → Dried blueberries, dried cherries, chopped dried apricots, or dried currants. Use the same amount. Dried blueberries or cherries offer similar tart notes; apricots add a sweeter flavor.
- orange → Lemon zest, or ½ tsp vanilla extract. Lemon zest provides a sharper citrus bite. Vanilla extract creates a more classic scone flavor but loses the citrus brightness.
- heavy cream → Whole milk, buttermilk, or Greek yogurt. Milk and buttermilk use the same amount. Greek yogurt will be slightly thicker, so start with ¼ cup and add more milk as needed. Scones will be slightly less rich.
- all-purpose flour → Pastry flour or cake flour. Use the same amount but add 1 tsp extra baking powder to compensate for lower protein content. Scones will be more tender and delicate.
More scones & biscuits
See all →


Find more like this
- Meal
- Breakfast
- Diet
- VegetarianHalal
- Method
- Oven