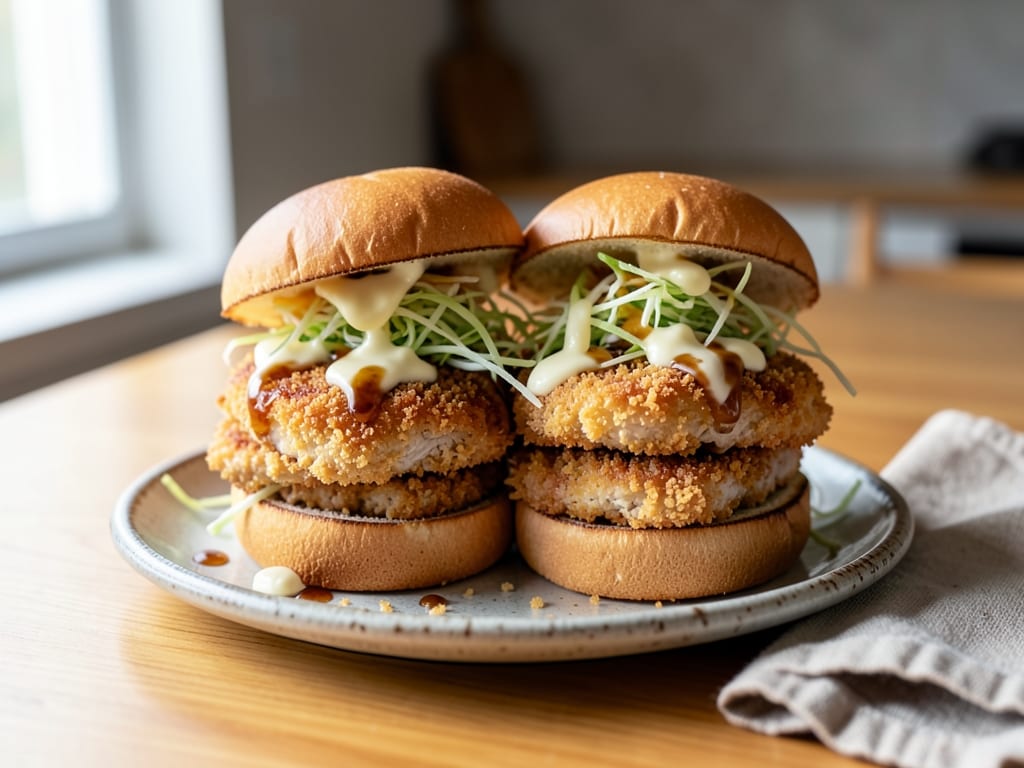
Chicken Katsu Burgers with Tonkatsu Sauce
Thin chicken breast cutlets coated in shatteringly crisp panko, fried until golden and juicy, then stacked on toasted milk bread buns with crunchy cabbage slaw, creamy mayo, and a tangy-sweet homemade tonkatsu sauce.
Steps
Before you start
- Clear a spot for a breading station with three shallow dishes, and set a wire rack over a rimmed baking sheet for the breaded and fried chicken.
- Have a deep-fry or instant-read thermometer ready. Holding the oil at 350°F (175°C) is the key to crisp, non-greasy katsu.
- Preheat the oven to 200°F (95°C) before you start frying so the first batch stays hot and crisp.
- Pat the chicken completely dry before breading. Wet chicken makes the coating slide off.
Mix the tonkatsu sauce
- In a small bowl, whisk together the ketchup, Worcestershire sauce, oyster sauce, soy sauce, sugar, and Dijon until completely smooth and the sugar has dissolved.
- Set aside at room temperature.
- You should have about ½ cup (120 ml) of sauce.
+ Show details− Hide details
Ready when: Sauce is uniformly dark reddish-brown with no streaks of ketchup or mustard.
Tip: Taste it: it should be tangy, savory, and lightly sweet. Add a pinch more sugar if your Worcestershire is very sharp.
Dress the cabbage
- In a medium bowl, toss the shredded cabbage with the rice vinegar and ¼ tsp kosher salt.
- Squeeze gently with your hands for 20 seconds to start softening it.
- Let it sit while you prepare the chicken, then stir in the sesame seeds, if using, just before assembling.
+ Show details− Hide details
Ready when: Cabbage looks slightly glossy and bends without snapping, but is still crunchy.
Tip: Shred the cabbage as thin as you can; thick pieces make the burger slide apart when you bite.
Slice and pound cutlets
- Lay each chicken breast flat and, holding the knife parallel to the board, slice it horizontally into 2 even cutlets (4 total).
- Place the cutlets between sheets of plastic wrap and pound with a mallet or rolling pin to an even ½-inch (1.25 cm) thickness, working from the center outward.
- Pat both sides very dry with paper towels, then season on both sides with 1 tsp kosher salt and ½ tsp pepper.
+ Show details− Hide details
Ready when: Cutlets are an even thickness all over, with no thick ridge at the center.
Tip: Even thickness means the chicken cooks through at the same moment the crust turns golden. Each cutlet should be roughly the width of your bun, so trim or pound wider if needed.
Set up breading stationOven 200°F / 95°C
- Preheat the oven to 200°F (95°C) and place the wire rack on a baking sheet.
- Line up three shallow dishes: flour in the first; eggs beaten with the milk in the second; panko in the third.
- Keep a second clean rack or tray at the end for breaded cutlets.
+ Show details− Hide details
Ready when: Three dishes are lined up in order: flour, egg, panko.
Tip: Use one hand for dry (flour and panko) and the other for wet (egg) to avoid heavy clumps on your fingers.
Bread the chicken
- Dredge one cutlet in flour and shake off all excess.
- Dip it into the egg mixture, letting the excess drip off for a few seconds.
- Lay it in the panko and press firmly with your palm on both sides so the crumbs adhere in a thick, even layer.
- Transfer to the rack and repeat with the remaining cutlets.
+ Show details− Hide details
Ready when: Each cutlet is fully covered in panko with no wet or bare patches.
Tip: Press, don't just sprinkle. Pressing is what makes the crust stay put during frying.
Heat the oilOven 350°F / 175°C
- Pour the oil into the Dutch oven so it is about 1½ inches (4 cm) deep, at least 2 inches (5 cm) below the rim.
- Set over medium-high heat and clip on a thermometer.
- Heat until the oil reaches 350°F (175°C), about 8 minutes.
- Meanwhile, leave the breaded cutlets resting on the rack so the coating hydrates and sticks.
+ Show details− Hide details
Ready when: Thermometer reads 350°F (175°C); a panko crumb dropped in sizzles immediately and steadily.
Tip: Adjust the burner to hold 340–360°F (170–180°C). Too cool and the crust is greasy; too hot and it browns before the chicken cooks.
Fry the katsuOven 200°F / 95°C
- Carefully lower 2 cutlets into the oil, away from you, without crowding.
- Fry 2½–3 minutes per side, turning once with tongs, until deep golden brown and the thickest part reads 165°F (74°C).
- Lift out, let the oil drip back, and set on the clean rack in the 200°F (95°C) oven.
- Let the oil return to 350°F (175°C), then fry the second batch the same way.
+ Show details− Hide details
Ready when: Crust is deep golden brown and crisp; an instant-read thermometer in the thickest part reads 165°F (74°C).
Tip: Never drain fried katsu on paper towels; steam from the bottom softens the crust. Use a wire rack.
Rest the cutlets
- Leave the fried cutlets on the rack for 5 minutes so the juices settle and the crust sets and crisps.
- While they rest, turn off the heat under the oil and let it cool before handling.
+ Show details− Hide details
Ready when: Crust sounds crisp when tapped with a fingertip.
Tip: Do this step while toasting the buns to save time.
Toast the buns
- Spread the softened butter over the cut sides of the buns.
- Heat a large skillet over medium heat and toast the buns cut-side down for 1–2 minutes, until golden brown.
- Spread about 1 tbsp mayonnaise on each of the bottom and top halves, using all of the mayonnaise across the 4 burgers.
+ Show details− Hide details
Ready when: Cut sides are evenly golden brown and lightly crisp.
Tip: Toast the buns just before serving so they stay crisp and don't soak up sauce.
Assemble and serve
- Stir the sesame seeds into the slaw if you haven't yet.
- Pile a generous handful of cabbage on each bun bottom, top with a katsu cutlet, then spoon about 1 tbsp tonkatsu sauce over each cutlet.
- Add the bun tops and serve immediately with extra sauce on the side.
+ Show details− Hide details
Ready when: Burgers stand tall with the crust still audibly crisp.
Tip: Sauce goes on the cutlet right before eating to protect the crunchy crust.
Good to know
Tips
- Pounding to an even ½-inch (1.25 cm) thickness is what gives you juicy chicken and a golden crust at the same time.
- Fry in batches of two; crowding drops the oil temperature and leads to greasy, pale katsu.
- Check the oil temperature between batches and wait for it to climb back to 350°F (175°C).
- Strain and cool leftover oil, then discard it according to local guidelines; never pour it down the drain.
Make ahead
"Make the tonkatsu sauce up to 1 week ahead and refrigerate in a sealed jar. Bread the cutlets up to 2 hours ahead, arrange on a rack, and refrigerate uncovered. Shred the cabbage up to 1 day ahead and store dry in a bag; dress it with vinegar and salt just before serving."
Storage & reheating
Best eaten right away. Store leftover cooked cutlets, sauce, and slaw separately in airtight containers in the fridge for up to 3 days (sauce up to 1 week). To reheat cutlets, bake on a wire rack at 400°F (200°C) for 8–10 minutes until hot and crisp; do not microwave. Cooked cutlets freeze for up to 2 months; reheat from frozen at 400°F (200°C) for 15–18 minutes. Keep room-temperature time for cooked chicken under 2 hours.
Substitutions
- boneless, skinless chicken breasts → boneless, skinless chicken thighs. Pound to ½ inch (1.25 cm) thick; thighs are juicier and cook in the same time. Still fry to 165°F (74°C).
- Worcestershire sauce → Store-bought tonkatsu sauce (about ½ cup / 120 ml). Skip the whole sauce mixture and use bottled Bull-Dog style sauce for the same result.
- milk bread buns (or soft brioche buns) → Brioche or potato buns. Any soft, slightly sweet bun works; toast them well.
- panko breadcrumbs → Crushed cornflakes (unsweetened). Gives a crunchy but slightly different crust; crush to coarse crumbs and press on firmly.
More chicken burgers
See all →
Find more like this
- Meal
- Lunch
- Cuisine
- Japanese
- Main ingredient
- Chicken Breast
- Diet
- Halal
- Method
- Stovetop