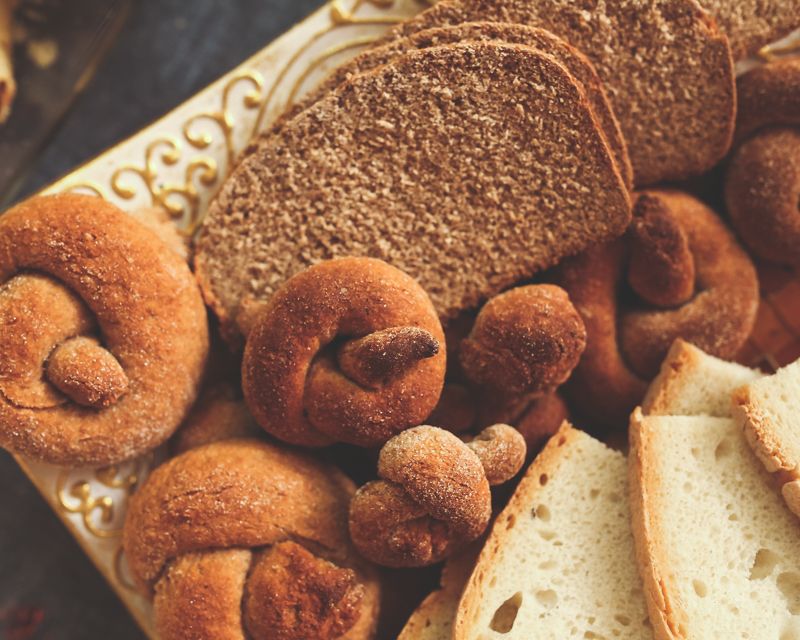
Anise and Piloncillo Breakfast Rolls
Soft, tender breakfast rolls sweetened with piloncillo and aromatic anise seeds, with a spiced cinnamon-piloncillo filling and a light glaze. These rolls have a subtle licorice note from the anise and deep molasses flavor from the piloncillo. Perfect for weekend breakfast or special occasions.
- Prep
- 30 min
- Cook
- 25 min
- Wait
- 1 hr 30 min
- Total
- 2 hr 25 min
- Makes
- 12 rolls
Steps
Before you start
- Have all ingredients at room temperature for even mixing
- Preheat oven to 375°F (190°C) 15 minutes before baking
- Crush piloncillo into small pieces before measuring if it is very hard
- Have a 9×13-inch (23×33 cm) baking pan ready and lightly buttered
Mix dough ingredients
- In a stand mixer bowl, combine 3½ cups (440 g) flour, 2¼ teaspoons (7 g) instant yeast, 1 teaspoon (6 g) salt, and 1½ teaspoons (5 g) lightly crushed anise seeds.
- Attach the dough hook.
- Pour in 1 cup (240 ml) warmed milk (110°F/43°C) and add 1 large room-temperature egg.
- Mix on low speed for 1 minute until shaggy, then increase to medium speed.
- Add 4 tablespoons (57 g) softened butter and ⅓ cup (60 g) grated piloncillo.
- Continue mixing for 8–10 minutes until the dough is smooth, elastic, and pulls away from the sides of the bowl.
- It should be slightly tacky but not sticky.
+ Show details− Hide details
Ready when: Dough is smooth, elastic, and pulls away from the sides of the bowl; slightly tacky but not sticky.
Tip: Warmed milk accelerates yeast activity. If milk is too hot (above 115°F/46°C), it will kill the yeast; too cool and the dough will rise slowly.
Bulk fermentation
- Transfer the dough to a lightly oiled large bowl, turning it to coat all sides.
- Cover with plastic wrap or a damp towel.
- Let it rise at room temperature (68–72°F/20–22°C) for 60 minutes until roughly doubled in size.
+ Show details− Hide details
Ready when: Dough has risen to about double its original volume; a gentle poke springs back slowly.
Tip: If your kitchen is warm (above 75°F/24°C), the dough may rise faster. If cool, it may take longer—this is fine, just watch for size rather than clock time.
Prepare filling
- While the dough rises, make the filling.
- In a small bowl, combine 3 tablespoons (43 g) softened butter, ½ cup (90 g) grated or crumbled piloncillo, and 1½ teaspoons (4 g) ground cinnamon.
- Stir until evenly mixed.
- Set aside.
+ Show details− Hide details
Ready when: Filling is well combined and spreadable.
Tip: If piloncillo is very hard, grate it with a microplane or box grater to break it into small pieces so it distributes evenly in the filling.
Shape the rolls
- Turn the risen dough onto a lightly floured work surface.
- Gently press it into a 16×10-inch (41×25 cm) rectangle.
- Spread the filling evenly across the dough, leaving a thin border on the far long edge.
- Starting from the long edge closest to you, roll the dough tightly into a log.
- Cut the log into 12 equal pieces (each about 1⅓ inches/3.5 cm wide) using a sharp knife or bench scraper.
+ Show details− Hide details
Ready when: Dough is shaped into a neat log and cut into 12 uniform pieces.
Tip: Use a bench scraper or sharp knife dipped in water between cuts to prevent sticking. Uneven pieces will bake at different rates.
Arrange in pan
- Place the 12 roll pieces cut-side up in a lightly buttered 9×13-inch (23×33 cm) baking pan, spacing them about ½ inch (1.3 cm) apart.
- They should fit snugly without crowding.
+ Show details− Hide details
Ready when: All 12 rolls are evenly arranged in the pan with consistent spacing.
Tip: Spacing allows each roll to puff independently without fusing together. Cut-side up exposes the swirl of filling.
Second rise
- Cover the pan loosely with plastic wrap or a damp towel.
- Let the rolls rise at room temperature for 30 minutes until they are puffy and touching each other.
+ Show details− Hide details
Ready when: Rolls are visibly puffed, soft to a gentle touch, and fill the spaces between each other.
Tip: Underproofing yields dense rolls; overproofing makes them collapse during baking. The rolls should look light and airy before they go in the oven.
Preheat ovenOven 375°F / 190°C
- While the rolls proof, preheat your oven to 375°F (190°C) for 15 minutes.
+ Show details− Hide details
Ready when: Oven is fully preheated to 375°F (190°C).
Tip: Use an oven thermometer to verify accuracy, especially if your oven tends to run hot or cold.
Bake rollsOven 375°F / 190°C
- Uncover the pan and place it in the preheated 375°F (190°C) oven.
- Bake for 22–25 minutes until the rolls are golden brown and spring back when lightly pressed on top.
- The internal temperature should reach 190–200°F (88–93°C) if using a thermometer.
+ Show details− Hide details
Ready when: Rolls are deep golden brown; a gentle press yields a roll that springs back slowly; internal temperature is 190–200°F (88–93°C).
Tip: If the tops are browning too quickly but the centers still feel doughy, tent the pan loosely with foil and add 3–5 minutes to the baking time.
Cool briefly
- Remove the pan from the oven and place it on a wire rack or heat-proof surface.
- Let the rolls cool in the pan for 5 minutes so they set slightly and become easier to handle.
+ Show details− Hide details
Ready when: Rolls are still warm but have firmed enough to hold their shape when moved.
Tip: Don't cool too long or the glaze will not adhere as well; apply it while the rolls are still warm.
Make glaze
- While the rolls cool, make the glaze.
- In a small saucepan over low heat, melt 2 tablespoons (29 g) butter.
- Remove from heat and whisk in 1½ cups (180 g) powdered sugar, 3 tablespoons (45 ml) milk, and ½ teaspoon (2.5 ml) vanilla extract until smooth and pourable.
- The glaze should coat the back of a spoon but still drip slowly.
+ Show details− Hide details
Ready when: Glaze is smooth, lump-free, and pourable but clings to a spoon.
Tip: If the glaze is too thick, whisk in milk a teaspoon at a time. If too thin, add more powdered sugar a tablespoon at a time.
Glaze and serve
- Drizzle the warm glaze over the warm rolls, allowing it to pool slightly around them.
- You can serve the rolls directly in the pan or transfer them to a serving platter.
- Serve warm or at room temperature.
+ Show details− Hide details
Ready when: Rolls are glazed and ready to eat.
Tip: Warm rolls absorb the glaze beautifully. If rolls cool completely, the glaze sets on the surface rather than soaking in slightly.
Good to know
Tips
- Piloncillo is often sold in hard cones. Grate it with a microplane grater or box grater for even distribution, or chop it into small pieces and let it soften slightly at room temperature before crumbling.
- The anise flavor is subtle; if you prefer a more pronounced licorice taste, increase the anise seeds to 2 teaspoons, but no more or the rolls will taste medicinal.
- Dough temperature matters. If your kitchen is very cold, the dough may rise more slowly. Conversely, a warm kitchen will accelerate fermentation. Taste and texture are more reliable than clock time.
- These rolls are best eaten fresh or warmed. A brief reheat in a 300°F (150°C) oven restores their softness and helps the glaze adhere better if reheating.
Make ahead
Prepare the dough through the end of bulk fermentation up to 12 hours ahead. Shape the rolls, cover them tightly with plastic wrap, and refrigerate. In the morning, remove from the refrigerator, let them come to room temperature (about 1 hour), then proceed with the second rise and baking. Alternatively, bake the rolls fully, cool completely, wrap tightly, and refrigerate for up to 2 days. Reheat gently in a 300°F (150°C) oven for 8–10 minutes before glazing.
Storage & reheating
Store cooled rolls in an airtight container at room temperature for up to 2 days. Refrigerate in an airtight container for up to 4 days and reheat gently before serving. Freeze baked (but unglazed) rolls in a freezer-safe bag for up to 3 months; thaw at room temperature for 2–3 hours, then warm in a 300°F (150°C) oven for 10 minutes and glaze fresh. Unbaked rolls can be frozen after shaping for up to 1 month; thaw overnight in the refrigerator and proceed with the second rise.
Substitutions
- piloncillo, finely grated or crumbled → packed light brown sugar. Use the same weight. Brown sugar is less molasses-forward than piloncillo but will still provide sweetness and subtle spice flavor. The rolls will be slightly less complex.
- piloncillo, finely grated or crumbled → packed light brown sugar. Use the same weight. The filling will be sweeter and less caramel-like but still delicious.
- anise seeds → ¾ teaspoon fennel seeds or ½ teaspoon crushed star anise. Fennel has a slightly earthier licorice note; star anise is brighter. Both work well but adjust to taste if you prefer less anise flavor.
- whole milk, warmed to 110°F (43°C) → unsweetened almond or oat milk. Works equally well in the dough. Use the same volume. The rolls will be slightly lighter in flavor but still tender.
More breakfast bakes
See all →


Find more like this
- Meal
- Breakfast
- Diet
- VegetarianHalal
- Quick & Easy
- Make AheadFreezer Friendly
- Occasion
- Family Gatherings