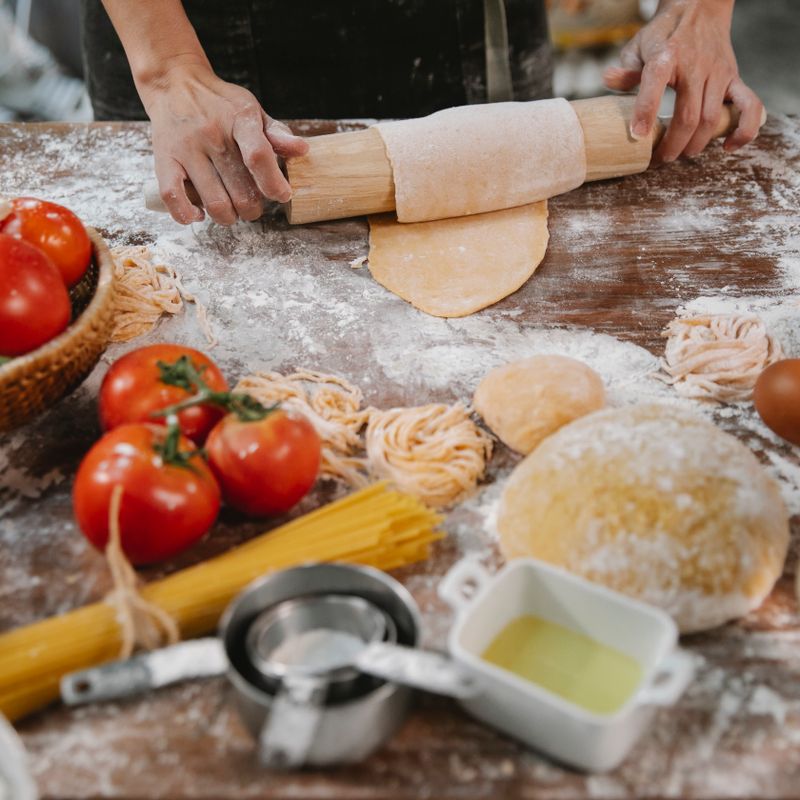
Homemade Hand-Rolled Egg Pasta Dough
A silky, golden Italian egg dough made with 00 flour, eggs, an extra yolk, a little olive oil and salt, rolled by hand with a rolling pin and cut into tender tagliatelle ribbons. No machine needed, just patience and a big work surface.
- Prep
- 1 hr 12 min
- Cook
- 18 min
- Wait
- 30 min
- Total
- 2 hr
- Makes
- About 1 lb (480 g) fresh pasta, 8 nests, serving 4 as a main course (2 nests each)
Steps
Before you start
- Clear a large, clean work surface of at least 24×24 inches (60×60 cm). Wood, marble or laminate all work.
- Set the eggs out 30 minutes ahead so they are at room temperature; cold eggs make a stiffer, harder-to-knead dough.
- Weigh the flour on a kitchen scale. Weight is the real measure; the cup amount only works if you spoon flour into the cup and level it, never scoop.
- Plan for about 2 hours start to finish: a 30-minute rest after kneading, and 30 to 40 minutes of rolling and cutting if this is your first time.
- Eggs are raw in the dough, so wash hands and surfaces after handling it.
Build the flour well
- Pour the 300 g (about 2½ cups) 00 flour onto your work surface and mix in the ½ tsp fine sea salt with your fingers.
- Shape the flour into a mound, then press a wide well in the center, about 5 inches (12 cm) across, with walls at least 1½ inches (4 cm) tall so the eggs cannot escape.
+ Show details− Hide details
Ready when: The well has thick, even walls and a visible floor of bare work surface.
Tip: Make the walls thick and sturdy. Thin spots are where the egg runs out.
Add eggs and oil
- Crack the 3 eggs into the well, add the egg yolk and the 1 tbsp olive oil.
- Using a fork, beat everything together for about 1 minute, staying in the center and breaking the yolks.
+ Show details− Hide details
Ready when: The egg mixture is uniformly yellow and slightly frothy, with no streaks of white.
Tip: The extra yolk makes the dough easier to knead and roll. Together the eggs and yolk should weigh about 168 g.
Draw in the flour
- Keep stirring with the fork in small circles, gradually pulling flour from the inner walls into the eggs.
- When the center becomes a thick, sticky paste and the walls start to slump, use a bench scraper to fold the remaining flour over the paste.
- Then press everything into a shaggy mass with your hands.
- If dry floury patches will not stick, sprinkle on 1 tbsp (15 ml) water, a teaspoon at a time, and press again.
+ Show details− Hide details
Ready when: The dough forms a rough, shaggy ball that holds together and picks up most of the loose flour.
Tip: Target feel: firm and stiff like modeling clay, not sticky. Add water only a teaspoon at a time; you may need up to 2 tbsp (30 ml) in total for dry flour or a dry climate.
Knead until smooth
- Scrape the work surface clean.
- Knead by pressing the dough forward with the heel of your hand, folding it back over itself, and giving it a quarter turn.
- Repeat for 8 to 10 minutes.
- The dough starts crumbly and stiff, then becomes smoother and more elastic.
- If it still cracks after 3 minutes, knead in another teaspoon of water.
+ Show details− Hide details
Ready when: The dough is smooth, satiny and firm, and a fingertip dent slowly springs back. A cut surface shows few or no air pockets.
Tip: If the dough sticks to your hands, dust with a pinch of flour. If it cracks and will not smooth out, wet your hands and keep kneading.
Rest the dough
- Shape the dough into a flattened disc, wrap it tightly in plastic wrap, and let it rest at room temperature for 30 minutes.
- This relaxes the gluten so the dough rolls out thin without springing back.
+ Show details− Hide details
Ready when: The dough is noticeably softer and more pliable when pressed.
Tip: Wrap tightly. Any exposed dough dries into a crust that will crack when rolled.
Divide the dough
- Weigh the dough (about 485 g) and cut it into 4 equal pieces of about 120 g each.
- Keep 3 pieces wrapped in plastic wrap.
- Lightly dust your work surface with a little of the 00 dusting flour and flatten the first piece into an oval with your palm.
+ Show details− Hide details
Tip: Unwrapped dough dries out within minutes, so keep the pieces you are not using covered.
Roll out the sheets
- Roll the oval with the pin from the center outward, rotating a quarter turn after every few passes so it stays round.
- As it grows, wrap the dough loosely around the pin, roll it forward while pressing outward with your palms to stretch it, then unroll, turn and repeat.
- Roll to about 1/16 inch (1–1.5 mm) thick, a round roughly 14 inches (35 cm) across.
- Allow 6 to 8 minutes per piece as a beginner.
- Lay each finished sheet flat on a clean towel, in the order rolled, and roll the remaining pieces the same way, keeping unrolled pieces wrapped.
+ Show details− Hide details
Ready when: The sheet is thin enough that you can see your hand or the work surface through it, and it is evenly yellow with no thick spots.
Tip: Dust with flour only if it sticks. Too much flour makes the dough dry and brittle. Sheets that dry while you work are fine: the first sheet will be ready to cut when you finish the fourth.
Cut the ribbons
- Start with the first sheet you rolled, which has been drying on the towel.
- Check it: it should feel leathery but still bend.
- Dust it lightly with semolina and fold it loosely into a flat roll, about 3 inches (8 cm) wide.
- With a sharp knife, cut crosswise into ¼-inch (6 mm) ribbons.
- Unroll the ribbons gently, toss with a pinch of semolina and set them on the towel-lined tray.
- Cut the other sheets one at a time in the order rolled, so the last sheet has dried for several minutes while you cut the others.
+ Show details− Hide details
Ready when: A sheet is ready when it feels like soft suede: dry to the touch but bendable without cracking.
Tip: If a sheet feels tacky and sticks when folded, wait 5 more minutes. If the edges crack, it has dried too much; cut it right away and cover the remaining sheets with a barely damp towel.
Nest the pasta
- Dust the towel-lined baking sheet with semolina.
- Gather a loose handful of ribbons (about 60 g) and twist it into a nest.
- Make 8 nests, spacing them apart so they do not touch.
- Serve 2 nests per person.
+ Show details− Hide details
Ready when: The nests hold their shape and nothing is sticking to the towel.
Tip: You can cook the nests right away or let them dry on the tray for up to 30 minutes.
Heat the water
- Only now, fill the large pot with 4 quarts (3.8 L) water, cover and bring to a rolling boil over high heat.
- This takes about 15 minutes, during which the nests rest on the tray.
+ Show details− Hide details
Ready when: The water is at a full, rolling boil.
Tip: Starting the water after the nests are formed keeps it from boiling away while you cut.
Boil and serve
- Add the 2 tbsp kosher salt to the boiling water; it should taste pleasantly salty like the sea.
- Lower in the nests, shaking each one gently so the strands separate, and stir once.
- Cook at a rolling boil for 2 to 3 minutes.
- Lift out with a spider or tongs, reserving ½ cup (120 ml) of the cooking water, and toss right away with your sauce.
+ Show details− Hide details
Ready when: The pasta floats and is tender with a slight chew in the center when you bite a strand (al dente).
Tip: Fresh pasta cooks much faster than dried. Start tasting at 2 minutes, because it goes from perfect to mushy quickly.
Good to know
Tips
- Egg size matters. Weigh the eggs and yolk after cracking them (without shell): you want about 165 to 170 g total to 300 g flour. If you have less, add water a teaspoon at a time; if more, knead in a spoonful of flour.
- Do not rush the rest. A 30-minute rest is the difference between dough that fights back and dough that rolls out easily.
- Roll thinner than seems right, since the pasta nearly doubles in thickness when cooked.
- Cook in plenty of well-salted boiling water so the strands stay separate and do not stick together.
Make ahead
Wrap the kneaded dough tightly in plastic and refrigerate for up to 24 hours; let it sit at room temperature for 30 minutes before rolling. Cut nests can also be dried on the tray for up to 30 minutes at room temperature, or frozen (see storage).
Storage & reheating
Uncooked nests: refrigerate in an airtight container, dusted with semolina, up to 2 days. Freeze: place nests on a tray until solid (about 1 hour), then transfer to a freezer bag for up to 2 months; cook straight from frozen, adding about 1 minute to the cooking time. Wrapped dough keeps 24 hours in the fridge. Cooked pasta is best eaten immediately; leftovers keep 2 days in the fridge and can be reheated in a skillet with a splash of water or sauce over medium-low heat.
Substitutions
- 00 flour → All-purpose flour. Works well, with a slightly chewier, less silky bite. You may need an extra teaspoon or two of water.
- semolina flour → Fine cornmeal or extra 00 flour. Semolina's coarse grain prevents sticking best, but fine cornmeal or flour works for dusting.
- extra-virgin olive oil → Leave it out. The dough works without oil. Oil only makes it a bit more supple and easier to roll.
- large egg yolk → 1 extra tbsp (15 ml) water. Gives a slightly paler, less rich dough, but the hydration stays about right.
More pasta & noodles
See all →

Find more like this
- Meal
- Dinner
- Cuisine
- Italian
- Method
- Stovetop
- Quick & Easy
- 5 Ingredients or LessMake Ahead