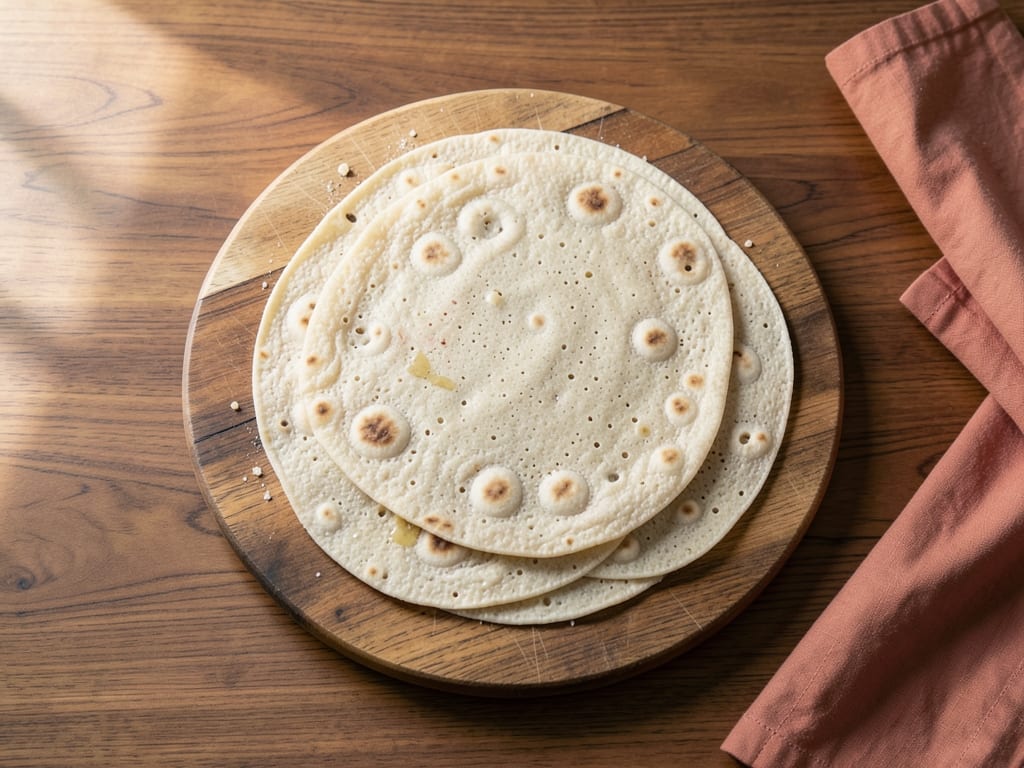
Traditional Teff Injera Batter (and How to Cook It)
A naturally fermented teff batter that gives soft, spongy, tangy Ethiopian injera covered in tiny "eyes." It takes patience, but only three ingredients and no flipping.
- Prep
- 25 min
- Cook
- 25 min
- Wait
- 2.1 days
- Total
- 2.1 days
- Makes
- About 6 injera, 10 inches (25 cm) each
Steps
Before you start
- Plan ahead: the batter ferments for 2 to 3 days at room temperature (68-78°F / 20-26°C). Start 3-4 days before you want to eat.
- Use a large glass or plastic bowl (at least 3 quarts / 3 L). Batter bubbles up and needs headroom. Avoid reactive metal bowls.
- Use 100% teff flour, ivory or brown. Brown gives a stronger, earthier, more sour flavor; ivory is milder.
- Have a nonstick skillet with a tight-fitting lid. Cast iron and carbon steel need seasoning and are harder for beginners.
Mix the batter
- In a large non-metal bowl, whisk the teff flour, 3 cups (710 ml) lukewarm water and the yeast (if using) for about 1 minute until no dry pockets remain.
- The batter should look like a thick pancake batter.
- Cover the bowl loosely with a clean towel, or set a lid on slightly ajar so gas can escape.
+ Show details− Hide details
Ready when: Smooth batter with no dry flour clumps
Tip: Don't seal the bowl airtight; fermentation gases need to escape.
Ferment 2 to 3 days
- Leave the bowl on the counter at 68-78°F (20-26°C), away from drafts.
- After 24 hours, give it a quick stir.
- Ferment for 48 to 72 hours total, until the surface is covered with small bubbles, the batter smells pleasantly sour like sourdough or yogurt, and a thin layer of grayish-brown liquid has risen to the top.
+ Show details− Hide details
Ready when: Bubbly surface, tangy sour aroma, and liquid on top. A sharp nail-polish smell means it has gone too far; a pink or fuzzy surface means discard.
Tip: In a cool kitchen allow the full 72 hours; in a warm one check at 48 hours.
Pour off liquid
- Tilt the bowl and carefully pour off or spoon out the dark liquid on top (about ¼ to ½ cup / 60-120 ml).
- Do not stir it back in.
- Then stir the settled batter gently until uniform.
- It should be thick but pourable, like pancake batter.
+ Show details− Hide details
Ready when: Batter is uniform and thick, with no dark liquid on top
Tip: If the liquid is hard to pour off, soak it up with a clean spoon.
Cook the absit
- Scoop ¼ cup (60 ml) of the fermented batter into a small saucepan with ½ cup (120 ml) cold water and whisk until smooth.
- Cook over medium heat, whisking constantly, for about 3 minutes until it thickens into a translucent, gel-like paste that bubbles at the edges.
- Remove from heat and let it cool for 15 minutes until just warm, not hot.
+ Show details− Hide details
Ready when: Thick, glossy, gel-like paste that coats the whisk
Tip: Whisk without pause or lumps will form on the bottom of the pan.
Combine and rest
- Scrape the cooled absit into the main bowl and whisk for 1 minute until fully mixed.
- Cover loosely and let the batter rest for 60 to 90 minutes at room temperature, until it is visibly bubbly and has risen slightly.
+ Show details− Hide details
Ready when: Lots of small bubbles on the surface and a slightly puffed look
Tip: Adding absit gives injera a softer, more pliable texture, so don't skip it.
Season and thin
- Whisk the salt and ¼ cup (60 ml) room-temperature water into the batter.
- Aim for the consistency of thin crepe batter: it should fall from a ladle in a thin, steady ribbon.
- If it still looks thick, whisk in water 1 tablespoon (15 ml) at a time, up to 2 tablespoons more.
+ Show details− Hide details
Ready when: Batter pours in a thin ribbon and settles smooth in a few seconds
Tip: Add salt only now. Salt early in fermentation slows it down.
Heat the pan
- Set a 10-inch (25 cm) nonstick skillet over medium heat for about 3 minutes.
- Flick a few drops of water onto the surface; they should sizzle and evaporate within a couple of seconds.
- Don't add oil.
+ Show details− Hide details
Ready when: Water drops sizzle and vanish within 2 seconds
Tip: If the pan is too hot the batter sets before spreading and won't form holes; lower the heat slightly.
Pour the batter
- Stir the batter, then ladle about ¾ cup (180 ml) into the pan.
- Start at the outer edge and pour in a quick spiral toward the center, then lift and swirl the pan so the batter coats the entire base in a thin, even layer.
+ Show details− Hide details
Ready when: Batter covers the whole base, with small bubbles starting to appear within seconds
Tip: Stir the batter before every ladle, as the teff settles quickly.
Steam, don't flip
- Cover the pan with the lid right away and cook for 2 to 3 minutes.
- Injera is cooked on one side only.
- It is done when the surface is covered in small holes, looks dry and matte rather than wet, and the edges curl up slightly from the pan.
- Slide it out with a spatula.
+ Show details− Hide details
Ready when: Top is dry and set with lots of holes; edges lift and curl; underside is pale, not browned
Tip: If the top stays wet after 3 minutes, cover and cook 30 seconds longer. Don't let the underside brown, or it will turn crisp.
Cook the rest
- Repeat with the remaining batter, stirring each time and wiping the pan with a dry paper towel if bits stick.
- You should get about 6 injera.
- Lower the heat a notch if they start to brown.
+ Show details− Hide details
Ready when: Each injera is pale, spongy and full of holes
Tip: The first injera is often a test; adjust heat and batter thickness from it.
Cool in a single layer
- Lay each injera holes-up in a single layer on a clean towel or wire rack.
- Let them cool completely, about 15 minutes, before stacking or folding.
- Serve with stews (wat), salads or vegetables, or tear pieces to scoop up food.
+ Show details− Hide details
Ready when: Surface feels dry and no longer sticky to the touch
Tip: Stacking warm injera makes them gummy and they fuse together.
Good to know
Tips
- Batter consistency is everything: too thick and the injera is dense with few holes; too thin and it tears. It should pour like thin cream.
- Fermentation time controls sourness. 48 hours is mild; 72 hours is tangy. In a warm kitchen, check earlier.
- Use a lid. Steam cooks the top surface so you never need to flip, and it creates the soft, spongy texture.
- Smell is a good guide: sour and yeasty is good. Pink, orange or fuzzy growth means discard the batch and start again.
Make ahead
The fermented batter (after the combine-and-rest step, before salting) can be refrigerated for up to 3 days. Bring to room temperature, stir, then season, thin and cook. Cooked injera can be made a day ahead.
Storage & reheating
Room temperature: stack cooled injera with parchment between layers in an airtight container for up to 1 day. Fridge: up to 5 days in an airtight bag. Freezer: up to 2 months, interleaved with parchment. Thaw at room temperature for 30 minutes; to refresh, wrap in a damp towel and warm in a covered skillet over low heat for 1 minute or in the microwave for 15-20 seconds.
Substitutions
- teff flour → 50% teff flour and 50% fine whole wheat or sorghum flour. Common in restaurants; gives a milder, more flexible injera, though it's not 100% teff or gluten-free (wheat) and flavor is less distinctive.
- active dry yeast → 1 tablespoon (15 ml) of batter from a previous injera batch (ersho). Traditional starter; stir into the initial mix to speed fermentation and give consistent sourness.
- water → Sparkling mineral water. Some cooks use it for extra bubbles. Chlorinated tap water can slow fermentation, so use filtered water if yours is heavily treated.
- fine sea salt → Kosher salt, ¾ teaspoon (4 g). Coarser grains are less dense by volume so use slightly more.