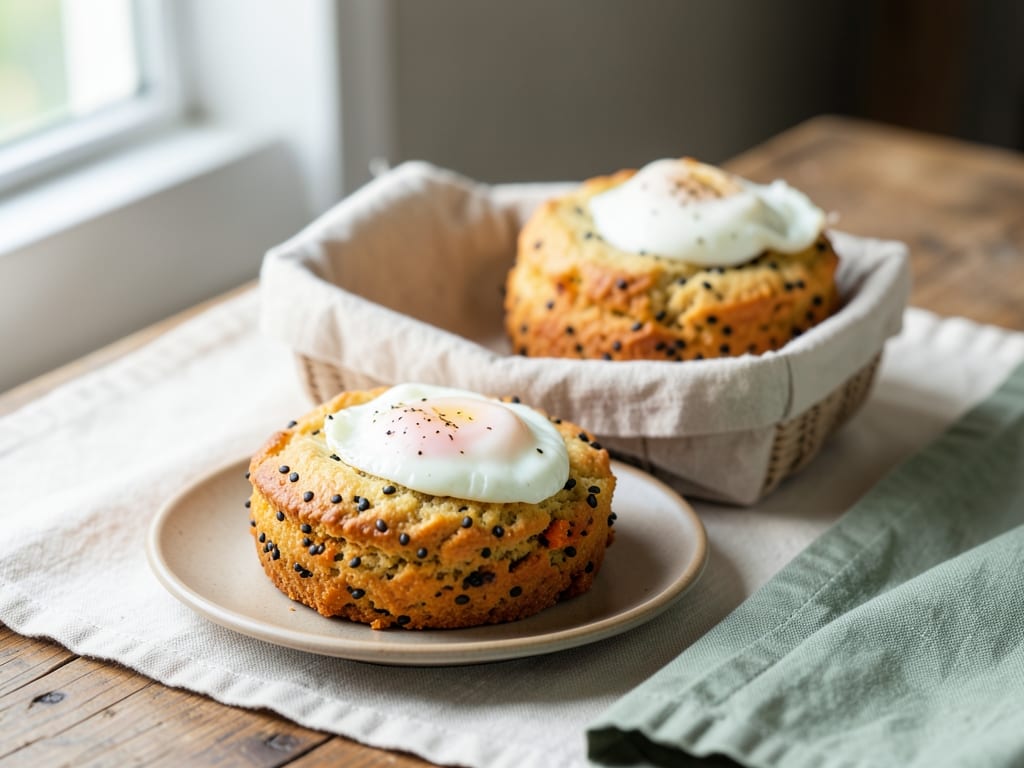
Sweet Potato and Black Sesame Scones
Tender, flaky scones infused with roasted sweet potato puree and studded with nutty black sesame seeds. This Asian-American fusion combines British pastry technique with bold Asian flavors, delivering a sophisticated scone that's perfect for breakfast, brunch, or afternoon tea. The black sesame seeds add subtle earthiness that complements the natural sweetness of the sweet potato.
Steps
Before you start
- Preheat your oven to 400°F (205°C) about 10 minutes before you'll start baking
- Chill your mixing bowl and butter in the freezer for at least 15 minutes—cold butter is essential for flaky scones
- Have all ingredients measured and ready (mise en place)
- Make sure your sweet potato puree is at room temperature to fold in smoothly
Preheat ovenOven 400°F / 205°C
- Preheat your oven to 400°F (205°C) and line a 9×13-inch baking sheet with parchment paper.
- The oven will be ready by the time you finish mixing.
+ Show details− Hide details
Tip: Start preheating while you gather your ingredients to save time
Mix dry ingredients
- In your chilled large mixing bowl, whisk together the all-purpose flour (2 cups/250g), granulated sugar (1/4 cup/50g), baking powder (2 tsp/10g), and salt (1/2 tsp/3g).
- Whisk for about 30 seconds to ensure the baking powder is evenly distributed throughout and there are no lumps.
+ Show details− Hide details
Ready when: Dry ingredients are evenly combined with no lumps visible
Tip: Keep your mixing bowl chilled in the freezer so it's cold when you use it—this helps keep the butter cold
Cut in cold butter
- Add the cold butter cubes (6 tbsp/85g) to the flour mixture.
- Using a pastry cutter, a fork, or your fingertips, work the butter into the flour with light, quick motions.
- Rub the butter between your fingertips until the mixture resembles coarse breadcrumbs with some pea-sized pieces of butter still visible throughout.
- This should take about 2–3 minutes.
- It's fine if some butter pieces are still visible—these create steam pockets for flaky scones.
+ Show details− Hide details
Ready when: Mixture resembles coarse breadcrumbs with pea-sized butter pieces still visible
Tip: Cold butter is essential for light, flaky scones; warm butter melts into the flour and creates dense, heavy results
Fold in sesame seeds
- Gently fold the black sesame seeds (1/4 cup/40g) into the flour-butter mixture using a rubber spatula or wooden spoon.
- Make 4–5 gentle folding motions, scraping from the bottom of the bowl and folding over the top, until the seeds are evenly distributed.
- The black sesame seeds should be visible throughout but not crushed.
+ Show details− Hide details
Ready when: Black sesame seeds are evenly distributed with no visible clumps
Combine sweet potato and milk
- In a small bowl, whisk together the sweet potato puree (1/2 cup/120g) and whole milk (1/4 cup/60ml) until smooth and combined with no lumps of sweet potato remaining.
- If your puree was cold from the refrigerator, let it sit for a few minutes to reach room temperature, which makes it easier to incorporate into the dough.
+ Show details− Hide details
Ready when: Mixture is smooth and uniform with no visible lumps or streaks
Fold in sweet potato mixture
- Pour the sweet potato and milk mixture over the flour mixture in the large bowl.
- Using a rubber spatula or wooden spoon, gently fold the two together, scraping from the bottom and folding over the top.
- Make about 10–12 strokes total until just combined.
- The dough should look shaggy and slightly sticky with some flour barely still visible.
- Stop folding as soon as no dry flour remains.
- Do not overmix—overworking the dough develops gluten, which makes scones tough and dense instead of tender and flaky.
+ Show details− Hide details
Ready when: Dough is shaggy and just combined with minimal flour streaks visible
Tip: Overmixing is the most common mistake that ruins scones—stop as soon as the dough comes together, even if it looks slightly rough
Shape into wedges
- Turn the dough out onto a lightly floured work surface.
- Gently pat it with floured hands into a circle about 3/4 inch thick and roughly 6 inches in diameter, being careful not to compress it too much.
- Using a sharp knife, cut the circle into 8 equal wedges, like slicing a pizza.
- Place the wedges about 2 inches apart on the prepared baking sheet.
+ Show details− Hide details
Ready when: 8 evenly sized wedges, about 3/4 inch thick, spaced 2 inches apart on the baking sheet
Tip: Use a light hand when shaping—gentle handling keeps the dough tender and flaky
Apply egg wash
- In a small cup or bowl, whisk together the large egg and water (1 tbsp/15ml) until the egg is broken up and well combined.
- Using a pastry brush, feather, or the back of a spoon, brush the egg wash evenly over the top and sides of each scone.
- Avoid dripping it onto the baking sheet, as it can cause sticking.
+ Show details− Hide details
Ready when: All scones are evenly coated with a thin, glossy layer of egg wash
Bake until goldenOven 400°F / 205°C
- Place the baking sheet in the preheated 400°F (205°C) oven.
- Bake for 15–18 minutes, until the tops are deep golden brown and the sides feel firm when gently squeezed.
- At 15 minutes, check the color—if still pale golden, continue baking for 1–2 minutes more.
- The scones should look dry on the outside, not shiny.
- An instant-read thermometer inserted into the center should read about 200–205°F (93–96°C), though visual cues are more reliable than temperature.
+ Show details− Hide details
Ready when: Tops are deep golden brown, sides are firm, and scones look dry
Tip: Don't open the oven door before 15 minutes; a sudden temperature drop can cause the scones to collapse
Cool before serving
- Carefully transfer the scones from the baking sheet to a wire cooling rack using a small spatula.
- Let them cool for 5–10 minutes.
- Warm scones are delicious and will be easier to handle after a few minutes of cooling.
- They can also be served at room temperature if desired.
+ Show details− Hide details
Tip: Scones are best enjoyed fresh and warm, ideally within a few hours of baking, served with clotted cream, jam, or butter and honey
Good to know
Tips
- Keep all ingredients and equipment as cold as possible—chill your mixing bowl and butter in the freezer for at least 15 minutes before starting. Cold butter creates the steam pockets that make scones light and flaky.
- Don't overmix the dough. Minimal handling is the secret to tender scones. Stop folding as soon as you don't see dry flour; it's okay if the dough looks slightly rough and shaggy.
- Black sesame seeds have a subtle, earthy, nutty flavor that's less aggressive than you might expect, making them perfect for pairing with sweet potato. Their color creates a beautiful visual contrast.
- Serve warm with clotted cream (or whipped cream) and jam, or with softened butter and a drizzle of honey. These scones are equally delicious at breakfast, brunch, or as an afternoon tea pastry.
Make ahead
Scones can be shaped, wrapped tightly in plastic wrap, and frozen for up to 3 months. Bake from frozen, adding 2–3 minutes to the baking time. Baked scones can be frozen in an airtight container for up to 3 months.
Storage & reheating
Room temperature: Store in an airtight container for 1–2 days. Refrigerator: Store in an airtight container for up to 5 days. Freezer: Baked scones freeze for up to 3 months; unbaked dough for up to 2 months. To reheat: Wrap loosely in foil and warm in a 350°F (175°C) oven for 8–10 minutes until heated through.
Substitutions
- black sesame seeds → white sesame seeds. Milder, more delicate nutty flavor that doesn't overshadow the sweet potato; use the same amount
- roasted sweet potato puree → canned pumpkin puree. Creates a warm, spiced flavor; substitute 1:1, though pumpkin may be slightly thinner so reduce milk to 3 tbsp
- all-purpose flour → whole wheat flour or spelt flour. Adds nuttiness and density; may need an extra 1–2 tbsp milk to achieve the right dough texture
- whole milk or heavy cream → buttermilk or Greek yogurt mixed with milk. Buttermilk creates tangier, more tender scones; use equal amounts. For Greek yogurt, use 2 tbsp yogurt plus 2 tbsp milk
More scones & biscuits
See all →



Find more like this
- Meal
- Breakfast
- Cuisine
- Japanese
- Main ingredient
- Sweet Potatoes
- Diet
- VegetarianHalal
- Quick & Easy
- Easy