Sourdough Discard Chicken Pot Pie with Flaky Double Crust
A creamy chicken and vegetable filling sealed under a buttery, subtly tangy double crust made with unfed sourdough discard. The discard adds flavor and tenderness, so the crust bakes up flaky and deeply golden without any rise time.
- Prep
- 59 min
- Cook
- 1 hr 19 min
- Wait
- 1 hr 20 min
- Total
- 3 hr 38 min
- Makes
- 1 deep-dish 9-inch pie (6 generous slices)
Steps
Before you start
- Take your sourdough discard straight from the fridge. Cold, unfed discard (up to a week or two old) works best, because it keeps the butter solid in the dough.
- Cube the butter for the crust and return it to the fridge or freezer for 10 minutes. Keep it cold until it goes into the flour.
- Plan about 3½ hours from start to finish. The dough chills for 60 minutes while you make the filling, and the baked pie rests for 20 minutes before slicing.
- The filling must be lukewarm (no longer steaming) before it goes into the crust. Hot filling melts the butter in the dough and gives you a soggy bottom.
- Use a deep-dish pie plate, at least 1½ inches deep. A standard shallow plate will overflow.
Mix the dough
- In a large bowl, whisk 2½ cups (312 g) flour with the fine sea salt.
- Add the cold butter cubes and toss to coat.
- Using a pastry cutter, fork, or your fingertips, press and cut the butter into the flour until most pieces are the size of peas and a few are almond-size.
- Add the cold sourdough discard and 4 tbsp (60 ml) ice water.
- Stir with a fork until shaggy clumps form.
- Squeeze a handful: it should hold together without crumbling.
- If it's dry, add ice water 1 tbsp at a time, up to 2 tbsp more.
+ Show details− Hide details
Ready when: Dough clumps hold together when squeezed, with visible streaks and pieces of butter.
Tip: Don't knead. Visible butter pieces are what make the crust flaky.
Divide and chill dough
- Turn the dough onto a lightly floured surface and gather it into a ball.
- Divide it into two pieces, one slightly larger (about 55%) for the bottom crust and one smaller for the top.
- Flatten each into a 1-inch-thick disk, wrap tightly in plastic, and refrigerate for at least 60 minutes.
- Make the filling while it chills.
+ Show details− Hide details
Ready when: Disks feel firm and cold all the way through.
Tip: Dough can be chilled up to 2 days ahead.
Prep the filling ingredients
- Cut the chicken thighs into ¾-inch pieces and pat dry with paper towels.
- Toss with ½ tsp of the kosher salt and half of the black pepper.
- Dice the onion, carrots, and celery into ½-inch pieces so they cook at the same rate, and mince the garlic.
- Measure the flour, broth, milk, and thyme and set everything within reach of the stove.
+ Show details− Hide details
Ready when: Vegetables are in uniform ½-inch pieces and the chicken surface is dry.
Tip: Dry chicken browns instead of steaming.
Brown the chicken
- Heat the olive oil in a 12-inch deep skillet or Dutch oven over medium-high heat until it shimmers.
- Add the chicken in a single layer and cook without stirring for 3 minutes, until the underside is golden.
- Stir and cook 2 to 3 minutes more, until browned on most sides but not yet cooked through.
- Transfer to a plate with a slotted spoon, leaving the drippings in the pan.
+ Show details− Hide details
Ready when: Chicken is golden on the outside; the center will still be pink.
Tip: Work in two batches if the pieces crowd the pan.
Soften the vegetables
- Reduce the heat to medium and add the filling butter to the drippings.
- When it foams, add the onion, carrots, and celery with a pinch of salt.
- Cook, stirring every minute or so, for 7 minutes until the onion is translucent and the carrots are just starting to soften.
- Add the garlic and thyme and stir for 30 seconds until fragrant.
+ Show details− Hide details
Ready when: Onion is translucent, carrots are slightly softened, and the garlic smells fragrant but hasn't browned.
Tip: Scrape up the browned bits as the vegetables release moisture; they add flavor.
Build the sauce
- Sprinkle the ⅓ cup (42 g) flour over the vegetables and stir constantly for 1 minute to cook out the raw flour taste.
- Slowly pour in the broth while whisking or stirring, scraping up any bits from the bottom.
- Add the milk in a steady stream.
- Raise the heat slightly to bring it to a gentle simmer and cook 4 to 5 minutes, stirring often, until thick enough to coat the back of a spoon and a finger drawn through it leaves a clear line.
+ Show details− Hide details
Ready when: Sauce is thick and glossy and coats the back of a spoon.
Tip: Add the liquid gradually, whisking constantly, to avoid flour lumps.
Finish the filling
- Return the chicken and any juices on the plate to the pan.
- Reduce the heat to medium-low and simmer gently for 5 minutes, stirring occasionally, until the chicken is cooked through.
- Stir in the frozen peas and the remaining salt and pepper.
- Taste and add more salt if needed.
- Fold in the parsley, if using.
+ Show details− Hide details
Ready when: Largest chicken pieces read 165°F (74°C) on an instant-read thermometer, and the sauce is thick, not runny.
Tip: The sauce thickens further as it cools, so stop when it is slightly looser than you want the final pie.
Cool the filling
- Scrape the filling into a wide, shallow dish or baking pan and spread it out.
- Let it cool, stirring once or twice, until lukewarm and no longer steaming.
- This should happen while the dough finishes chilling, and the filling should be about 100°F (38°C) or cooler.
+ Show details− Hide details
Ready when: Filling is thick and lukewarm, with no steam rising.
Tip: A warm filling melts the butter in the crust and makes a soggy bottom. For faster cooling, set the dish in the fridge for 10 minutes.
Preheat and roll bottom crustOven 400°F / 205°C
- Place a rack in the lower third of the oven and set a rimmed baking sheet on it.
- Preheat to 400°F (200°C).
- Remove the larger dough disk from the fridge and let it sit 5 minutes if it is rock-hard.
- On a lightly floured surface (using some of the 2 tbsp dusting flour), roll it into a round about 13 inches (33 cm) across and ⅛ inch (3 mm) thick, rotating a quarter turn after every few passes.
- Drape it over the rolling pin and ease it into the pie plate, pressing it into the corners without stretching.
- Leave the overhang in place and refrigerate the plate while you roll the top.
+ Show details− Hide details
Ready when: Dough is an even ⅛ inch thick, with no tears, and sits snugly in the plate.
Tip: If the dough cracks, patch it with a scrap pressed on with a drop of cold water. If it turns soft or sticky, slide it onto a sheet pan and chill 10 minutes.
Fill, top, and seal
- Roll the second disk into an 11-inch (28 cm) round, about ⅛ inch thick.
- Pour the cooled filling into the chilled crust and mound it slightly in the center.
- Lay the top crust over the filling.
- Trim both crusts to a ¾-inch overhang, tuck the edge under itself so it sits on the rim of the plate, and crimp with your fingers or a fork to seal.
- Whisk the egg with 1 tbsp water and brush it over the top.
- Cut 4 slits, each about 1½ inches long, in the center to let steam escape.
+ Show details− Hide details
Ready when: Edges are fully sealed, the top is evenly glossy with egg wash, and the vents are open.
Tip: If the top feels soft or warm after assembly, chill the whole pie for 10 minutes before baking to help the crust hold its shape.
Bake the pieOven 400°F / 205°C
- Set the pie on the preheated baking sheet in the oven (the hot sheet helps brown the bottom crust and catches any drips).
- Bake at 400°F (200°C) for 50 minutes.
- After 30 minutes, check the edges, and if they are browning faster than the center, cover the rim loosely with foil strips or a pie shield.
- Bake until the top is a deep golden brown and thick bubbling filling is visible through the vents.
+ Show details− Hide details
Ready when: Crust is deep golden brown and the filling is bubbling through the vents.
Tip: If the filling isn't bubbling at 50 minutes, bake 5 to 10 minutes longer, shielding the crust if needed.
Rest before slicing
- Transfer the pie to a wire rack and let it rest for 20 minutes.
- The filling will thicken as it cools slightly so it holds together when sliced.
- Cut into 6 wedges with a sharp knife and serve warm.
+ Show details− Hide details
Ready when: Bubbling has stopped, and the filling is thick and still hot.
Tip: Cutting too soon causes the filling to run out and the bottom crust to turn soggy.
Good to know
Tips
- Use unfed, cold discard. Active, bubbly starter adds more moisture and makes the dough sticky, so you may need to add a little more flour to roll it.
- Keep everything cold. If the dough softens or butter starts to smear while rolling, slide it onto a sheet pan and chill 10 to 15 minutes.
- Don't skip cooling the filling. Lukewarm filling is the best defense against a soggy bottom crust.
- Place the pie on a preheated baking sheet on the lower rack for a crisp bottom crust and to catch drips.
Make ahead
"The dough can be made up to 2 days ahead and kept wrapped in the fridge, or frozen for up to 2 months (thaw overnight in the fridge). The filling can be cooked up to 2 days ahead, cooled completely, and refrigerated in an airtight container. Fill the crust with chilled filling and add 5 to 10 minutes to the bake time. Use a thermometer to confirm the center reaches 165°F (74°C)."
Storage & reheating
"Room temperature: up to 2 hours after baking. Fridge: cover and refrigerate leftovers for up to 4 days. Freezer: freeze individual slices wrapped tightly for up to 3 months, or freeze the unbaked assembled pie (without egg wash) for up to 2 months. Reheat slices on a baking sheet at 350°F (175°C) for 15 to 20 minutes (30 to 35 minutes from frozen) until hot in the center, covering the top with foil if it darkens too quickly. Avoid the microwave, which makes the crust soft."
Substitutions
- boneless, skinless chicken thighs → 2½ to 3 cups (about 350 to 400 g) shredded cooked chicken or rotisserie chicken. Skip the browning step. Sauté the vegetables, make the sauce, then stir in the cooked chicken and peas and warm for 3 minutes.
- whole milk → Half-and-half or heavy cream. This makes a richer sauce. Use the same amount.
- frozen peas → Frozen mixed vegetables, corn, or green beans. Use the same weight of vegetables and add them frozen at the end for the same texture.
- unsalted butter → Cold vegetable shortening for up to half of the butter. Shortening makes a slightly more tender crust but less buttery flavor.
More casseroles
See all →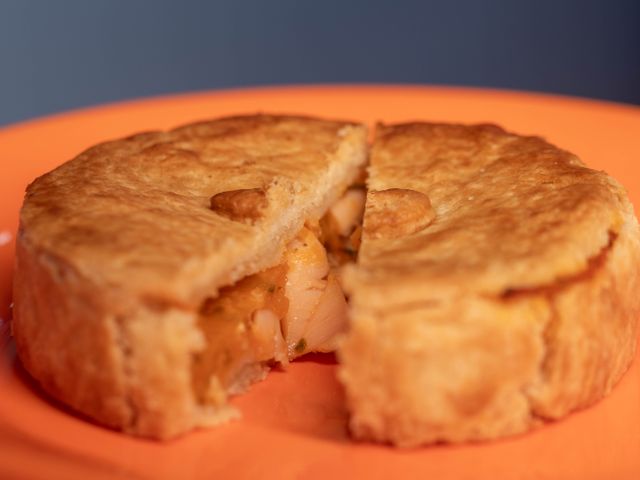
Find more like this
- Meal
- Dinner
- Cuisine
- American
- Main ingredient
- Chicken Thighs
- Diet
- HalalSugar-Free