
Sicilian Arancini (Rice Fritters)
Golden, crispy exterior giving way to creamy risotto studded with ragù, peas, and stretchy mozzarella at the center. These iconic Sicilian rice fritters are made by shaping cooled risotto around a filling, breading, and deep-frying until they're irresistibly savory and satisfying. Serve hot as an appetizer or snack.
- Prep
- 45 min
- Cook
- 30 min
- Wait
- 2 hr
- Total
- 3 hr 15 min
- Makes
- 12 fritters (4–6 servings)
Steps
Before you start
- Make or have ragù ready (fresh, store-bought, or prepare ahead)
- Chill risotto completely—at least 2 hours or overnight—so it's firm enough to shape
- Have all breading components assembled and ready
- Use a deep-fry thermometer to maintain accurate oil temperature
Make the risotto
- Heat 2 tablespoons olive oil in a large heavy pot over medium heat.
- Add diced onion and sauté for 2–3 minutes until softened and lightly golden.
- Add the arborio rice and stir constantly for 1 minute to lightly toast it, listening for a gentle clicking sound.
- Pour in the white wine and stir until nearly absorbed, about 1 minute.
- Begin adding warm stock one ladle at a time (about ½ cup per ladle), stirring frequently.
- As each addition is absorbed (about 2–3 minutes), add the next ladle.
- Continue this process for 16–18 minutes total, until the rice is creamy and tender with a slight firmness in the center of each grain.
- In the final minute, stir in the thawed peas, then add the cold butter and grated Parmigiano-Reggiano, stirring vigorously until the mixture is creamy.
- Season with salt and pepper to taste.
- The risotto should flow slightly on the plate but not be soupy.
+ Show details− Hide details
Ready when: Rice is creamy and tender, with a slight bite remaining in the center of each grain; risotto flows slightly on the plate
Tip: Don't rush by adding stock all at once. Frequent stirring releases starch and creates creaminess without cream.
Cool and chill the risotto
- Spread the hot risotto onto a large baking sheet in an even, shallow layer (about ½ inch thick).
- Let it cool to room temperature for about 30 minutes, then cover and refrigerate for at least 2 hours or overnight until completely cold and firm.
- Cold risotto is much easier to shape and will hold together well when fried.
+ Show details− Hide details
Ready when: Risotto is completely cold and holds its shape when a spoon is pressed into it
Tip: Don't skip or rush the chilling—warm risotto will fall apart when shaped. Overnight chilling is ideal.
Set up the breading station
- Place beaten eggs in the first shallow bowl, panko breadcrumbs in the second, and prepare a large plate or baking sheet lined with parchment paper for the breaded arancini.
- Have the mozzarella cubes and cooled ragù within reach.
+ Show details− Hide details
Tip: Keep everything organized—you'll move quickly once you start shaping.
Shape the arancini
- Working with one portion at a time, wet your hands lightly with cool water to prevent sticking.
- Scoop about 3 tablespoons (45 g) of cold risotto into the palm of your hand and flatten it into a small disk.
- Place about ½ teaspoon ragù and one cube of mozzarella in the center.
- Fold the risotto edges over the filling, then gently roll between your palms to form a ball about the size of a small orange (roughly 2 inches / 5 cm diameter).
- Place the shaped ball on the lined plate.
- Repeat with remaining risotto, ragù, and mozzarella.
- You should have 12 arancini.
- Work quickly so the risotto doesn't warm up too much.
+ Show details− Hide details
Ready when: All 12 risotto balls are shaped and firm
Tip: If risotto becomes too soft while shaping, return it to the refrigerator for 15 minutes. Slightly wet hands help prevent sticking without adding too much moisture.
Bread the arancini
- Working one at a time, drop an arancino into the beaten egg, rolling it to coat completely.
- Lift it out with a slotted spoon or your fingers, let excess egg drip off, then roll it in the breadcrumb mixture, pressing gently so the crumbs adhere.
- Place the breaded arancino on the lined plate.
- Repeat with all 12.
- Let the breaded arancini sit at room temperature for 10–15 minutes so the coating sets, making it less likely to crack during frying.
+ Show details− Hide details
Ready when: All arancini are evenly coated with breadcrumbs; coating feels dry to the touch
Tip: If you have time, refrigerate the breaded arancini for up to 4 hours before frying. A cold, set coating fries more evenly.
Heat the oil and fryOven 350°F / 175°C
- Pour oil into a large heavy-bottomed pot until it reaches a depth of 3 inches (7.5 cm).
- Heat over medium-high heat to 350°F (175°C), checking with a deep-fry thermometer.
- Once the oil reaches temperature, carefully place 3–4 arancini into the hot oil using a slotted spoon, working in batches to avoid crowding.
- Fry for 3–4 minutes, rotating gently halfway through with a frying spider or slotted spoon, until the coating is deep golden brown on all sides.
- Use a slotted spoon to transfer the fried arancini to a paper-towel-lined plate to drain excess oil.
- Return the oil to 350°F between batches before frying the next batch.
- Do not overcrowd the pot; arancini need space to fry evenly.
+ Show details− Hide details
Ready when: Coating is deep golden brown; arancino feels firm when gently pressed and sounds crispy when tapped
Tip: Keep oil at 350°F. Too cool and the coating absorbs oil and becomes greasy; too hot and it browns before the inside heats through. The mozzarella inside should be warm and slightly melted but not bursting out.
Rest and serve
- Let the fried arancini rest for 5 minutes on the paper towels before serving.
- This allows the exterior to firm up and the interior to set slightly.
- Serve warm, preferably within 30 minutes of frying, with marinara sauce or additional ragù for dipping.
+ Show details− Hide details
Tip: Arancini are best eaten fresh and hot. If they cool and you want to reheat them, place them on a baking sheet and warm in a 350°F (175°C) oven for 8–10 minutes to restore crispness without over-crisping the coating.
Good to know
Tips
- Use a deep-fry thermometer—not guessing by sight or sound. Oil temperature is critical: 350°F yields a crispy, golden exterior and warm, slightly melted mozzarella inside. Too cool and the filling leaks; too hot and the coating burns before the risotto heats.
- Cold risotto is non-negotiable. Warm risotto is too soft to shape cleanly and will fall apart during frying. Refrigerate for at least 2 hours, or prepare the risotto the day before.
- Shape arancini at least 15 minutes before breading them, and let the breaded arancini set for at least 10–15 minutes at room temperature (or refrigerate for up to 4 hours) before frying. Each resting step ensures the coating adheres and doesn't crack open when oil makes contact.
- Fry in batches without crowding. Arancini need room to rotate and brown evenly. Overcrowded oil drops in temperature, resulting in greasy, soggy centers and pale coating.
Make ahead
The risotto base and ragù can be made up to 2 days ahead and refrigerated separately. The breaded arancini can be refrigerated for up to 4 hours before frying. Do not freeze after breading, as the crust may absorb excess moisture; however, unbreaded shaped arancini can be frozen for up to 3 months, then thawed overnight in the fridge and breaded fresh before frying.
Storage & reheating
Store cooled leftover arancini in an airtight container in the refrigerator for up to 3 days. Reheat in a 350°F (175°C) oven for 8–10 minutes until warmed through and the exterior is crispy again. Do not microwave, as this will make the coating soft and soggy. Unbreaded, unfired shaped arancini keep frozen for up to 3 months; thaw overnight in the fridge before breading and frying.
Substitutions
- ragù (meat sauce) → Béchamel sauce mixed with peas, or simple ragù made from ground beef, tomato, and onion cooked for 20 minutes. The filling should be flavorful but thick enough not to leak during frying. Avoid very liquid sauces.
- fresh mozzarella or fior di latte → Caciocavallo or other mild semi-hard cheese cut into cubes, or ragù alone without a cheese insert. Fresh mozzarella is traditional, but semi-hard cheese melts less during frying and won't ooze out.
- panko breadcrumbs or fine dry breadcrumbs → Fine dry breadcrumbs or even panko mixed with grated Parmigiano-Reggiano (¾ cup breadcrumbs + ¼ cup cheese). Panko gives a crispier texture; fine breadcrumbs create a more delicate crust. Cheese-breadcrumb mixture adds savory depth.
- vegetable oil or peanut oil for deep frying → Extra virgin olive oil or a blend of olive and vegetable oil. Avoid oils with low smoke points. Olive oil lends authentic flavor; use neutral oil if you prefer a less pronounced flavor.
More stuffed bites
See all →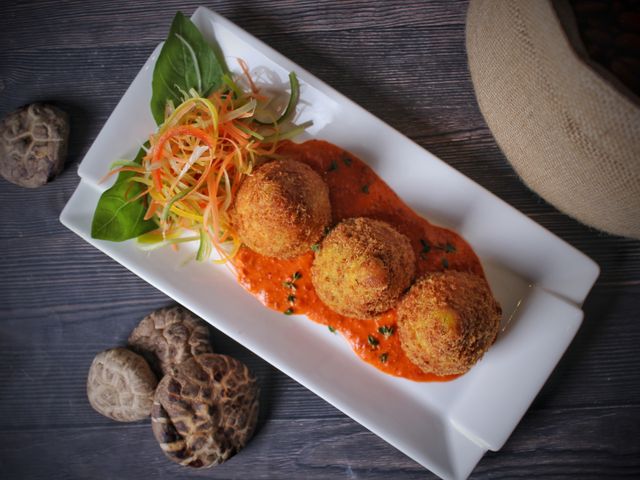


Find more like this
- Meal
- Snack
- Cuisine
- Sicilian
- Diet
- Sugar-Free
- Method
- Stovetop
- Quick & Easy
- Make AheadFreezer Friendly