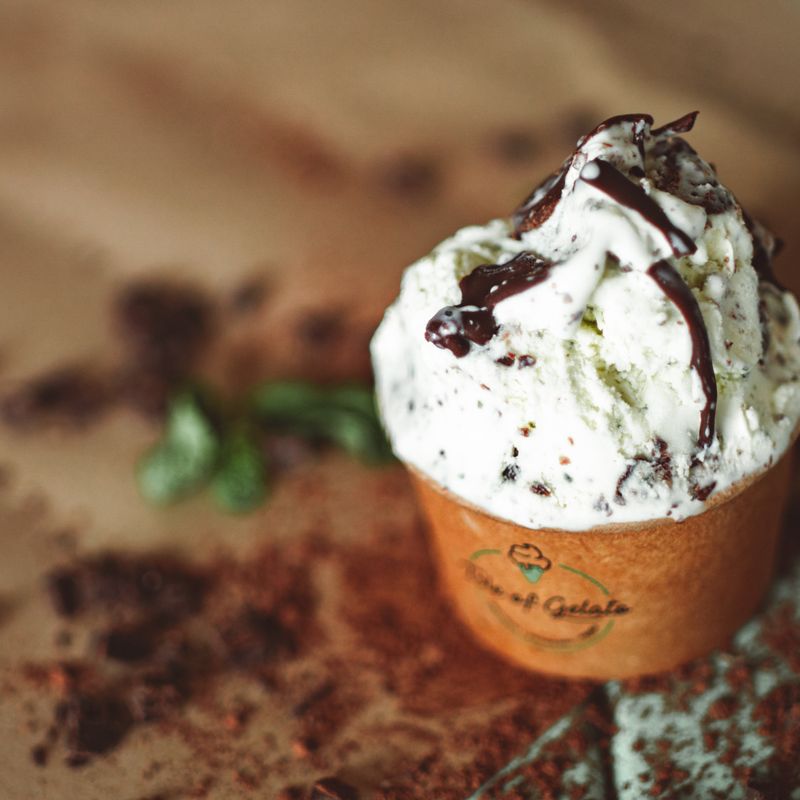
Mint Chocolate Chip Ice Cream with Fresh Mint
A silky egg-custard ice cream infused with a big handful of fresh mint, then streaked with thin, crisp shards of dark chocolate. The flavor is cool and garden-fresh, not toothpaste-sharp. The color is a soft cream-green, since nothing is dyed.
- Prep
- 35 min
- Cook
- 13 min
- Wait
- 8 hr 50 min
- Total
- 9 hr 38 min
- Makes
- About 1½ quarts (1.4 L), 8 servings of ¾ cup
Steps
Before you start
- Freeze your ice cream machine's bowl for at least 24 hours (or follow your machine's instructions). It should be solid with no sloshing when shaken.
- Plan ahead: the custard needs a 30-minute mint steep and at least 4 hours of chilling (overnight is best), then about 20 minutes of churning and 4 hours of freezing. Total time is about 9½ hours, but most of it is hands-off.
- Use fresh, perky spearmint or garden mint, not dried and not wilted. Rinse it and pat it completely dry so you don't dilute the base.
- Separate the eggs while they are cold, and save the whites for another use (meringues or an omelet).
Melt the chocolate
- Put the 115 g (4 oz) finely chopped dark chocolate and 2 tsp (10 ml) neutral oil in a small microwave-safe bowl.
- Microwave in 20-second bursts, stirring between each, until about three-quarters melted, usually 40–60 seconds total.
- Stir off the heat until completely smooth.
- Let it cool at room temperature while you make the custard.
- It should stay fluid and feel just barely warm, not hot.
- Also put your frozen machine bowl in place and set the ice bath: fill the large bowl halfway with ice and cold water, and set the medium bowl inside it.
+ Show details− Hide details
Ready when: Chocolate is glossy, smooth, and fluid, with no lumps.
Tip: The oil keeps the chocolate thin and brittle when it hits the cold ice cream, so you get delicate flakes instead of hard, waxy chunks.
Warm milk and cream
- In the saucepan, combine the milk, 1 cup (240 ml) cream, and 75 g (⅜ cup) sugar.
- Set over medium heat and stir occasionally until the sugar dissolves and the surface is steaming with small bubbles around the edge, about 5 minutes (about 170°F / 77°C).
- Do not let it boil.
- Remove from the heat.
+ Show details− Hide details
Ready when: Steaming, with tiny bubbles at the edge and no sugar granules on the bottom when you scrape with a spatula.
Steep the mint
- Add the torn mint to the hot milk mixture and press the leaves under the surface with a spatula so they are all submerged.
- Cover the pan and let it steep for 30 minutes at room temperature.
- Don't steep longer than 45 minutes, or the flavor turns grassy and slightly bitter.
+ Show details− Hide details
Ready when: The liquid smells strongly of mint and has turned a pale greenish tan.
Tip: Tearing the leaves breaks open the oil glands for a fresher flavor. Don't blend or crush them to a paste, which makes the base look murky and taste grassy.
Strain and set up
- Pour 1 cup (240 ml) cold cream into the medium bowl sitting in the ice bath and set the fine-mesh sieve on top.
- Pour the steeped mixture through a second sieve into the saucepan, pressing firmly on the mint with the spatula to squeeze out all the liquid.
- Discard the mint.
- You should have about 2 cups (480 ml) of infused liquid.
- Return the saucepan to the stove and rewarm over medium-low heat until steaming again, about 2 minutes.
+ Show details− Hide details
Ready when: Liquid is steaming again but not simmering.
Tip: The mint soaks up some liquid, so pressing hard matters. That's where much of the flavor is.
Whisk the yolks
- In a medium bowl, whisk the 5 egg yolks, 75 g (⅜ cup) sugar, and ¼ tsp salt vigorously for about 1 minute, until thick, pale yellow, and slightly ribbony when the whisk is lifted.
+ Show details− Hide details
Ready when: Mixture is pale yellow and falls from the whisk in a thick ribbon.
Tip: Whisk the sugar and yolks together promptly. If they sit together undisturbed, the sugar can start to 'cook' the yolks and form specks.
Temper the yolks
- While whisking the yolks constantly, slowly drizzle in about 1 cup (240 ml) of the hot infused liquid, a ladleful at a time.
- Then pour the warmed yolk mixture back into the saucepan with the remaining liquid, whisking as you pour.
+ Show details− Hide details
Ready when: Mixture is smooth, uniformly pale, and slightly thickened, with no scrambled bits.
Tip: Go slowly with the first few ladlefuls. Pouring hot liquid in too quickly scrambles the yolks.
Cook the custard
- Cook over medium-low heat, stirring constantly and scraping the bottom and corners with a heatproof spatula in a figure-eight motion, for 6–8 minutes.
- Keep an instant-read thermometer in the custard.
- Remove the pan from the heat when it reaches 175°F (79°C), or when the custard coats the back of the spatula and a finger drawn across it leaves a clean line.
- Do not let it boil.
+ Show details− Hide details
Ready when: 175°F (79°C), and the custard coats the spatula so a finger-drawn line holds its shape.
Tip: If the heat creeps above 180°F (82°C) the custard will curdle. If you see any lumps, pull the pan off the heat immediately and keep stirring.
Strain and chill
- Immediately pour the hot custard through the sieve into the cold cream in the ice-bath bowl.
- Stir in 1 tsp vanilla.
- Stir for 2 minutes to cool it quickly.
- Taste: if the mint flavor seems faint, stir in up to ⅛ tsp peppermint extract (the flavor mellows and deepens as it chills, so go lightly).
- Cover the surface directly with plastic wrap and refrigerate at least 4 hours, ideally overnight, until the base is thoroughly cold, below 40°F (4°C).
+ Show details− Hide details
Ready when: Base is completely cold and noticeably thicker, like heavy pouring cream.
Tip: A warm base makes icy, grainy ice cream and can melt your frozen bowl, so don't rush this step.
Churn the ice cream
- Set up the ice cream machine with the frozen bowl and turn it on.
- Pour in the cold custard base, stirring it first if it has settled.
- Churn for 20–25 minutes, or per your machine's instructions, until it looks like thick soft-serve and holds a mark when the paddle passes.
+ Show details− Hide details
Ready when: Thick, billowy soft-serve texture that clings to the paddle and has roughly doubled in volume.
Tip: Don't overchurn. Once it stops getting thicker, stop the machine, or it can turn buttery.
Add chocolate flakes
- With the machine still running, drizzle the cooled melted chocolate in a thin, steady stream over about 1 minute.
- It hits the cold ice cream and shatters into fine flakes and shards.
- Stop the machine as soon as the last of the chocolate is in.
- If your machine can't run while you pour, stop it, drizzle the chocolate, and fold gently with a spatula for 20 seconds.
+ Show details− Hide details
Ready when: Chocolate is evenly dispersed as thin flakes and shards throughout the ice cream.
Tip: Pour the chocolate off to the side of the paddle, not directly onto it, so it doesn't clump.
Freeze until firm
- Spoon the soft ice cream into the chilled airtight container, pressing a piece of parchment directly onto the surface.
- Seal and freeze at least 4 hours, until firm enough to scoop cleanly.
- Let it sit at room temperature for 5 minutes before scooping.
+ Show details− Hide details
Ready when: Firm all the way through and scoopable without being rock hard.
Tip: Pre-chilling the container in the freezer for 15 minutes keeps the ice cream from melting as you pack it.
Good to know
Tips
- Don't skip straining and pressing the mint. It captures the flavor and leaves a smooth, clean-looking base.
- For a deeper green color, add a handful of fresh spinach leaves to the steep. They add color without any taste. Don't use food dye if you want a natural look.
- Make sure the base is below 40°F (4°C) before churning for the creamiest texture.
- Chop the chocolate finely so it melts evenly and quickly without scorching in the microwave.
Make ahead
The custard base can be made up to 2 days ahead and kept covered in the refrigerator. Churn it when you're ready. Finished ice cream is best after at least 4 hours of freezing and can be made up to a week in advance.
Storage & reheating
Freezer: store in an airtight container with parchment pressed on the surface for up to 2 weeks for the best texture (safe longer, but it gets icier). Not suitable for room-temperature or refrigerator storage; serve straight from the freezer after 5 minutes of softening on the counter. If it's too hard, rest it 10 minutes at room temperature.
Substitutions
- dark chocolate (60–70% cacao) bar → semisweet or bittersweet chocolate chips. Use the same weight. Chips contain stabilizers and may give slightly thicker flakes.
- fresh mint leaves and tender stems → fresh peppermint or chocolate mint. Peppermint is a bit stronger and cooler, so use about 40 g (1½ cups packed). Chocolate mint gives a rounder flavor.
- whole milk → half-and-half. Swap for a richer, creamier ice cream. The texture will be a little softer in the freezer.
- neutral oil (such as canola or refined coconut oil) → refined coconut oil. Use the same amount. It firms up faster in the cold ice cream for crisper flakes.
More frozen desserts
See all →


Find more like this
- Meal
- Dessert
- Quick & Easy
- Make Ahead
- Season
- Summer