Kimchi Fried Rice (Kimchi Bokkeumbap) with Fried Egg
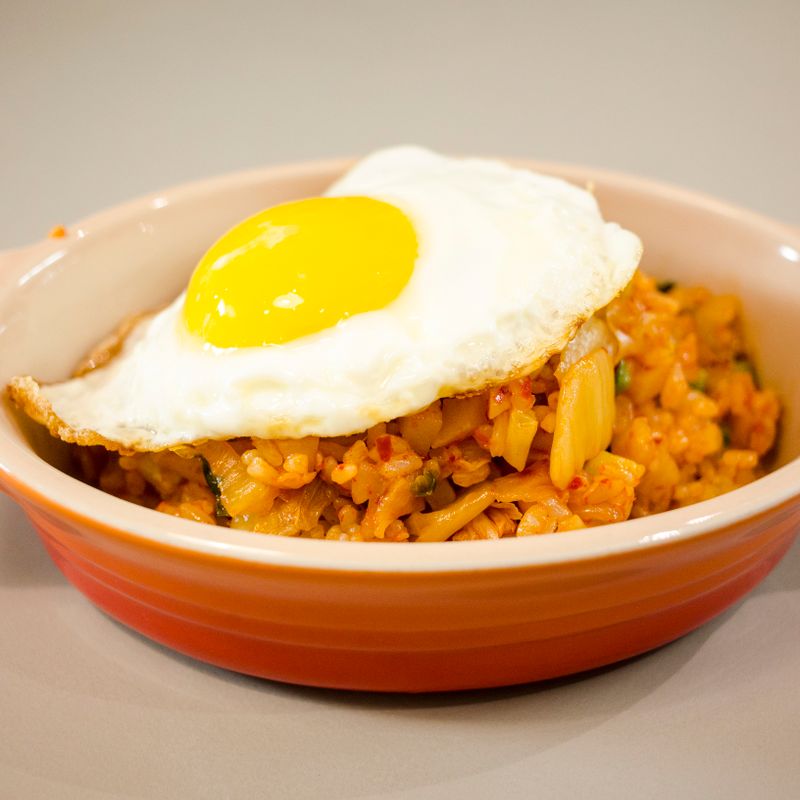
Tangy, spicy and savory Korean fried rice built on well-fermented kimchi, a spoonful of gochujang and toasty sesame oil, crowned with a lacy-edged fried egg. It comes together in about 25 minutes in one skillet.
- Prep
- 12 min
- Cook
- 14 min
- Total
- 26 min
- Makes
- 2 generous main-course servings
Steps
Before you start
- Use cold, day-old cooked rice. If you only have fresh rice, spread it on a tray and chill it uncovered in the fridge for 1 hour, or freezer for 15 minutes, so the grains dry out.
- Use well-fermented, sour kimchi for the best flavor. Fresh kimchi will taste flat and less tangy.
- Have everything chopped and measured before you light the stove; the stir-fry moves fast.
- Break up any clumps in the cold rice with wet or oiled fingers before cooking.
Prep the ingredients
- Slice the scallions, keeping the whites and light greens separate from the dark green tops.
- Mince the garlic.
- Drain the kimchi over a bowl, reserving 2 tablespoons of brine, then chop the kimchi into ½-inch (1 cm) pieces.
- In a small bowl, stir together the gochujang, soy sauce, sugar and kimchi brine until smooth.
- Break up the cold rice with your fingers so no large clumps remain.
+ Show details− Hide details
Ready when: Rice is loose and separated; sauce is smooth with no lumps of paste.
Tip: Mixing the sauce first means it coats the rice evenly instead of scorching in clumps.
Sauté aromatics
- Heat 1 tablespoon neutral oil in the 12-inch (30 cm) skillet over medium-high heat until it shimmers.
- Add the scallion whites and light greens and the garlic.
- Stir constantly for 30 to 45 seconds.
+ Show details− Hide details
Ready when: Fragrant and softened, garlic pale gold but not brown.
Tip: If the garlic starts to brown, lower the heat; burnt garlic turns bitter.
Caramelize the kimchi
- Add the chopped kimchi to the skillet.
- Cook, stirring every 30 seconds or so, for 3 to 4 minutes, so some moisture cooks off and the edges begin to brown and catch.
+ Show details− Hide details
Ready when: Kimchi looks glossy and slightly darkened at the edges, with the pan nearly dry of liquid.
Tip: Cooking the kimchi first deepens its flavor and keeps the rice from turning soggy.
Add the sauce
- Reduce the heat to medium.
- Pour in the gochujang mixture and stir for 1 minute to coat the kimchi and cook off the raw edge of the paste.
+ Show details− Hide details
Ready when: The sauce darkens to a deep brick red and smells sweet and savory.
Tip: Gochujang contains sugar and burns easily, so keep stirring.
Fry the rice
- Add the cold rice and raise the heat to medium-high.
- Using a spatula, press and fold the rice into the kimchi for 4 to 5 minutes, breaking up clumps, until every grain is evenly red-orange and hot throughout.
- Let it sit undisturbed for 20 to 30 seconds at a time to pick up some toasty bits on the bottom.
+ Show details− Hide details
Ready when: Rice is evenly colored, steaming hot, and the grains are separate and slightly springy, not mushy.
Tip: Press with the flat of the spatula rather than stirring vigorously to avoid mashing the grains.
Finish the rice
- Turn off the heat.
- Stir in 1 teaspoon of the sesame oil and half of the dark green scallion tops.
- Taste and add a pinch of salt only if needed (kimchi and gochujang are already salty).
- Cover loosely and keep warm while you fry the eggs.
+ Show details− Hide details
Ready when: Rice smells nutty and tastes balanced: spicy, tangy, slightly sweet.
Tip: Add sesame oil off the heat; high heat dulls its aroma.
Fry the eggs
- Heat the 2 remaining tablespoons of neutral oil in the 8-inch (20 cm) nonstick skillet over medium-high heat until it shimmers.
- Crack in the eggs, season with a pinch of salt, and cook for 2 to 3 minutes, spooning a little hot oil over the whites, until the whites are set and the edges are crisp and lacy.
+ Show details− Hide details
Ready when: Whites are fully opaque and crisp-edged; yolks are still jiggly and runny.
Tip: Cook the eggs for another 1 minute if you prefer a firm yolk. Serve immediately for safety with runny yolks, or use pasteurized eggs for vulnerable guests.
Plate and serve
- Divide the rice between 2 bowls.
- Top each with a fried egg.
- Drizzle with the remaining 1 teaspoon sesame oil, then sprinkle with the sesame seeds, the remaining scallion greens and the crumbled seaweed, if using.
- Serve right away and break the yolk into the rice.
+ Show details− Hide details
Ready when: Hot rice with a glossy egg on top.
Good to know
Tips
- Sour, old kimchi is best for fried rice; if yours is fresh, add an extra tablespoon of brine and a splash of rice vinegar.
- Don't overcrowd the pan. For double the recipe, cook in two batches so the rice fries instead of steaming.
- Add protein if you like: diced Spam, bacon, leftover pork or sautéed shrimp go well with kimchi. Cook it first and add it back in step 5.
- Adjust the heat by changing the amount of gochujang; start with 1 tablespoon for a milder dish.
Make ahead
"Cook the rice up to 2 days ahead and refrigerate it uncovered for the first hour, then covered. The kimchi and sauce base (steps 1 to 4) can be cooked up to 2 days ahead and refrigerated; reheat in the skillet before adding the rice."
Storage & reheating
"Store the rice (without eggs) in an airtight container: room temperature no more than 2 hours, refrigerator up to 3 days, freezer up to 2 months. Reheat in a skillet over medium heat with a splash of water for 3 to 4 minutes, or microwave covered until steaming hot (165°F/74°C). Fry fresh eggs when serving."
Substitutions
- gochujang (Korean chili paste) → 1 tablespoon gochugaru (Korean chili flakes) plus 1 teaspoon miso or extra soy sauce. Gives similar heat and savoriness with a slightly less sticky, less sweet result.
- cooked short- or medium-grain white rice → Cooked brown rice or short-grain sushi rice. Brown rice is nuttier and chewier; cook a little longer in step 5 for it to heat through.
- neutral oil (such as avocado or canola) → Bacon fat or rendered pork belly fat (use 1 tablespoon). Stir-fry 3 oz (85 g) diced bacon or pork belly first for a richer, traditional-style version; reduce the soy sauce if needed.
- large eggs → Soft scrambled eggs or a jammy 6½-minute boiled egg. Good alternatives if you prefer no fried egg.