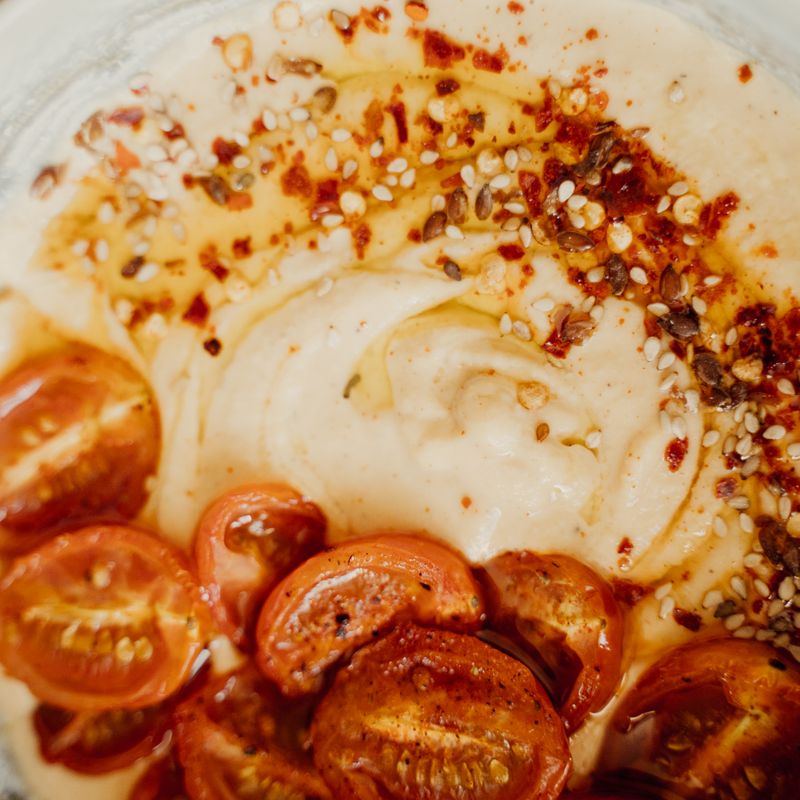
Creamy Roasted Garlic White Bean Dip
Sweet, mellow roasted garlic and fragrant rosemary blend with cannellini beans, lemon and good olive oil into a silky, scoopable dip that comes together with one oven tray and a food processor.
- Prep
- 15 min
- Cook
- 40 min
- Wait
- 15 min
- Total
- 1 hr 10 min
- Makes
- About 2 cups (8 servings of ¼ cup)
Steps
Before you start
- Preheat the oven to 400°F (200°C) with a rack in the center.
- Rinse and drain the canned beans well, then let them sit in the strainer while the garlic roasts so they dry slightly.
- Roasting garlic takes about 40 minutes, so start there; the rest comes together in 10 minutes.
- Use a good extra-virgin olive oil, since its flavor is front and center.
Preheat and prep garlicOven 400°F / 205°C
- Position a rack in the center and heat the oven to 400°F (200°C).
- Slice about ¼ inch (6 mm) off the top of each garlic head so every clove is exposed.
- Set both heads cut-side up on a large square of foil.
+ Show details− Hide details
Ready when: Every clove shows a cut surface.
Tip: Leave the papery skin on the sides; it holds the head together while roasting.
Season and wrap
- Drizzle 1 tablespoon olive oil over the cut garlic and tuck the rosemary sprig alongside.
- Fold the foil up and crimp the edges to make a sealed packet.
- Place it in a small baking dish to catch any drips.
+ Show details− Hide details
Ready when: Packet is fully sealed with no gaps.
Roast the garlicOven 400°F / 205°C
- Roast at 400°F (200°C) for 40 to 45 minutes, until the cloves are deep golden and soft enough to squish under gentle pressure.
- Carefully open the packet to check; if still firm, reseal and roast 5 to 10 minutes more.
+ Show details− Hide details
Ready when: Cloves are golden-brown, jammy and squeeze out easily.
Tip: Open the foil away from your face; escaping steam is very hot.
Cool the garlic
- Remove the packet and let it cool, partly open, for 15 minutes until you can handle the heads.
- Discard the rosemary sprig.
- Squeeze the heads from the base so the soft cloves pop into the food processor bowl; discard the papery skins.
+ Show details− Hide details
Ready when: Heads are warm, not hot, to the touch.
Tip: Pick out any bits of skin or tough root end so the dip stays smooth.
Prepare the beans
- Drain the cannellini beans in a fine-mesh strainer and rinse under cold running water for 30 seconds, shaking until the water runs clear and no foam remains.
- Shake off excess water.
- Zest the lemon, then juice it.
+ Show details− Hide details
Ready when: Rinse water is clear.
Tip: Zest the lemon before juicing; it is far easier.
Blend the base
- Add the beans, lemon juice, lemon zest, chopped rosemary, salt and 3 tablespoons water to the garlic.
- Process for 1 minute, scraping down the sides with a spatula halfway through, until mostly smooth.
+ Show details− Hide details
Ready when: Mixture looks thick with no whole beans visible.
Stream in the oil
- With the processor running, slowly pour in ⅓ cup (80 ml) olive oil through the feed tube over about 30 seconds.
- Continue to process for 1 to 2 minutes more, until very smooth, airy and creamy.
- If it is stiff, add water 1 tablespoon at a time.
+ Show details− Hide details
Ready when: Dip is silky, pale and holds soft swoops from a spoon.
Tip: Adding oil slowly gives a creamier, more stable texture.
Taste and adjust
- Taste and add a pinch more salt, a few grinds of black pepper, or a teaspoon more lemon juice if it needs brightness.
- Pulse 3 or 4 times to combine.
+ Show details− Hide details
Ready when: Flavor is balanced: savory, sweet garlic, bright lemon.
Tip: Bean dips taste blander when cold, so season slightly boldly.
Serve
- Spoon the dip into a shallow bowl and make a swirl with the back of the spoon.
- Drizzle with 1 tablespoon olive oil and dust with smoked paprika, if using.
- Serve at room temperature with warm pita, raw vegetables or crackers.
+ Show details− Hide details
Tip: For the best flavor, let chilled dip stand 20 minutes before serving.
Good to know
Tips
- Rinse canned beans thoroughly to remove the starchy canning liquid, which can taste tinny.
- Scrape down the bowl often; unblended bits on the sides cause a grainy texture.
- Add water gradually; the dip thickens as it chills, so aim slightly looser than you want.
- For an extra-smooth finish, peel the bean skins or blend 1 minute longer.
Make ahead
Roast the garlic up to 3 days ahead and refrigerate the cloves in an airtight container. The finished dip can be made up to 3 days ahead; stir in a splash of water or olive oil before serving.
Storage & reheating
Room temperature: up to 2 hours. Refrigerator: airtight container with a thin film of olive oil on top, up to 5 days. Freezer: up to 2 months in a freezer-safe container; thaw overnight in the fridge and stir well, adding a little water or oil if it separates. Serve cold or at room temperature; to serve warm, microwave 20 to 30 seconds.
Substitutions
- canned cannellini beans → Great Northern beans or butter beans. Same weight; butter beans make it slightly richer and creamier.
- fresh rosemary leaves → 1 teaspoon fresh thyme leaves. Gives a milder, more floral herb flavor.
- fresh lemon juice → white wine vinegar. Use 2 tablespoons and omit the zest for a tangier dip.
- whole garlic heads → 12 to 14 peeled cloves roasted in oil. Roast in a small foil packet at 400°F (200°C) for 30 minutes if you lack whole heads.
More dips & spreads
See all →



Find more like this
- Meal
- Snack
- Cuisine
- Mediterranean
- Main ingredient
- White Beans
- Method
- Oven
- Quick & Easy
- EasyMake Ahead