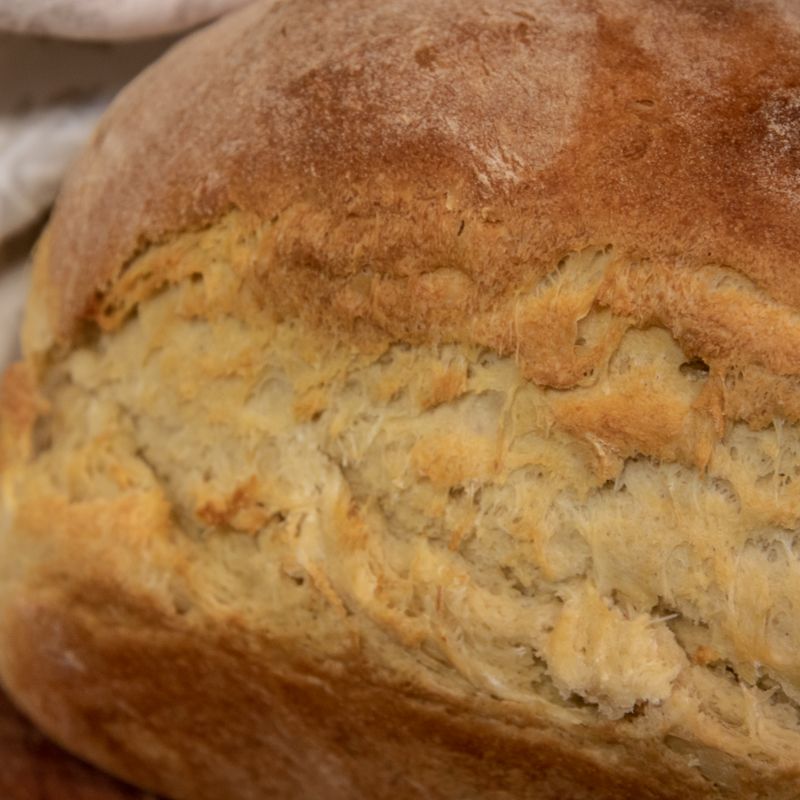
Classic Irish Soda Bread
A rustic, crusty round loaf with a tender, tangy crumb, made in one bowl with just four pantry ingredients. No yeast, no kneading, and no rising time: it goes from bowl to oven in 10 minutes.
- Prep
- 12 min
- Cook
- 42 min
- Wait
- 30 min
- Total
- 1 hr 24 min
- Makes
- 1 round loaf (10 slices)
Steps
Before you start
- Position an oven rack in the center and preheat the oven to 425°F (220°C) before you start mixing. The dough should go into a hot oven right away.
- Check that your baking soda is fresh (less than 6 months old). Old soda gives a dense, flat loaf.
- Use real, full-fat cultured buttermilk straight from the fridge. Cold buttermilk is fine here.
- Measure flour by spooning it into the cup and leveling it, or better, weigh it. Too much flour makes a dry, heavy loaf.
Preheat and prepOven 425°F / 220°C
- Place a rack in the center of the oven and heat to 425°F (220°C).
- Line a rimmed baking sheet with parchment paper.
- Dust a clean counter lightly with some of the extra flour.
+ Show details− Hide details
Ready when: Oven reads 425°F (220°C)
Tip: An oven that is fully hot gives the loaf its quick rise and crisp crust.
Whisk dry ingredients
- In a large bowl, whisk together 4 cups (500 g) flour, 1½ teaspoons baking soda and 1½ teaspoons salt for about 30 seconds, until the soda is evenly distributed with no clumps.
+ Show details− Hide details
Ready when: Mixture looks uniform in color with no lumps of soda
Tip: Pockets of baking soda taste soapy and leave yellow-green spots, so whisk thoroughly.
Add the buttermilk
- Make a well in the center of the flour.
- Pour in 1¾ cups (420 ml) cold buttermilk all at once.
- Stir with a wooden spoon or your hand in wide circles, working from the center outward, for about 20 to 30 seconds.
+ Show details− Hide details
Ready when: Dough is shaggy and sticky, with no dry flour left in the bowl, though it will look rough
Tip: Mix as little as possible. Overworking develops gluten and makes the bread tough.
Shape the round
- Turn the dough onto the floured counter.
- With floured hands, fold it over itself 4 to 5 times, just until it holds together in a ball.
- Pat into a round about 7 inches (18 cm) wide and 2 inches (5 cm) thick.
- Transfer to the lined baking sheet.
+ Show details− Hide details
Ready when: Dough forms a slightly tacky, cohesive round; the surface may be a little craggy
Tip: If the dough sticks to your hands, dust them with flour rather than kneading more flour into the dough.
Score the cross
- Dust the top lightly with flour.
- Using a sharp knife dipped in flour, cut a deep X across the loaf, about 1 inch (2.5 cm) deep and reaching almost to the edges.
- This helps the center cook through.
+ Show details− Hide details
Ready when: Cuts are deep and open slightly
Tip: Bake immediately. The baking soda starts reacting as soon as it meets the buttermilk.
Bake hot, then lowerOven 425°F / 220°C
- Bake at 425°F (220°C) for 15 minutes, until the crust is set and starting to turn pale gold.
- Without opening the door longer than needed, reduce the oven to 400°F (200°C) and bake 25 to 30 minutes more.
+ Show details− Hide details
Ready when: Crust is deep golden brown and sounds hollow when tapped on the bottom; center of the loaf reads 200–205°F (93–96°C) on an instant-read thermometer
Tip: If the crust browns too fast before the time is up, tent loosely with foil.
Cool before slicing
- Slide the loaf onto a wire rack.
- Let it cool for at least 30 minutes so the crumb finishes setting.
- Slice with a serrated knife into 10 wedges or slices.
+ Show details− Hide details
Ready when: Loaf is warm, not hot, to the touch
Tip: Slicing too early makes the center seem doughy.
Good to know
Tips
- Handle the dough gently and briefly. A shaggy, slightly sticky dough makes the most tender loaf.
- Always check the bottom: a hollow thump means it is done. If it sounds dull, bake 5 to 10 more minutes.
- For a softer crust, brush the hot loaf with 1 tablespoon melted butter or wrap it in a towel while cooling.
- Serve warm with good salted butter, or with jam, cheese, or alongside soup and stew.
Make ahead
Whisk the dry ingredients up to 1 week ahead and keep covered at room temperature. Add the buttermilk and bake right away; the dough cannot be made ahead.
Storage & reheating
Room temperature: wrap tightly in a clean towel or store in a bread bag for up to 2 days. Fridge: not recommended, as it dries the bread out. Freezer: slice, wrap well, and freeze up to 3 months. Reheat slices in a toaster, or warm a whole loaf at 350°F (175°C) for 10 to 15 minutes.
Substitutions
- full-fat buttermilk → 1¾ cups (420 ml) whole milk mixed with 1½ tablespoons lemon juice or white vinegar. Let it sit 10 minutes until slightly curdled. The crumb will be a little less tangy.
- full-fat buttermilk → Plain whole-milk yogurt thinned with milk. Use 1 cup (240 g) yogurt plus ¾ cup (180 ml) milk.
- all-purpose flour → Replace 1 cup (about 120 g) of the flour with whole wheat flour. This gives a nuttier, more traditional brown flavor. You may need an extra tablespoon or two of buttermilk.
- fine sea salt → Kosher salt (Diamond Crystal) at 2 teaspoons. Coarser flakes are less dense; use more by volume.
More quick breads
See all →
Find more like this
- Meal
- Dinner
- Method
- Oven
- Quick & Easy
- 5 Ingredients or LessEasyBudget