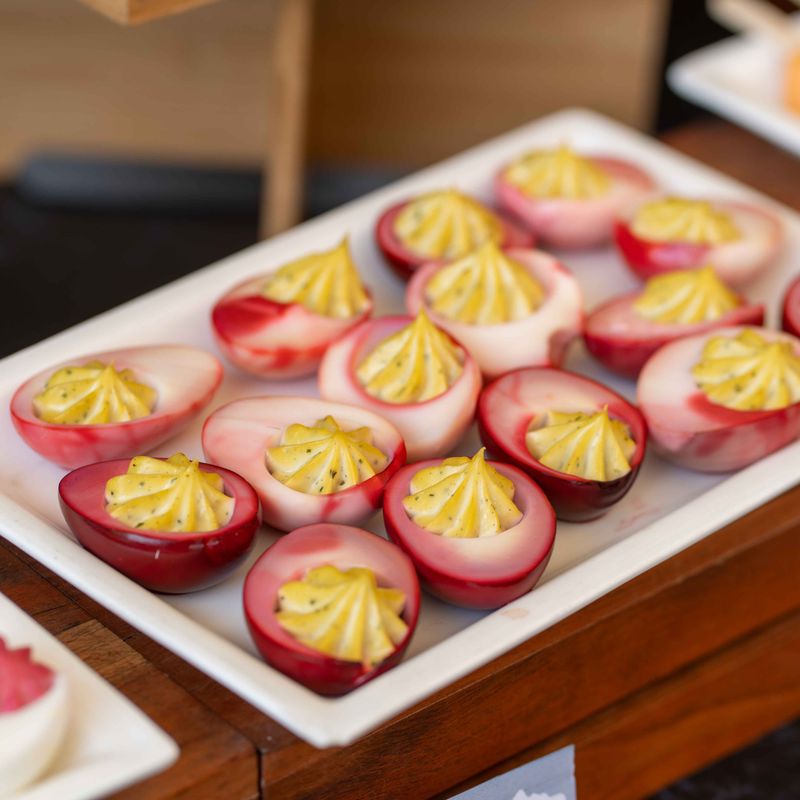
Classic Deviled Eggs
Creamy, tangy deviled eggs with a silky yolk filling, a bright note of Dijon and vinegar, and a dusting of paprika. Steamed-then-chilled eggs peel cleanly, and piping makes them look party-ready.
- Prep
- 33 min
- Cook
- 18 min
- Wait
- 35 min
- Total
- 1 hr 26 min
- Makes
- 24 deviled egg halves (12 servings of 2)
Steps
Before you start
- Use eggs that are at least a week old; very fresh eggs are harder to peel.
- Fill a large bowl with ice and water before you start so the eggs can chill the moment they finish cooking.
- Eggs go straight from the refrigerator into the steaming pan, so no advance warming is needed.
- Have a paper towel-lined plate and a damp paper towel ready for wiping the knife between cuts.
- Plan on about 1 hour 25 minutes from start to serving, including 35 minutes of chilling.
Prepare ice bath
- Fill a large bowl with 4 cups (about 1 L) of ice and enough cold water to float it.
- Set it next to the stove.
+ Show details− Hide details
Ready when: Water is very cold with plenty of ice still floating.
Boil the water
- Pour about 2 inches (5 cm) of water into a large saucepan and bring to a full rolling boil over high heat.
+ Show details− Hide details
Ready when: Large bubbles break the surface constantly and steam rises.
Steam the eggs
- Gently lower the 12 cold eggs into the pan with a slotted spoon (they will sit partly above the water).
- Cover, reduce heat to medium so the water keeps a steady simmer, and steam for exactly 13 minutes.
+ Show details− Hide details
Ready when: Timer reaches 13 minutes; yolks will be set and pale yellow with no green ring.
Tip: Lower eggs slowly to avoid cracking them on the pan bottom.
Chill the eggs
- Use the slotted spoon to move the eggs straight into the ice bath.
- Let them chill for 15 minutes.
+ Show details− Hide details
Ready when: Eggs feel completely cold to the touch.
Tip: Warm eggs peel poorly and the yolks can turn green-gray.
Peel and halve
- Tap each egg on the counter, roll gently to crackle the shell, and peel under a thin stream of cool water, starting at the wider end.
- Pat dry.
- Slice each egg in half lengthwise with a sharp knife, wiping the blade with a damp paper towel between eggs so the whites stay clean.
+ Show details− Hide details
Ready when: Whites are smooth and unblemished with fully set yolks.
Tip: Discard any halves that tear badly, or chop them into the filling bowl.
Remove the yolks
- Pop the yolks into a medium bowl.
- Arrange the 24 white halves on a platter, hollows facing up.
- Blot any moisture from the hollows with a paper towel.
+ Show details− Hide details
Ready when: Yolks are removed cleanly and the whites are intact.
Mash the yolks
- Mash the yolks with a fork until they look like fine crumbs.
- For the smoothest filling, press them through a fine-mesh sieve into the bowl with a spatula.
+ Show details− Hide details
Ready when: No lumps larger than a grain of rice remain.
Tip: Mash before adding any wet ingredients; lumps will not break down afterward.
Make the filling
- Add the mayonnaise, Dijon, vinegar, salt, and pepper to the yolks.
- Stir and mash with a spatula until completely smooth and creamy.
- Taste and add more salt, a pinch at a time, if needed.
+ Show details− Hide details
Ready when: Filling is thick, smooth, and holds a soft peak when lifted with the spatula.
Tip: If the filling seems loose, mash in 1 more cooked yolk; if stiff, add a teaspoon more mayonnaise.
Pipe the filling
- Spoon the filling into a piping bag fitted with a large star tip (or a zip-top bag with a corner snipped).
- Pipe a generous swirl into each egg white half, dividing the filling evenly.
+ Show details− Hide details
Ready when: Each half holds a tall, rounded swirl of filling.
Tip: Twist the top of the bag closed and squeeze from the top for control.
Garnish and chill
- Dust the tops lightly with the paprika, using a small sieve if you have one, and scatter with chives if using.
- Refrigerate uncovered or loosely covered for at least 20 minutes before serving so the flavors meld and the filling firms.
+ Show details− Hide details
Ready when: Filling is cold and holds its shape when touched.
Tip: Paprika can bleed into the filling if added too long ahead; garnish within an hour of serving.
Good to know
Tips
- Steaming rather than boiling makes the shells slip off more easily and reduces cracking.
- Stand the eggs upright in a carton for a day before cooking if you want more centered yolks.
- A muffin tin lined with a bit of crumpled parchment keeps the halves from sliding during transport.
- Taste the filling when it is cold: chilling mutes seasoning, so aim for slightly bold.
Make ahead
Steam, chill, peel, and halve the eggs up to 2 days ahead and refrigerate the whites in an airtight container. Make the filling up to 1 day ahead and keep it in the sealed piping bag in the refrigerator. Pipe and garnish within 2 hours of serving.
Storage & reheating
Refrigerate assembled eggs in an airtight container for up to 2 days. Do not leave at room temperature longer than 2 hours (1 hour above 90°F/32°C). Not suitable for freezing. Serve cold, straight from the refrigerator.
Substitutions
- full-fat mayonnaise → Plain full-fat Greek yogurt for half of the mayonnaise. Gives a tangier, lighter filling; add a pinch more salt.
- white vinegar → Dill pickle juice or fresh lemon juice. Use the same amount; pickle juice adds a classic briny flavor.
- sweet paprika → Smoked paprika. Adds a smoky flavor; use the same amount, as it is a little stronger.
- Dijon mustard → Yellow mustard. Use the same amount for a milder, more traditional diner-style flavor.
More stuffed bites
See all →

Find more like this
- Meal
- Snack
- Cuisine
- American
- Main ingredient
- Eggs
- Method
- Stovetop
- Quick & Easy
- 5 Ingredients or LessEasyMake Ahead
- Occasion
- Parties