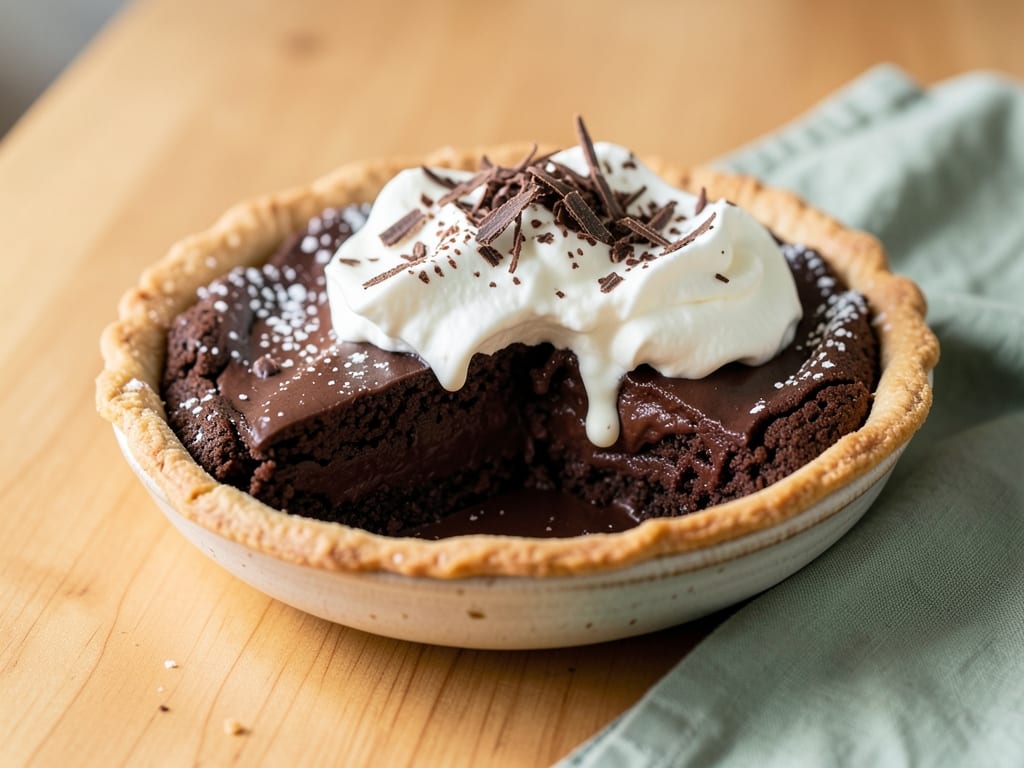
Classic Chocolate Cream Pie
A deeply chocolatey stovetop custard with egg yolks and bittersweet chocolate, set in a crisp baked chocolate cookie crust and finished with billowy vanilla whipped cream. It slices cleanly after a long chill.
- Prep
- 35 min
- Cook
- 20 min
- Wait
- 4 hr 30 min
- Total
- 5 hr 25 min
- Makes
- 1 (9-inch/23 cm) pie (8 slices)
Steps
Before you start
- Plan on at least 4 hours of chilling, so start this pie in the morning for an evening dessert or the day before.
- Measure and chop everything first. Once the custard is on the heat you must whisk nonstop and can't step away.
- Separate the eggs while cold, then let the yolks sit out while you make the crust. Save the whites for another use (omelets, meringues).
- Chill the mixing bowl and whisk or beaters for 15 minutes before whipping the cream.
Heat oven, crush cookiesOven 350°F / 175°C
- Position a rack in the center of the oven and heat to 350°F (175°C).
- Grind the chocolate wafers in a food processor into fine, sand-like crumbs (or seal in a zip-top bag and crush with a rolling pin).
- You need about 1½ cups (150 g).
- Stir in the 2 tbsp sugar.
+ Show details− Hide details
Ready when: Crumbs are fine and even with no large chunks.
Press the crust
- Pour the melted butter over the crumbs and stir with a fork until all crumbs look damp and hold together when squeezed.
- Tip into the 9-inch pie plate.
- Press firmly and evenly across the bottom and up the sides, using the flat bottom of a measuring cup to pack the corner and a finger to shape the rim.
+ Show details− Hide details
Ready when: Crust is packed, even in thickness, and holds its shape.
Tip: Pack firmly. A loosely pressed crust crumbles when you slice.
Bake the crustOven 350°F / 175°C
- Bake at 350°F (175°C) for 10 minutes to set the crust.
- It will smell toasty and the edge will look slightly dry and firm.
+ Show details− Hide details
Ready when: Edge looks dry and feels firm; the crust smells toasty.
Cool crust, prep chocolate
- Set the crust on a wire rack to cool completely, about 30 minutes.
- Meanwhile, finely chop the 4 oz bittersweet chocolate and set it in a small bowl near the stove.
- Set the fine-mesh sieve over a medium bowl and put the butter pieces and vanilla within reach.
+ Show details− Hide details
Ready when: Crust is completely cool to the touch.
Tip: Finely chopped chocolate melts instantly in the hot custard, so you avoid overworking it.
Whisk the custard base
- In the saucepan off the heat, whisk the ¾ cup sugar, cornstarch, and salt together so there are no cornstarch lumps.
- Add the egg yolks and whisk to a thick, pasty mixture.
- Pour in the milk in a slow stream while whisking, until completely smooth.
+ Show details− Hide details
Ready when: Mixture is smooth, pale, and free of lumps.
Tip: Add the milk slowly at first. Dumping it all at once makes the cornstarch clump.
Cook until thick
- Set the pan over medium heat.
- Whisk constantly, reaching into the corners and along the bottom, for 6–8 minutes.
- The mixture will slowly thicken, then suddenly turn pudding-like and begin to bubble.
- When large bubbles slowly burp at the surface, keep whisking 1 full minute to cook off the starchy taste.
- Remove from the heat.
+ Show details− Hide details
Ready when: Thick enough that the whisk leaves trails; large bubbles burp at the surface and the custard reads at least 175°F (80°C).
Tip: If you see scrambled bits forming, lower the heat and whisk harder; you can strain them out later.
Melt in chocolate
- Immediately add the chopped chocolate, butter, and 1½ tsp vanilla.
- Let sit 30 seconds, then whisk gently until the chocolate is fully melted and the custard is glossy and uniform.
+ Show details− Hide details
Ready when: Custard is glossy, dark, and streak-free.
Strain and fill
- Pour the hot custard through the sieve into the bowl, pressing with a spatula, to catch any cooked bits.
- Scrape the custard into the cooled crust and spread it level.
- Press plastic wrap directly onto the surface to prevent a skin from forming.
+ Show details− Hide details
Ready when: Filling is smooth and level, with plastic touching the entire surface.
Tip: Work quickly; the custard starts to set as it cools and becomes hard to spread.
Chill until firm
- Refrigerate the pie for at least 4 hours, until the filling is completely cold and set.
+ Show details− Hide details
Ready when: Filling is firm and doesn't jiggle when the pie is gently nudged.
Tip: Don't rush this. A warm filling will weep and slump when cut.
Whip the cream
- In the chilled bowl, beat the cold heavy cream, powdered sugar, and 1 tsp vanilla with the mixer on medium speed for about 2 minutes, then on medium-high until soft-medium peaks form, about 1 minute more.
+ Show details− Hide details
Ready when: Cream holds a peak that gently curls at the tip.
Tip: Stop as soon as peaks hold. Overwhipped cream turns grainy and buttery.
Top and serve
- Remove the plastic wrap from the pie.
- Mound the whipped cream over the filling and swirl with the back of a spoon, leaving a border if you like.
- Garnish with the chocolate curls.
- Slice with a sharp knife dipped in hot water and wiped dry between cuts.
+ Show details− Hide details
Ready when: Cream is evenly mounded; slices come out with clean edges.
Tip: Top with cream within 1–2 hours of serving for the best look.
Good to know
Tips
- Whisk constantly and reach the corners of the pan; that's where the custard scorches first.
- Always strain the custard. It guarantees a silky texture even if a few tiny bits cooked unevenly.
- Press the plastic wrap directly on the surface while the custard chills to prevent a rubbery skin.
- For the cleanest slices, chill the pie fully and wipe the knife with a hot, damp towel between cuts.
Make ahead
"Bake the crust up to 2 days ahead and store, covered, at room temperature. The unwhipped pie (filled, plastic pressed on the surface) can be made up to 2 days ahead and refrigerated. Add the whipped cream and garnish on the day of serving."
Storage & reheating
"Room temperature: no more than 2 hours. Fridge: cover loosely and keep up to 3 days; the crust softens a little each day. Freezing is not recommended, since the custard turns watery and grainy when thawed. Serve cold, straight from the fridge."
Substitutions
- chocolate wafer cookies → Graham crackers or Oreo-style cookies with the filling removed. Graham crumbs make a milder, honeyed crust (use 1½ cups crumbs and ¼ cup/50 g sugar); with Oreo cookies, omit the sugar and use about 4 tbsp butter.
- bittersweet chocolate (60–70% cacao) → Semisweet chocolate. Gives a sweeter, milder pie; reduce the sugar in the filling to ⅔ cup (130 g) for balance.
- whole milk → 2 cups (480 ml) whole milk plus ½ cup (120 ml) heavy cream. Makes a richer, softer-set custard.
- cornstarch → Arrowroot or potato starch, same weight. Cook only until just thickened and do not boil hard, as these starches can thin if overheated.
More pies & tarts
See all →


Find more like this
- Meal
- Dessert
- Cuisine
- American
- Diet
- VegetarianHalal
- Quick & Easy
- Make Ahead