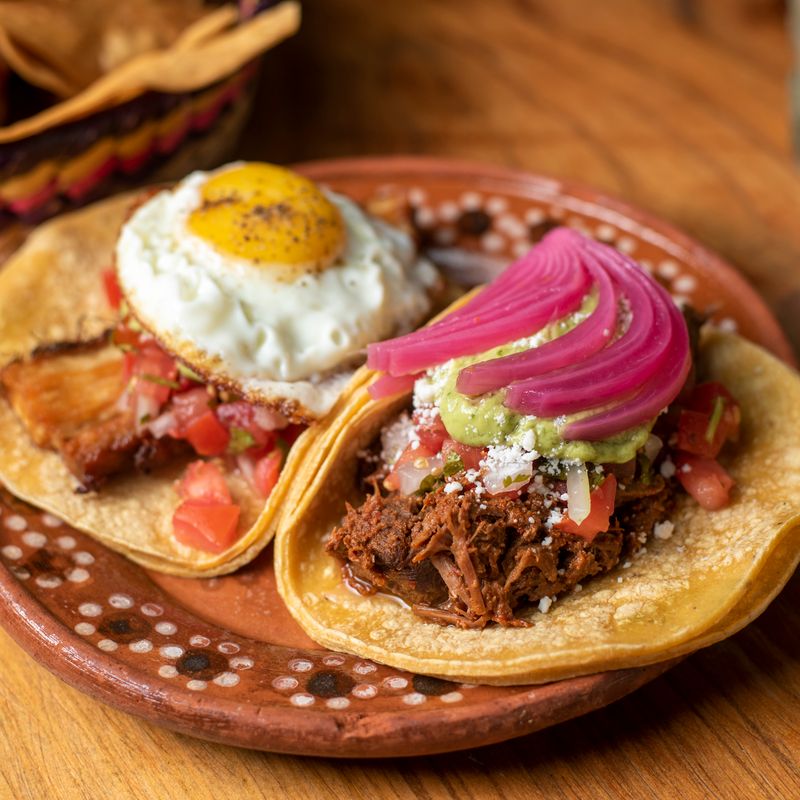
Carnitas Wrap with Pickled Onions
Tender, slow-cooked pork carnitas seasoned with cumin and cinnamon, wrapped in warm tortillas and topped with tangy pickled red onions, creamy avocado, and fresh cilantro. This classic Mexican comfort dish delivers rich, savory meat balanced by bright acidity and refreshing toppings.
- Prep
- 20 min
- Cook
- 3 hr 10 min
- Wait
- 20 min
- Total
- 3 hr 50 min
- Makes
- 4 wraps (serves 2–4 people)
Steps
Before you start
- Read the recipe; carnitas need 3 hours to cook
- Prep all ingredients before starting (mise en place)
- Make pickled onions while carnitas cook, or prepare them up to 1 week ahead
- Have a large heavy pot or Dutch oven ready
Prepare the Pork
- Pat the pork shoulder dry with paper towels.
- Cut into roughly 2-inch (5 cm) chunks, leaving some fat attached to the meat; this renders out during cooking and keeps the carnitas moist.
- Season the pork generously on all sides with 1 tsp salt and 1/4 tsp black pepper.
+ Show details− Hide details
Tip: Don't trim away all the fat; it's essential for authentic carnitas and renders down to keep the meat tender and flavorful.
Combine Seasonings and Aromatics
- In a large Dutch oven or heavy-bottomed pot, combine the lard, smashed garlic cloves, ground cumin, dried oregano, ground cinnamon, bay leaves, and halved orange.
- Add the seasoned pork chunks, stirring well to coat everything evenly with the fat and spices.
- The pork won't be fully submerged at this point, and that's fine.
+ Show details− Hide details
Tip: Stir the pork well to distribute the spices and fat evenly, ensuring every piece gets seasoned.
Slow-Cook the CarnitasOven 300°F / 150°C
- Cover the pot with its lid and transfer to a 300°F (150°C) oven.
- Cook for 2.5 to 3 hours, stirring once or twice halfway through.
- The pork is done when it's fork-tender, easily shreds with gentle pressure, and has rendered substantially into its own fat.
- The braising liquid should be clear and savory, not cloudy.
- Use a meat thermometer if you have one; the internal temperature should reach 195–205°F (90–96°C) for optimal tenderness.
+ Show details− Hide details
Ready when: Fork-tender pork that shreds easily with minimal resistance; clear, flavorful braising liquid
Tip: Low and slow cooking is essential—resist the urge to raise the temperature. High heat will toughen the meat and prevent proper rendering of fat.
Make the Pickled Onions
- While the carnitas cook (around the 1.5-hour mark), prepare the pickled onions.
- In a medium saucepan, combine the red wine vinegar, sugar, salt, water, and optional cumin.
- Bring to a boil over medium-high heat, stirring until the sugar and salt dissolve completely.
- Remove from heat.
- Place the thinly sliced red onion in a heatproof bowl or glass jar.
- Pour the hot pickling liquid over the onions, stir gently, and let sit at room temperature for at least 15 to 20 minutes before serving.
- The onions will soften slightly and turn a bright pink color.
- They can be made up to 1 week ahead and stored in the refrigerator.
+ Show details− Hide details
Ready when: Onions are bright pink, slightly softened, and the brine smells sharp and fragrant
Tip: Quick-pickling at room temperature preserves a crisp, slightly crunchy texture; longer refrigeration will soften them further. Either way is delicious.
Crisp the Carnitas (Optional)
- Once the carnitas are cooked through and fork-tender, you can optionally crisp the exterior for textural contrast.
- Using a slotted spoon, transfer the cooked pork to a large skillet, keeping about 2 to 3 tbsp of the rendered fat from the braising pot in the pan.
- Heat the skillet over medium-high heat and cook the carnitas for 5 to 8 minutes, stirring occasionally, until the edges are golden brown and lightly crispy.
- This step adds a desirable texture but is completely optional—the meat is delicious moist and tender if you prefer to skip it.
+ Show details− Hide details
Ready when: Edges of pork are golden brown and slightly crispy; fat is shimmering
Tip: If crisping in batches, don't overcrowd the skillet or the meat will steam rather than brown. Work in 2 batches if needed.
Warm the TortillasOven 325°F / 165°C
- Just before serving, warm the tortillas to make them pliable and enhance their flavor.
- You can warm them directly over a gas flame for a few seconds per side (if available), heat them one at a time in a dry skillet over medium heat for about 30 seconds per side until lightly spotted, or wrap them in foil and warm in a 325°F (163°C) oven for about 5 minutes.
- Warm tortillas are soft, flexible, and taste noticeably better than cold ones.
+ Show details− Hide details
Ready when: Tortillas are warm, pliable, and show light browning or charring if using direct heat
Tip: Warm tortillas just before assembly so they stay soft and don't dry out.
Assemble the Wraps
- Cut the ripe avocados in half lengthwise, remove the pit, and scoop the flesh into a small bowl.
- Mash lightly with a fork and season with a pinch of salt and a squeeze of lime juice.
- Roughly chop the cilantro.
- Lay out a warm tortilla and build your wrap: spread a spoonful of mashed avocado down the center, add a generous handful of the slow-cooked carnitas (about 3 to 4 oz), top with a small handful of pickled red onions (they're tangy, so a little goes a long way), a small pinch of fresh cilantro, and optional crumbled queso fresco, sour cream, or sliced jalapenos.
- Fold the tortilla in half or burrito-style (fold in the sides first, then roll), keeping the filling centered.
- Serve immediately with lime wedges on the side for extra brightness.
+ Show details− Hide details
Tip: Don't overfill the wrap or the tortilla will burst open. A thin, well-distributed layer of each ingredient is better than a chunky one.
Good to know
Tips
- Carnitas is a high-fat, slow-cooked preparation by tradition. Don't discard the rendered fat—it's liquid gold for reheating and adds incredible flavor.
- For a shortcut, cook the carnitas in a slow cooker on LOW for 6 to 8 hours instead of the oven; the result is equally tender and you don't need to stir as often.
- The pickled onions are acidic and bright; they're the perfect counterpoint to the rich carnitas. Serve them generously—don't be timid with the acidity.
- Set up a small toppings station with the carnitas, pickled onions, mashed avocado, cilantro, queso fresco, crema, and jalapenos so guests can build their own wraps. It's interactive, fun, and everyone gets exactly what they like.
Make ahead
Carnitas can be cooked up to 3 days ahead and stored in an airtight container in the refrigerator, fully submerged in their rendered fat. Gently reheat in a 300°F (150°C) oven for 20 minutes before serving or crisping. Pickled onions keep for up to 1 week in the refrigerator. Assemble wraps just before eating for the best texture and to keep the tortillas warm.
Storage & reheating
Room temperature: Leftover carnitas (covered) up to 2 hours. Refrigerator: Carnitas in an airtight container with their cooking fat, up to 3 days; pickled onions in a jar, up to 1 week. Freezer: Carnitas (in their fat, in a freezer-safe container) for up to 3 months; thaw in the refrigerator overnight and reheat gently in a 300°F (150°C) oven for 15–20 minutes to avoid drying out.
Substitutions
- pork shoulder, trimmed → Pork butt (also labeled pork butt roast). Both cuts come from the same area and work identically; use whichever is fattier or less expensive at the market.
- lard or vegetable oil → Vegetable oil, olive oil, or duck fat. Lard is traditional and imparts rich flavor, but any fat with a high smoke point (above 350°F / 175°C) will work. Duck fat adds delicious richness; vegetable oil is neutral.
- red onion, large → White onion or yellow onion. White and yellow onions will be less dramatically colored but equally tangy, tender, and delicious when pickled.
- flour tortillas or corn tortillas, 6–8 inch (15–20 cm) → Corn tortillas, large lettuce leaves (romaine or butter lettuce), or low-carb wraps. Corn tortillas are traditional and have authentic flavor; lettuce cups make a low-carb version; low-carb wraps are a higher-protein alternative.
More wraps
See all →

Find more like this
- Meal
- Dinner
- Cuisine
- Mexican
- Main ingredient
- Pork Shoulder
- Method
- Oven